15
Operation
To start the measurements without patient ID for identification press the Start button.
(If you have entered patient ID’s in a worklist the instrument measures samples according
to the sequence of ID’s of the worklist. You can start measuring ID’s from worklist direct
from worklist sub-menu or from Main Menu. To enter a worklist please see chapter 4.2.)
After reading is finished the result will be printed out automatically if the printer is
enabled (see section 4.4.1.1 on how to enable/disable the printer). The evaluation of a
test strip and the printing of the result will be complete in less than 20 seconds. This
guarantees a throughput of at least 120 strips per hour.
After the printing is ready you can proceed with the next measurement.
WARNING!
When performing serial measurements in Fast mode, allow the strips to react for ap
-
proximately 55 seconds before inserting them in the CombiScan® 100 and pressing
Start. False-low or false-negative results may be obtained for some analytes if the reac
-
tion time is too short. Likewise, false-high results may be obtained for some analytes if
the incubation time outside the CombiScan
®
100 is too long.
Note: All instructions must be followed thoroughly to get accurate results!
4.5.3. Results printout
Printed/sent result contains a lot of data: type of measurement, device type, date and time,
serial number of test, patient identifier, result with analyte names, values, units, markings of
pathological values and an end line. Before each analyte name the pathological value is marked
with an asterisk (*). If one or more result classification limits (see section 4.4.2.2 for changing
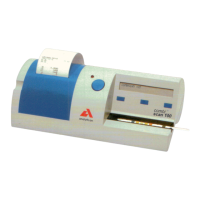
right
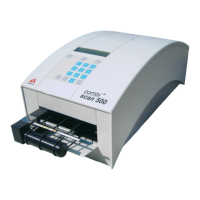
wrong
Fig. 5 Correct positioning of the urine strip: The top end of the strip has to touch the top
edge of the area for the test strip on the strip holder tray, as shown in Fig. 5a. Wrong
positioning is shown in Fig. 5b.
Fig. 5a Fig. 5b
 Loading...