English - 50 -
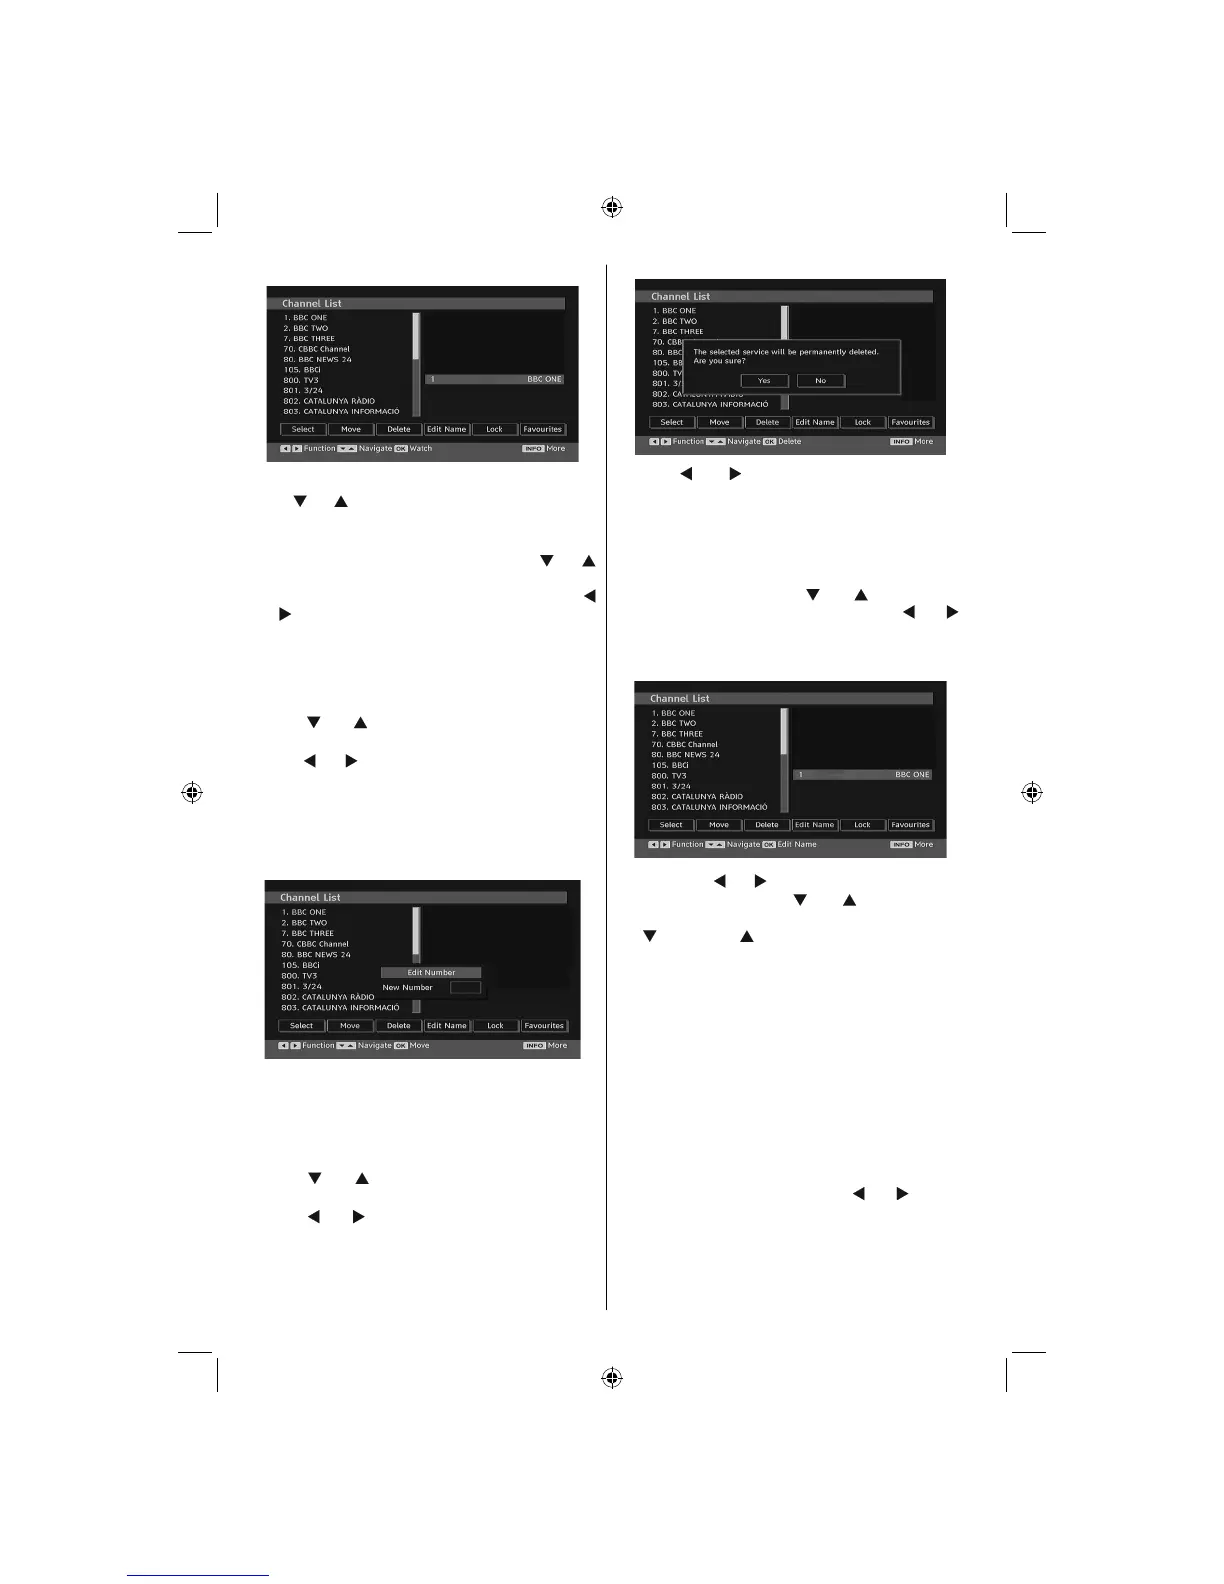
Navigating the Entire Channel List
Press “ ” or “ ” button for selecting the previous or next
channel. You can press “RED” or “GREEN” button to
move page up or page down.
To watch a specifi c channel, highlight it using “
” or “
” button and then press “OK” button, while the “Select”
item on Channel List menu is highlighted by using “
” or “ ” button.
Then the name and number of the selected channel will
be displayed in the top-left and top-right of the channel
display at the top-right of the screen, respectively.
Moving the channels in the channel list
• Press “ ” or “ ” buttons to select the channel that
will be moved.
• Press “
” or “ ” buttons to select the “Move” item on
Channel List menu.
Following OSD will be displayed next to “OK” item
to indicate that enter a number by using the numeric
buttons on the remote control and press “OK” to
confi rm.
Note: If you enter the same programme number of the channel
that you want to move, “.... channel services will be replaced.
Do you want to continue?” OSD will be displayed. Press OK
to confi rm or select “No” to cancel.
Deleting the Channels in the Channel List
• Press “ ” or “ ” button to select the channel that
will be deleted.
• Press “
” or “ ” button to select the “Delete’’ item
on Channel List menu.
• Press the “OK” button to delete the highlighted
channel in the channel list. Then the message below
appears on the screen:
• Press “ ” or “ ” button to highlight the desired
option. If “OK” button is pressed while “Yes” is
highlighted, the highlighted channel is deleted.
Selecting “No” cancels the deletion.
Renaming Channels
To rename a specifi c channel, the channel must
be highlighted by pressing “ ” or “ ” button. Then
highlight the Edit Name item by pressing “ ” or “ ”
button as illustrated below. Press the “OK” button to
activate the rename feature.
Now pressing “ ” or “ ” button moves to the previous/
next character. Pressing “ ” or “ ” button toggles
the current character, i.e., ‘b’ character becomes ‘a’
by “ ” and ‘c’ by “ ”. Pressing the numeric buttons
‘0...9’ replaces the highlighted character with the
characters printed above the button one by one as
the button is pressed.
Press the
“MENU” button to cancel the editing or OK
button to save the new name.
Adding Locks to Channels
Channel locking provides a password-protected access to
channels selected by parents. In order to lock a channel
you should know the parental lock password (default value
is set to 0000 in the factory and can only be changed from
the Confi guration menu).
Select the channel to be locked by highlighting it and
select the Lock option by pressing “
” or “ ” button.
When the “OK” button is pressed, a dialog OSD asking
for the password will be displayed.
02_MB45M_[GB]_5110UK_PVR_IDTV_SILVER8_(psm)_32843W_10071150_50180023.indd 1502_MB45M_[GB]_5110UK_PVR_IDTV_SILVER8_(psm)_32843W_10071150_50180023.indd 15 25.11.2010 13:11:0925.11.2010 13:11:09