92
03/2010 Rev. 0.1
03/2010 Rev. 0.1
93
7. ELECTRONICS SUMMARY
WARNING
During repairs or maintenance work, avoid electrostatic
discharge (ESD) on the control unit.
Main PC board .................................. 7.1
Interface board / display .................... 7.2
Power supply 230Vac:24V 65W ........ 7.3
Grinder board 230Vac:24V 65W ....... 7.4
7.1 Main PC board
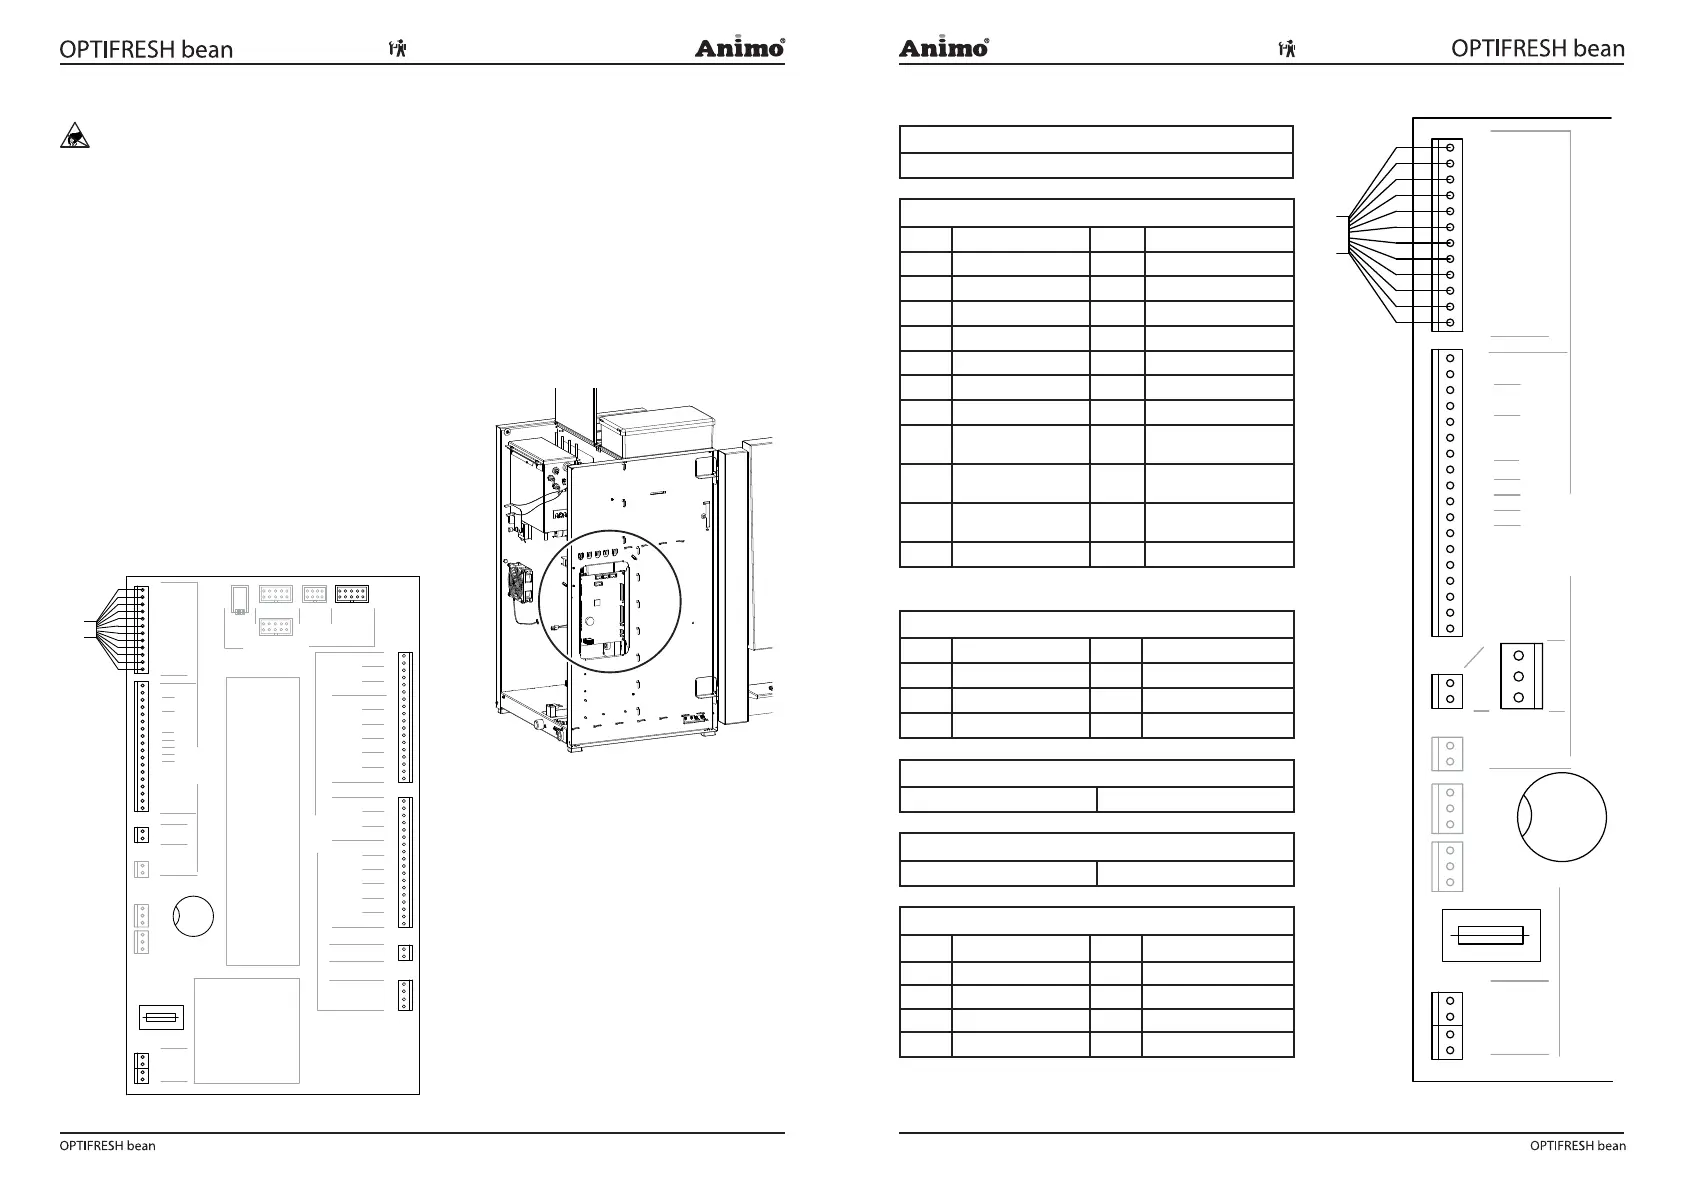
This control unit is the device’s main control unit and
is accessible by removing the left side panel ( g. 25a).
The following important parts can be found in the main
control unit ( g. 25):
Fuse 6, 3A T (Art. No. 03391) ): to safeguard the
power supply to the main PC bard.
Battery 3V Li CR2032 (Art. No. 02816);: to maintain
the clock function when there is no power supply to
the device.
7.1.1 Main circuit board entrances
Connector J12
Connector cable between the main circuit and door circuit
Connector J7
Pin Sensor Colour Comments
1-2 -
3 Drip tray sensor Yellow
4 Drip tray sensor Mass Black
5 Level sensor Low Brown
6 Level sensor Mass Green
7 Level sensor High White
8-
9 Waste bin switch Pink Waste bin in position;
contact closed
10 Brewer switch Grey Brewer in home position;
contact closed
11 Door switch Or-
ange
Door closed; contact
closed
12-18 -
Connector J18 (J16 not used)
Pin Sensor Colour Comments
1 NTC sensor Violet
2- -
3 NTC sensor Violet
Battery B1
Lithium 3V Type CR2025 Art. No. 02816
Fuse F1
6,3A slow Art. No. 03391
Connector J1
Pin Colour Comments
1 Mass (GND) Black
2 Mass (GND) Black
3 +24V DC Red
4 +24V DC Red
18
17
16
15
14
13
12
11
10
9
8
7
6
5
4
3
2
1
MIX/BR
MIX2
MIX3
IM1
IM2
IM3
IM4
IM5
IM6
2
1
KW1
KW2
KW3
DV1
DV2
DV3
DV4
DV5
DV6
18
17
16
15
14
13
12
11
10
9
8
7
6
5
4
3
2
1
2
1
HEATER
RELAIS
DOSING VALVESVALVES
INGREDIENT MOTORSMIXERS
4
3
FAN
INLET
OUTPUTS
G13MDB
RS232
COMMUNICATION
POWER SUPPLY
MICROCONTROLLER
J15
J6
J2
USB
J4
2
1
TEMP1
2
1
4
3
24V DC
KEY / DISPLAY
INPUTS
J12
J7
J16
J1
F1
+
BATT
F6,3AT
1
2
3
4
5
6
7
8
9
10
11
12
18
17
16
15
14
13
12
11
10
9
8
7
6
5
4
3
2
1
SENSORS
+5V
LB
LSL
GND
AS
BS
DS
LSH
GND
GND
GND
GND
+24Vdc
CSI
Fig. 25
Fig. 25a
2
1
TEMP1
2
1
4
3
24V DC
KEY / DISPLAY
INPUTS
J12
J7
J16
J1
F1
+
BATT
F6,3AT
1
2
3
4
5
6
7
8
9
10
11
12
18
17
16
15
14
13
12
11
10
9
8
7
6
5
4
3
2
1
SENSORS
+5V
LB
LSL
GND
AS
BS
DS
LSH
GND
GND
GND
J18
2
1
3
Fig. 26










 To Next Page