The INNI 3D Printer (ACP-M11Y) is a specialized bio-ceramic DLP 3D printer designed for dental applications, specifically for producing artificial teeth. It utilizes Digital Light Processing (DLP) technology to create dental configurations layer by layer using a proprietary zirconia slurry.
Function Description
The primary function of the INNI 3D Printer is to fabricate dental restorations such as inlays, crowns, and bridges using INNI-CERA (BCM-W500), a zirconia slurry exclusively designed for this printer. The process involves uploading a printing file (STL, OBJ, PNG format) from a computer or an external memory stick/drive via USB. The printer then laminates layers of the zirconia slurry, curing each layer with UV LED light until the specified dental restoration shape is achieved.
Important Technical Specifications
Product Name: INNI 3D Printer
Model Name: INNI
Product Code: ACP-M11Y
KC Registration No.: R-R-AON-ACPM11
Specifications:
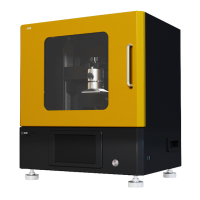
- Product Dimensions (W x D x H): 480mm x 370mm x 543mm
- Product Weight: 46kg
- Package Dimensions (W x D x H) / Weight: 560mm x 450mm x 630mm / 4kg
- Total Shipping Weight (with included accessories): 50kg
Temperature:
- Ambient Temperature: 20 - 40 °C
- Storage Temperature: 0 - 40 °C
Power:
- AC Input: AC 100-240 V
- Power Consumption: 50/60 Hz, 113-136 VA
- External Port: USB (2 ports)
Software:
- Software: AON Slicer
- Input File Type: STL, OBJ, PNG
- Operating System: Windows (7 or higher), Mac OS, Linux
Printing:
- Method: DLP (Digital Light Processing)
- Printed Supply Size (W x D x H): 75mm x 75mm x 75mm
- Printed Object Size (W x D x H): 25mm x 25mm x 25mm
- Layer Thickness: 50μm
- Resolution: 1,280 x 800
Usage Features
The INNI 3D Printer is designed for smart and comfortable use, featuring a 7-inch color touch screen at the front for easy operation.
Setting Up the Printer:
- Installation: The printer should be installed in a climate-controlled environment (15-35°C), away from water or direct sunlight. It requires a 220V power supply.
- Power On: The main power switch on the back must be flipped to the ON position. The power button next to the LCD console on the front is then pressed for one or more seconds until a click is heard, displaying the AON logo.
- Navigation: The touch screen allows users to select menu items via icons. After 10 seconds of inactivity, the screen automatically moves to "Position Control."
Printing Process:
- File Preparation: Printing files are created or edited using AON slicer software. The layer thickness is set to 50μm and curing conditions to 15 seconds.
- Slurry Preparation: 150g of INNI-CERA (BCM-W500) zirconia slurry is poured into the modeling bed.
- Preheat and Blade Mixing: The printer requires preheating (10/20/30 minutes options) and blade mixing of the slurry before printing. During preheating, a light turns on inside the printer, and no other operations should be performed.
- Automatic Leveling: A key feature is its automatic bed leveling function, which ensures hassle-free operation and precision by adjusting the build platform to the correct height.
- Start Print: After preparation, the printing process begins, with layers laminated and cured by UV LED light.
- File Selection and Printing: Users navigate to "Plates" on the touch screen, choose a file, check the model, and initiate printing. Files can be added from external storage (USB or Hard Disk).
- INNICERA Profiles: The printer uses INNICERA Profiles to define printing conditions (layer thickness, cure time). Users select the appropriate profile for their print job.
- Position Control: This function allows users to reset and/or manually move the build platform. The "Home Position" button moves the platform to a neutral (zero) position.
- Projector Calibration: The "Projector" function allows checking and displaying various patterns on the printer's inner panel (UV LCD projector) and turning the UV LCD ON/OFF.
3D Modeling Bed Film:
- The special modeling bed film forms the base of the modeling bed.
- It is detachable and reversible, optimized for light refraction to enhance print durability.
- Designed for clean and easy release of finished products.
Network Setup:
- Ethernet (Wired) Connection: Recommended for primary printer-to-PC connection to avoid errors from weak Wi-Fi signals.
- Wi-Fi Connection: The printer can also connect to a Wi-Fi network. Users access the Wi-Fi settings via the touch screen, scan for networks, enter the password, and connect. The AON Slicer software then connects to the printer via its IP address.
Turning Off the Printer:
- Press and hold the power button on the front for 3 seconds until the AON logo disappears and the touch screen turns off.
- For complete power off, the main power switch on the back must be flipped to OFF [O].
- Caution: Do NOT turn off the printer while it is in operation.
Maintenance Features
Post-Printing:
- Detaching Prints: The printed output should detach easily from the platform plate. A scraper (included accessory) is used to gently pry the restoration from the base. Caution is advised to avoid damaging the platform.
- Support Removal: Supports attached underneath the printed output are removed using a nipper (optional accessory).
- Cleaning: The finished product requires cleaning and a final heat treatment. Slurry residue from the modeling bed film can be removed using ethanol. A sprayer (optional accessory) can be used to clean the build platform and modeling bed.
- Slurry Management: A sieve (optional accessory) is used to filter out residue from the slurry. A spatula (optional accessory) is used for mixing the slurry and spreading it evenly across the modeling bed.
Software & Firmware Updates:
- Updates are available on the AON homepage (www.aoninni.com).
- Updates require at least 8GB of memory space on the computer or external drive.
- Support is available via the AON Call Center (+82 70 4304 4996) or their Support page for any issues during updates.
Troubleshooting:
- Software Download Issues: Use Microsoft Edge or Chrome instead of Internet Explorer.
- Printing via Web Browser Issues: Verify that the printer's static IP address matches the one in the web browser.
- Dropped Wi-Fi Connection: Connect the printer to the computer via an Ethernet cable.
- Difficulty Detaching Prints: Use the provided scraper gently.
- Slurry Residue: Use ethanol to remove polymerized residue.
- Incorrect Layer Printing: Spread slurry evenly with a spatula or use the automatic Slicer function (Position Control).
Warranty:
- The product is guaranteed for 1 year from the date of purchase (or 1 month from manufacture date if purchase date is unconfirmed).
- Product part availability is guaranteed for 3 years, though some parts may have shorter guarantee periods.
- Compensation is provided for malfunctions or breakages under normal use, including product replacement, free repair, or refund.
- Paid warranty services apply for issues not related to product malfunction or breakage, user error (e.g., foreign substances, incorrect voltage, non-genuine parts, physical damage, use of organic solvents, third-party repairs, failure to observe safety precautions), or natural disasters.
- Replacement of consumable parts (projector lamp, modeling bed film, filter) and the UV LCD (replacement cycle of 5 months) are also paid services.