Do you have a question about the Armfield PCT40 and is the answer not in the manual?
The Armfield PCT40 is a comprehensive system designed for teaching a wide range of process control methods. It operates under computer control to demonstrate various process control loops, including level, temperature, flow, and pressure control. The unit supports manual, on/off, proportional, and PID control, with software allowing users to modify control parameters and analyze results. Optional accessories like the PCT41 Process Vessel Accessory, PCT42 pH Probe, PCT43 Electronic Console, and PCT44 Pneumatic Valve Module expand its capabilities for more advanced control strategies and specialized demonstrations.
All users must adhere to local safety regulations. The PCT40 operates from a mains voltage electrical supply and must be connected to a supply matching the equipment's specifications. It incorporates a Residual Current Device (RCD) for operator protection, which should be tested monthly. The unit includes an electric heating element capable of producing temperatures that can cause burns or scalds. Users must ensure the heating element is off when not needed, allow liquids to cool before disconnecting pipes, and avoid touching surfaces near "Hot Surfaces" warning labels. Chemical safety guidelines, including proper handling, ventilation, and disposal, must be followed. Water-borne hazards, such as Legionella pneumophila, necessitate regular water changes and cleaning of the equipment to prevent microbial growth.
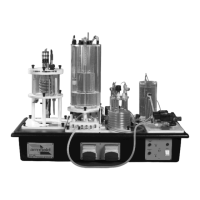
The PCT40 base unit comprises a molded plinth, two process vessels, pumps, and sensors. It also features a mounting point and electrical connections for the optional PCT41 accessory.
Molded Plinth: The base plate for the large process vessel is centrally located on the molded plinth and secured with thumb nuts. The plinth includes a drainage channel with a drain valve, which can be connected to a suitable drain using the supplied flexible tubing. The valve should remain open when connected to a drain. The rear of the plinth houses a mains power inlet socket and sensor connections, along with an RCD and circuit breakers for electrical safety. The front of the plinth features the mains on/off switch and a USB socket for PC connection. Both a 60-way I/O connector and a 50-way I/O connector are located on the right-hand end for connecting the PCT43 Electronic Console. The left-hand end provides a mounting point for the optional PCT41 Process Vessel Accessory.
Large Process Vessel: This acrylic vessel has a removable inner tube to vary its volume, creating an annular vessel when installed on the 'O' rings at the base. It is mounted on spacers for access to underside connections and includes a level scale. Tappings at the base allow connections to pressure sensors, solenoid valves, and pumps. A vertical overflow tube acts as a safety feature. The lid supports an adjustable height level switch, a differential level switch, and a dip tube for filling or draining.
Small Process Vessel (Hot Water Tank): Located at the rear, this clear acrylic vessel contains an electrical heating element. A fixed thermostat and level detector prevent the heater from operating if the water is too hot or the level is too low. Quick-release fittings are provided for inlet and outlet connections. The lid supports the heating/cooling coil.
Heating/Cooling Coil: A stainless steel coil mounted on a lid fits inside the small process vessel around the heating element. Fittings at the coil's inlet and outlet accommodate thermocouple-type temperature sensors and connect to the water supply. The lid also has adjustable glands for a variable-height thermocouple sensor (T1), a thermometer pocket, and a temperature switch (thermostat). A spare gland allows for an additional thermometer for calibration.
Manifold Block with Orifices and Pressure Tappings: This block contains three orifices with associated differential pressure sensors for flow rate measurement. P1 and P2 are for low flow rates (PCT41 accessory), while P3 is for higher flow rates (PCT40). Fluid enters via quick-release connectors. The downstream connection to P3 includes an in-line quick-release connector, allowing for differential pressure measurement or venting to atmosphere for line pressure.
Process Valves SOL 1, 2 and 3: SOL 1, a normally closed solenoid valve, is located in front of the Proportioning Solenoid Valve for on/off control. SOL 2 and SOL 3 are beneath the large process vessel, with outlets connectable to a drain.
Pressure Regulator (PRV): Connected to the mains water inlet, this regulator with an integral filter allows adjustment of water flow through the equipment (0-1.5 L/min, 1.4 L/min recommended maximum).
Inlet Flow Meter F1: A turbine-type flow meter in series with the mains water inlet measures flow rate (0-1.5 L/min).
Proportioning Solenoid Valve PSV: Located near the mains water inlet, this valve is used for proportional control and regulating inlet flow rate.
Gear Pump: A DC motor-driven pump at the front of the plinth, used for pumping hot water during heating and temperature control experiments.
Peristaltic Pumps A & B: Two identical peristaltic pumps at the front of the plinth, accommodating various silicone tubing sizes. They can operate individually or in parallel.
Differential Pressure Sensors P1, P2 & P3: Three piezoelectric sensors within the manifold block measure differential pressure across orifices. P1 and P2 are for small flow rates (PCT41), and P3 is for PCT40.
Level Sensor L1: A piezoelectric pressure sensor in the base of the large process vessel measures water level relative to atmosphere.
Temperature Sensor T1: A type K thermocouple probe mounted with the heating/cooling coil in the small process vessel, measuring fluid temperature.
Temperature Sensors T2 & T3: Two type K thermocouples measure fluid temperature at the inlet (T2) and outlet (T3) of the heating/cooling coil.
Temperature Sensor T4: A type K thermocouple near the back of the base plate, used for measuring fluid temperature at the outlet of a holding tube or inside the PCT41 reactor.
Level Switch: A height-adjustable fixed dead-band float switch.
Differential Level Switch: A variable dead-band conductive level switch with a fixed earth rod and adjustable high/low level electrodes.
Thermostat (Temperature switch): A fixed dead-band temperature switch with an adjustable set point.
Thermometer Pocket: A stainless steel pocket in the lid of the small process vessel, slowing the response of thermocouple T1.
The PCT40 includes an educational software package with real-time process mimic diagrams, sensor readings, and controls for system inputs. It supports manual, on/off, time-proportioned, and PID control loops via ten predetermined student exercises. Control and sensor signals can be continuously logged, and disturbances of known magnitude can be introduced. The software is compatible with Microsoft Windows™ XP (or later) and communicates via a standard USB interface, including comprehensive online Help Text.
The equipment must be unpacked, assembled, and installed correctly. The PCT40-A, PCT40-B, and PCT40-G models require single-phase, fused electrical supplies with specific voltage and frequency ratings. Software installation involves running the CD-ROM and enabling the USB virtual COM port. The physical setup includes placing the unit on a level bench, connecting the cold water inlet, connecting tubing to drain valves, and connecting the power cable. The RCD and circuit breakers should be in the ON position. The PCT40 software is then loaded, and the apparatus is switched on. Flexible tubing is plumbed as shown in diagrams for testing.
The PC software provides a 'Help' tab for operational details. Before operating, ensure the RCD and circuit breakers are on. The mains on/off switch is on the front panel. USB connection indicators may be lit even if the unit is off.
Setting the Pressure Regulator: To adjust flow rate, pull out the grey knob, turn it clockwise to increase flow (up to 1.5 L/min, 1.4 L/min recommended), and anticlockwise to reduce it. Push the knob back in to lock the setting.
Operating the On/Off Solenoid Valves: SOL1, SOL2, and SOL3 are controlled via buttons on the software's mimic diagram. '0' indicates off (closed), '1' indicates on (open). PID control exercises use the PID control window for valve control.
Operating the Proportioning Solenoid Valve (PSV): Controlled via a text display box on the software, showing percentage values. Arrow buttons or direct input can adjust the value. PID control exercises display the valve position and manual setting.
Filling the Process Vessels: Vessels can be filled manually or via the mains inlet pipe. The large vessel can be filled through tappings in its base. The small vessel can be filled from the mains inlet pipe via quick-release fittings connected to SOL1 or PSV.
Using Guest Push Fittings: Rigid tube couplings are pushed firmly into the loose collet until they stop. To remove, push the collet against the fitting while pulling the tube.
Using Quick Release Fittings: Male couplings are pushed into sockets until an audible click is heard. To remove, press the metal catch and pull the tube. Some fittings have self-sealing valves to prevent fluid loss.
Controlling the Gear Pump: Controlled from the mimic diagram, displaying percentage and RPM values. Settings can be typed or adjusted with arrow keys. PID control exercises display pump speed and manual setting.
Using the Peristaltic Pumps: To insert tubing, raise the pump head cover, adjust the knurled screw to the tube size (6.3mm ID for PCT40), lay the tube over rollers, and close the head. Pumps are controlled via the mimic diagram, displaying percentage and RPM. A fault light indicates issues. PID control exercises display pump speed and manual setting.
Operating the Heating Element: Controlled by an on/off switch on the software screen. '0' is off, '1' is on. PID control exercises display heater status.
Use of the Thermostat (Temperature Switch): A thermostat on the small process vessel's lid controls the heating element, switching it on below and off above a set point. Selected via a radio button on the mimic diagram.
Use of the Differential Pressure Sensors: Outputs are displayed on the mimic diagram. P1 and P2 are for PCT41, P3 for PCT40. Flow is directed through the orifice to measure differential pressure.
Emptying Tubes with Self-Sealing Ends: Manually drain by holding both ends over a sink and depressing the fittings to release trapped water.
Overall Dimensions:
USB Channel Numbers:
Other Specifications:
Environmental Conditions: Designed for indoor use, up to 2000m altitude, 5°C to 40°C temperature, maximum 80% relative humidity (decreasing linearly to 50% at 40°C), mains supply voltage fluctuations up to ±10%, and transient over-voltages typical of an office or laboratory environment (Pollution degree 2).
General: Disconnect from electrical supply when not in use. Drain process vessels, reactor, heating/cooling coil, and pipework after use to remove chemical deposits. In hard water areas, use a de-ionizer. Release peristaltic pump heads after use to prolong tubing life. Rotate tubing in pump heads regularly. Replace flexible tubing with specified Altesil (PCT40) or Watson Marlow (PCT41) silicon rubber.
RCD Test: Press the TEST button monthly; the circuit breaker must trip. If not, the equipment is unsafe and requires repair.
Calibration of Sensor Conditioning Circuits: Zero and Span potentiometers are located at the right-hand end of the plinth, accessible by removing the cover plate. Software recalibration is preferred for small changes; potentiometer adjustment is for large changes (e.g., sensor replacement).
DAC Programming: A 12-bit LTC1456 DAC chip controls the Gear Pump and PSV. Two chips in series control the hot water pump and solenoid valve with 24-bit binary output (0-4095).
Cleaning the Equipment: Minimize scale by drying vessels when unused. Clean scale from the large process vessel manually. Clean the pressure regulator filter regularly. Use a mild descaler for pipework and process vessels, following instructions. Drain and change water regularly to prevent algae and microbial growth.
Accessing Electrical Circuits: Disconnect power, drain liquids, and remove tubing. Unscrew the drain valve and six fixings around the plinth top. Raise the front of the top section (hinged at the rear) and support it with the prop. A circuit diagram is provided for fault finding.
Freeing a Seized Hot Water Pump: Disconnect electrical supply and flexible tubes. Remove the rectangular end cover from the pump head. Inspect and clean gears for contamination. If removing gears, take care not to damage them or lose the drive key. Replace gears, ensuring the drive key is correctly located. Replace the sealing gasket and end cover. Reconnect and check pump operation after filling the hot water vessel.
| Brand | Armfield |
|---|---|
| Model | PCT40 |
| Category | Control Unit |
| Language | English |