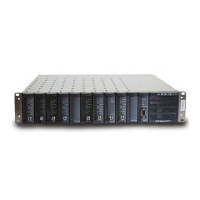
2-16 CHP Max™ Headend Optics Platform Chassis, Controllers and Power Supplies Rev D
Installing the CMM or SMM Module
➤ To install the CMM or SMM
1. Gently insert the CMM or SMM into the slot just to the left of the Power Supply
module(s). Be careful to align the top of the module’s circuit board with the metal
guides on the top of the chassis.
2. Carefully slide the CMM or SMM into the chassis until it is fully seated in the
backplane. The latch on the front panel locks when the module is fully seated.
Each SMM is shipped with the following default addresses. Refer to the section, To connect
network cabling on page 5-12, to change any of these addresses.
Maintenance
Chassis installation is covered in CHP Chassis Installation on page 2-11. The following sections
discuss installation or replacement of user-serviceable chassis components.
Fuse Replacement
There are no fuses to replace in the CHP system.
Redundant Single Channel Forward Receiver
(CHP-RFRX-S)
Configuring the RFRX or GFRX on page 12-9
Redundant Single Channel Forward Receiver
(CHP-GFRX-S)
Configuring the RFRX or GFRX on page 12-9
Dual Channel Return Receiver (CHP-2RRX-S) Configuring the 2RRX on page 13-8
Redundant Dual Channel Return Receiver (CHP-R2RR-S) Configuring the R2RR on page 14-11
Redundant Digital 1:2 Demux Return Receiver
(CHP-D1RRX-S)
Configuring the D1RRX on page 15-13
1GHz Forward RF Amplifier (CHP-GAMP/CHP-GAMP3) Configuring the Amplifier on page 17-10
Note Ensure that the desired Power Supply configuration is installed before
installing the CMM or SMM. The Power Supply module(s) is located behind the CMM
or SMM module.
Table 2.8 SMM Default Addresses
Address Type Default Address
IP address 192.168.1.1
netmask 255.255.255.0
gateway 192.168.1.1
Table 2.7 Module Configuration Reference (cont’d)
Module Section