6472
17
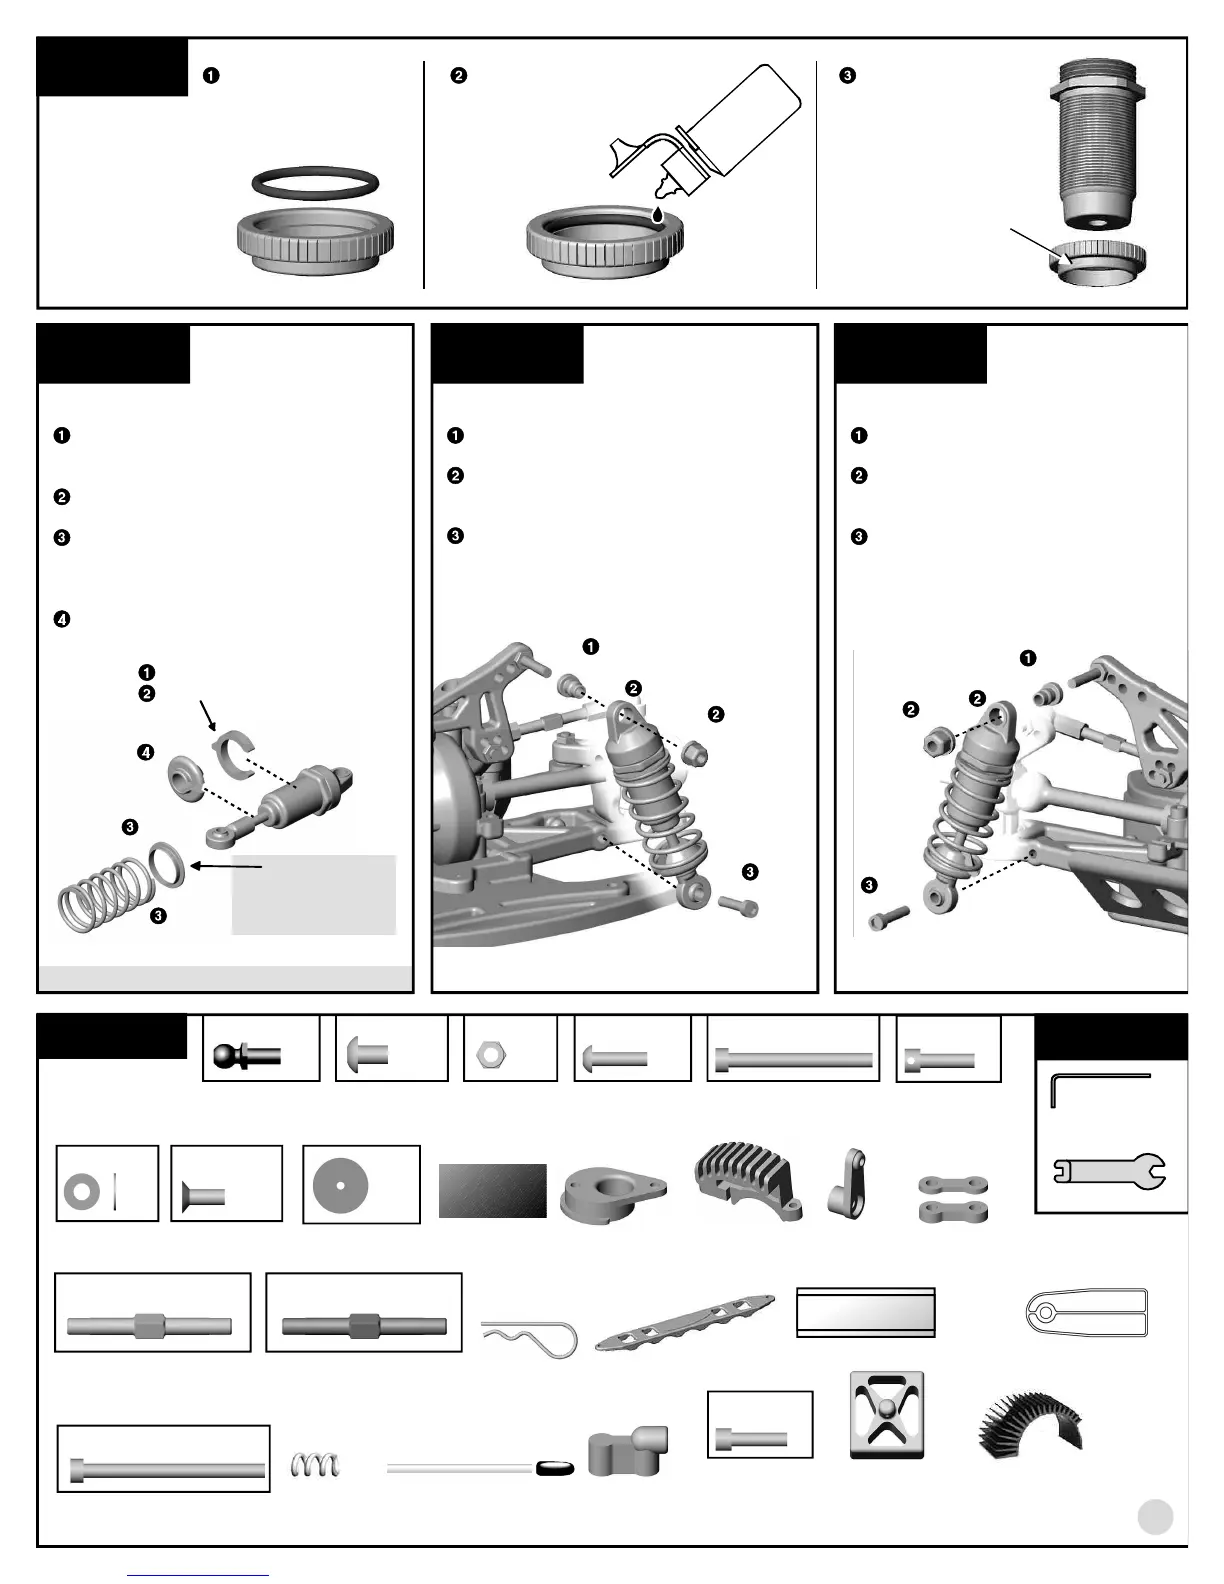
step 6
FINAL SHOCK ASSEMBLY
Slide the 1/8" #8846 preload spacer
onto the body of the two front
shocks.
Slide the 1/8" and 1/16" preload
spacers onto the rear shocks.
Slide on the #6475 spring collar,
then #3944 gold spring on the front
shocks, and #3942 silver spring on
the rear shocks.
Compress the spring to add the
#6475 spring cup.
8846
FRONT: 1/8"
REAR: 1/8" and 1/16"
6475
FRONT: 3944 gold
REAR: 3942 silver
6475
step 7
FRONT SHOCK MOUNTING
Add the #6473 shock bushing to the shock
tower.
Push the shock cap over the bushing and
add the #6472 nut. Do not overtighten or
the shock will bind.
Fasten the lower shock into the arm with
the #6925 screw.
Do the other front shock.
step 8
6473
6472
6925
4
REAR SHOCK MOUNTING
Add the #6473 shock bushing to the
rear shock tower.
Push the shock cap over the bushing
and add the #6472 nut. Do not
overtighten or the shock will bind.
Fasten the lower shock into the arm
with the #6925 screw.
Do the other rear shock.
4
6473
6925
BAG H
REMOVE THESE
PARTS FOR:
Steps 1-6
TOOLS USED
1:1
3858, qty 1
short special
ball end, black
3853, 3974*, qty 1
battery brace
3930, 3932*, qty 1
motor cam
3931, 3933*, qty 1
motor clamp
(with heatsink)
3934, qty 2
3mm motor screw
4449, qty 2
4-40 locknut
6332, qty 3
battery clip
1:1
RACER & TEAM
6917, qty 4
4-40 x 3/8 screw
1:1
6928, qty 1
4-40 x 1 screw
1:1
6916, qty 2
4-40 x 1/2 screw
with hole
7336, qty 2
servo mount
7336, offset spacer
qty 2, thin
qty 2, thick
1:1
7337, qty 4
steel washer
1:1
7673, 6934*, qty 2
4-40 x 5/16 screw
9180, qty 4
servo horn
F.T. & TEAM KIT ONLY
1356, qty 1
blue titanium turnbuckle
RACER KIT ONLY
3867, qty 1
steel turnbuckle
6727, qty 1
servo tape
6338, qty 1
antenna tube and cap
1:11:1
1:1 1:1
3848 qty 1
foam spacer
1/16"
5/64"
3/32"
1:1
6272, qty 4
ball end dust cover
3902, qty 1
transponder mount
1:1
3929, qty 1
4-40 x 1.25 screw
3929, qty 1
motor clamp
spring
Slide one black O-ring
into the groove in the
threaded shock collar.
Use one drop of oil on
the O-ring before you
thread on the shock
collar.
Thread on the shock
collar. Make sure that
the shoulder is facing
down when threaded
on the body.
shoulder faces down
OIL
step 5
F.T.KIT ONLY
6860*, qty 4
4-40 x 3/8 screw
blue aluminum
F.T. KIT ONLY
3968*, qty 1
counterfeit
transponder
1:1
F.T. KIT ONLY
3927*, qty 1
clip-on radial heatsink
FACTORY TEAM
ONLY, STEP 5
NOT USED IN
FACTORY TEAM KITS
ON THREADED
SHOCK BODIES
See page 25 to set ride height for your kit.