22
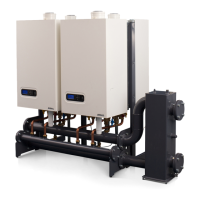
Installation
Cascade free-standing in line
3RVLWLRQWKHÀRZDQGUHWXUQKHDGHU
in the required location. When using
VHYHUDOÀRZDQGUHWXUQKHDGHUV
FRQQHFWWKHÀRZDQGUHWXUQKHDGHUV
using the supplied gaskets, M12
(DN65) or M16 (DN100) bolts,
spring washers and nuts. Align
WKHÀRZDQGUHWXUQKHDGHUV
horizontally using the adjustable
feet.
2. Place the gas line in its intended
VSDFH:KHQXVLQJVHYHUDOÀRZ
and return headers: connect the
gas lines using the supplied DN65
gaskets, M12 bolts, spring washers
and nuts.
Fasten the gas line with the 2
special close tolerance bolts
0[[RQHDFKÀDQJHRIWKH
ÀRZDQGUHWXUQKHDGHUV
)LWWKH,FROXPQVRQWKHÀDQJHSODWH
using 2-x bolt M8x110mm.
Attention: Use the correct holes
in the column!
:KHQXVLQJDOHIWÀDQJHSODWH
use the right-hand holes in the
column.
:KHQXVLQJDULJKWKDQGÀDQJH
plate: use the left-hand holes in
the column.
4. Fit a lower spacer on the front
of each I-column using 2-x bolt
M8x16mm.
Fit a lower spacer on the back
of each I-column using 2-x bolt
M8x16mm.
5. Fit the upper beam on each
I-column using 2-x bolt M8x50 mm.
6. Hang the boilers on the back
suspension Brackets.
For the lifting refer to “Lifting
and carrying precautions”
on page 18.
Continue with page 24.
1
okok
3
4
5
6
2
 Loading...