Syn248 Installation and Configuration Guide Back to Contents
Installation 17
Connecting the Gateway
Figure 4. Gateway Grounding Terminal
Connect the telephone lines to the Gateway:
1. Remove the plastic covers from the Gateway LINE ports to be used, as shown in
Figure 5.
Figure 5. Gateway Telephone Line Connections
2. Plug up to four telephone lines from the telephone wall jacks into the Gateway.
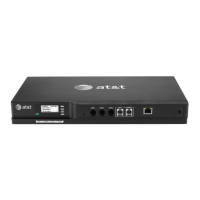
Figure 6. DSL Connection
The Gateway grounding terminal shown in Figure 4 must be connected to
reliable earth ground using a separate ground wire before connecting the
telecommunication lines. The connection to earth ground must be verified by
qualified personnel.
If your service provider uses Centrex lines, you must log on to the WebUI and
enter a line access code for each line to allow calibration to take place. Before
connecting the lines to the Gateway, connect the Gateway and one Deskset to
the network, then see “Accessing the Administrator WebUI” on page 36 and
“Line Calibration Configuration” on page 80.
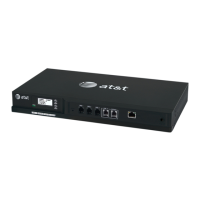
DC 5.1V
LINE 1
LINE 2 LINE 3 LINE 4 BYPASS
LAN
RESET
LINE 1
LINE 2
LINE 3
LINE 4
POWER
SELECT CANCEL
DOWN
UP
+-
BYPASS
LINE 1 through LINE 4
If you subscribe to Digital Subscriber Line (DSL) high-speed Internet service
through your telephone line, you must plug each telephone line with DSL
service into a DSL filter. Then plug the DSL filter into the telephone wall jack,
as shown in Figure 6.
 Loading...