D-5
For step numbers indicated in red like
5
, the following precaution applies:
• If the key lock is set, the numerical value does not flash, and the value cannot be changed.
To change a numerical value, cancel the key lock first.
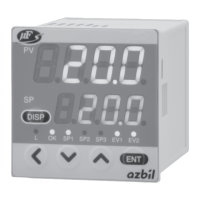
AUTO/MANUAL mode selection
1
Press [display] once
to get the operation
display.
The [mode] key can be
used for 1 of 7 different
operations.
The initial (factory) set-
ting is "AUTO/MANUAL
selection".
2
Press and hold [mode]
for more than 2s,
Man
flashes on the lower
display.
If the control method is
set to "ON/OFF control"
and if the DI assignment
is "AUTO/MANUAL," the
display does not blink
and the setting cannot be
changed.
3
When
Man
appears,
stop pressing [mode].
The MV is shown on
the lower display.
The rightmost digit of
the MV on the lower
display flashes and its
value can be changed.
4
Press [<], [ ] or [ ] to
change to the desired
MV value.
Even while the num-
ber is flashing, the MV
is changed at the same
time that the number
is changed.
For the flashing MV in step 3, either bumpless transition (the same
value as before the change) or preset MANUAL value (the value set
in setup
C20
) can be selected (in setup
C19
, Output operation at
changing Auto/Manual).
Execution of position proportional control auto adjust
When control output is R1 (motor relay output) and setup
C57
is "0"
(initial value) or "1", the following position proportional control auto
adjust is necessary.
1
Press [display] once
to get the operation
display.
2
Press and hold [para]
for more than 2s to get
the parameter setup
display.
MOde
flashes
on the upper display.
3
Press
[ ] or [ ]
repeat-
edly until
StUP
is
flashing on the upper
display.
4
Press [enter] to get
C0
1
on the upper
display.
Press [<], [ ] or [ ] to
change to
C60
.
(
C60
: motor adjust)
5
If [enter] is pressed, the
lower display flashes.
Press
[ ] or [ ]
to get
1
.
Press [enter] and auto
adjustment starts.
6
CA.CL
is displayed on
the upper display and
open contact is ON.
The lower display
shows the MFB count
value and when count
is stable,
CA.OP
is dis-
played on the upper
diplay and closed con-
tact is ON.
When the count value
is stable, auto adjust
completes to get op-
eration display.
After starting auto adjust, press [display] key to stop auto adjust.
During auto adjust the key operation except [display] key of stop-
ping auto adjust is impossible.
Setup of event value
In this example, the event set value and hysteresis for the event 1
operation type is set to deviation high limit.
1
Press [display] once
to get the operation
display.
2
Press and hold [para]
for more than 2s to get
the parameter setup
display.
MOde
flashes
on the upper display.
3
Press [ ] twice or [ ]
repeatedly, and
EV
flashes on the upper
display.
4
Press [enter] to get
e
1
on the upper display
and
0
is displayed on
the lower display.
0
on the lower display indi-
cates that the event main
setting is "0".
5
If [enter] is pressed,
the rightmost digit
on the lower display
flashes, and can be
changed.
Press [<], [ ] or [ ], and
change to the desired
value for event set
value. In this case, the
flashing of the numeri-
cal value implies that it
is not yet set.
6
If [enter] is pressed,
the changed numeri-
cal value is set and
changes from flashing
to continuously lit.
Similarly, use
e2
to set a value for event 2, and
e3
to set a value
for event 3.
7
To continue from this
point and set hyster-
esis as well, press [ ]
twice or [ ] repeatedly
to get
E
1.HY
on the
upper display. The
lower display says 5.
5
on the lower display
indicates that the event
hysteresis is "5".
8
In the same way that
event settings were
changed, press [enter]
to make the number
flash, and then press
[<], [ ] or [ ] to change
to the desired setting
for hysteresis. After
that, press [enter] to
finalize the setting.
Similarly, use
E2.HY
to set a value for event 2, and
E3.HY
to set a
value for event 3.
Memo