Human Machine Interface 2-1
SECTION 2
•
••
•
HUMAN-MACHINE INTERFACE
(Controls And Indicators)
FRONT PANEL DISPLAY
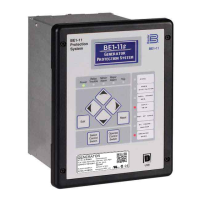
Figure 2-1 shows the front panel human-machine interface.
Figure 2-1. BE3-GPR Typical Front Panel
Red LED illuminates for a sync or a deadbus condition and output contacts closed (Note: LED
present only on the BE3-GPR P units with the sync-check feature).
Pushbutton used to toggle the menu selections, scroll for setpoint adjustments, fast scroll by
pressing for one second, and, when pressed after holding the SELECT pushbutton down, makes
the menu selection sequence move in the forward direction.
Pushbutton used to scroll and fast scroll (by holding for one second) for setpoint adjustments,
and, when pressed after holding the SELECT pushbutton down, to reverse the menu selection
sequence from the forward direction.
Pushbutton used to simultaneously save settings in the nonvolatile memory and move on to the
next selection sequence. Also, when held down before pressing either the Raise or Lower
pushbutton, the direction of the user option sequence can be forced forward or reverse,
respectively.
LCD provides the primary visual interface to the user. Used when setting and monitoring relay
functions.
B
C
D
E
A