OM6003.PUB Page 32 DATE PRINTED: 4/7/11
© Blaze King Industries Canada Ltd June 2006 Version 1.07SIT
The Contemporary by Blaze King Owners Installation and Operation Manual
Troubleshooting
Please check to make sure the instructions are followed exactly before attempting trouble shooting of the appliance.
WARNING: Trouble shooting and servicing of gas and electrical devices of the appliance should only be conducted by a qualified service technician.
CAUTION: Label all wires prior to disconnection when servicing controls. Wiring errors can cause improper and dangerous operation. Verify proper
operation after servicing.
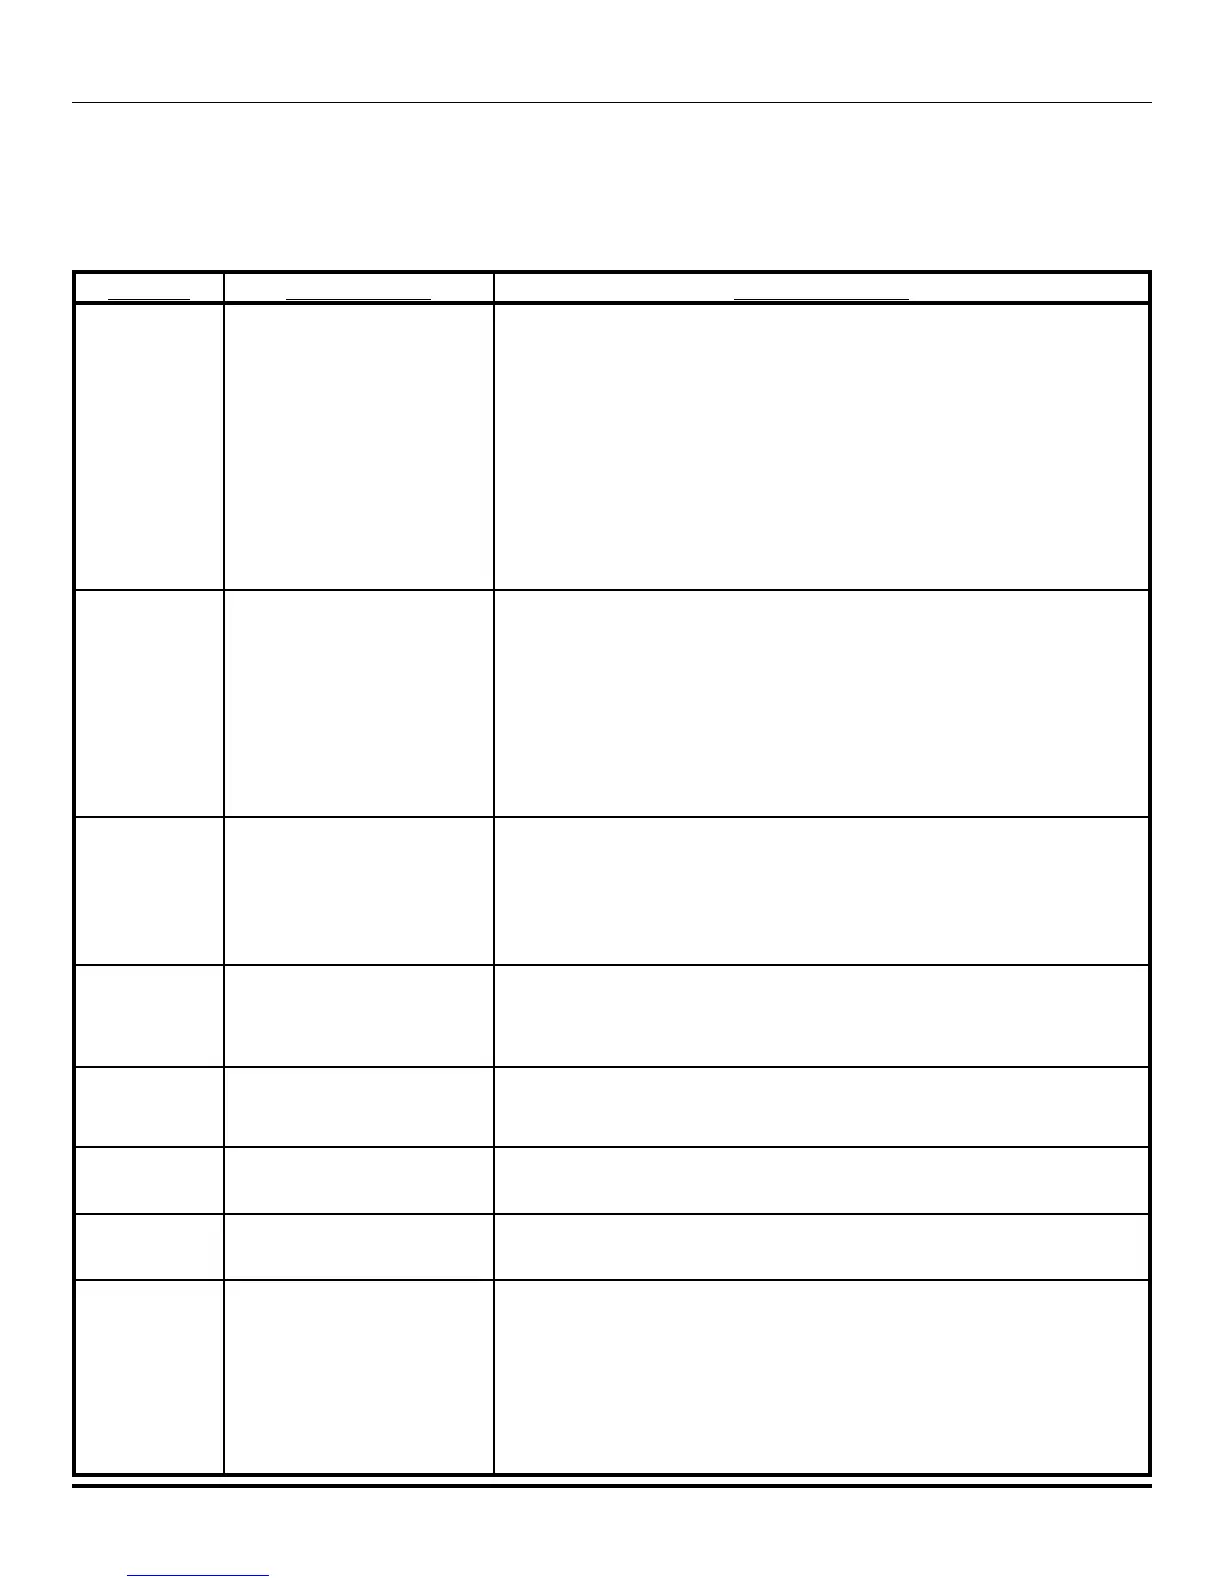
PROBLEM POSSIBLE CAUSE CORRECTIVE ACTION
Pilot will not light
after pressing the
sparker many
times.
Air in gas line.
No gas supply.
Piezo wire loose.
Defective Piezo.
Piezo wire grounding.
Electrode grounding.
Electrode gap
Incorrect.
Purge air out of gas line.
Check to make sure the gas supply to the appliance is turned on and there is adequate
gas supply pressure to the appliance.
Check for sparks between the spark electrode and the pilot head when the sparker is
pressed. If there are no sparks:
Check for broken or poor connection from the sparker to the electrode.
Check for the spark shorting or arcing at other locations.
Check for defective piezo.
Check for defective/cracked spark electrode.
With the viewing door open, try lighting the pilot with a match.
Note: If there is no gas or air coming out of the pilot and there is gas pressure to the
appliance, the pilot orifice may be blocked or the gas valve maybe defective.
Pilot will not remain
on after being lit.
Poor Pilot flame.
Faulty thermocouple.
Thermocouple and/or Thermopile
grounding.
Loose TP-THTP on gas valve.
Faulty gas valve.
Note: This is very rare and faults
blamed on the gas valve are
usually incorrect.
Check to see if the pilot flame is large enough to reach and surround the thermocouple.
If the flame is too small, check for correct gas supply pressure. If pressure is good,
adjust the pilot flame size with the adjustment screw on the valve. If the flame cannot be
adjusted, there might be some debris obstructing the pilot orifice.
Check for correct millivolts at the thermocouple. The thermocouple should generate at
least 30 mv.
Check for poor connection of the thermocouple and thermopile to the valve.
If readings are correct for thermopile and thermocouple replace gas valve.
The main burner
does not turn on
with the pilot lit.
Gas valve not in on position.
Faulty thermopile.
Faulty unit on/off switch.
Faulty thermostat.
Faulty Gas Valve
Check to make sure the control knob is turned to the ‘ON’ position.
Check for correct millivolts at the thermopile, it should generate at least 250mv.
Place jumper wire across terminals TH-THTP, if burner comes on this will indicate you
have a poor connection or faulty appliance on/off switch, wall switch or wall thermostat.
Check the minimum inlet gas supply pressure, if the minimum pressure is present then
try changing the gas valve.
Frequent pilot
outage problems.
Pilot adjusted too low.
Switch wires may be grounding out.
Thermocouple worn.
Adverse wind conditions.
Adjust pilot and clean if required.
Check switch wires.
Check thermocouple millivolts (see above).
Check termination location is not subject to adverse environmental conditions.
The main burner
shuts off when the
appliance is warm.
Pilot flame lifting of thermopile. Check thermopile voltage from start up. If the millivolts drop dramatically it is an
indication that the pilot is lifting. Check the vent is correctly attached.
Excessive soot on
burner or logs.
Incorrect aeration adjustment.
Incorrect venting.
Check aeration setting.
Check that venting is correctly attached.
Sharp blue flames
lifting off burner.
Incorrect aeration adjustment. Reduce primary aeration adjustment.
Convection blower
does not operate.
No power supply.
Thermal snap switch lose or
defective.
Loose electrical connection.
Defective speed controller.
Defective blower.
Check electrical supply to unit.
Turn the fan speed control to a different setting, make sure it is not in the off position
Check for correct positioning of the snap disc. You can by-pass the snap disc to check
it’s operation.
Check all electrical connections are secure.
By-pass the speed controller to check for defective operation.
With the speed control by-passed check for 120 VAC to the motor. If you have 120VAC
and the motor is not working, the blower motor is defective.