English–121 609 929 J60 • (05.12) PS
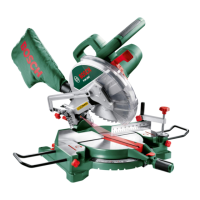
Changing the Tool
Before all work on the machine, pull the mains
plug.
Use only saw blades whose allowable rotational speed
is as least as high as the noload speed of the power
tool.
Use only saw blades that comply with the characteris
tic data given in these operating instructions and have
been tested according to EN 8471 and appropriately
marked.
Wear gloves when mounting the saw blade. Danger of
injury exists for contact with the saw blade.
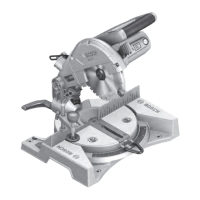
Removing the Saw Blade
Place the power tool in the working position.
Pull the transport locking pin 27 completely out and
turn by 90°. Allow the transport locking pin to engage
in this position.
The tool arm is then locked in the working position.
Turn the screw 55 with the allen key 29 (6 mm) provid
ed and, at the same time, press the spindle lock 54 un
til it latches (see Figure ).
Hold the spindle lock depressed and unscrew the
screw 55 in the clockwise direction (left?hand
threads!). Take off the clamping flange 56 (see
Figure ).
Press the button 1 and swing the swinging guard 4 to
the rear to the stop (see Figure ).
Hold the swinging guard in this position and remove
the saw blade 21 (see Figure ).
Move the swinging guard slowly down again.
Mounting the Saw Blade
If necessary, clean all parts to be mounted.
Press the button 1, swing the swinging guard 4 to the
rear to the stop and hold in this position.
Place the new saw blade on the tool spindle 57.
(see Figure )
When mounting, observe that the cutting
direction of the saw teeth (arrow on the
saw blade) agrees with the direction of the
arrow on the protective hood!
Move the swinging guard slowly down again.
Place on the clamping flange 56 and the screw 55.
Press the spindle lock 54 until it engages and tighten
the screw in the counter clockwise direction.
To continue working, the tool arm must be unlocked
by loosening the transport locking pin 27, pulling it out
and rotating it by 90°.
Checking and Adjusting Basic
Adjustments
To ensure precise cuts, the basic adjustments must be
checked and adjusted as necessary after intensive us
age.
Adjusting the Laser
Place the power tool in the working position.
Remove the cover 24 (see Figure ).
Checking: (see Figure )
Draw a straight cutting line on a work piece.
Press the button 1 and move the tool arm downward
with the handle 2.
Position the work piece so that the teeth of the saw
blade are aligned with the cutting line.
Hold the work piece in this position and move the tool
arm slowly upward. Clamp the work piece.
Switch on the laser beam with the switch 33.
The laser beam must be in alignment with the cutting
line on the work piece over its entire length.
Adjusting: (see Figure )
Loosen the knurled screw 36.
Pull out the allen key 34.
Turn the adjustment screw 37 (horizontal laser posi
tioning) and/or the adjustment screw 35 (vertical laser
positioning) with the allen key until the laser beam is
aligned with the cutting line on the work piece along its
entire length.
Carefully retighten the knurled screw.
Bevel Angle 0° (Vertical)
Place the power tool in the transport position.
Rotate the saw table 14 to the detent 13 for 0°. The le
ver 11 must audibly engage in the detent.
Checking: (see Figure
)
Place a combination square set to 90° on the saw ta
ble 14. The leg of the square must be flush with the
saw blade over its entire length.
Adjusting: (see Figure
)
Loosen the locking knob 26. Loosen the locking nut of
the stop bolt 17 with a commercially available ring or
openended spanner (10 mm). Turn the stop bolt in or
out until the leg of the combination square is flush with
the saw blade over its entire length.
Retighten the locking knob. Then retighten the locking
nut of the stop bolt 17.
In case the angle indicator 50 is not aligned with the 0°
mark on the scale 58, loosen the screw 59 with a com
mercially available Phillips screwdriver and align the
angle indicator with the 0° mark.
S1
S2
S3
S4
S4
T1
T2
T3
U1
U2
PCM10_WEU.book Seite 12 Donnerstag, 1. Dezember 2005 9:16 09