18/36 Digital axis control VT-HMC...1X | Installation
Bosch Rexroth AG, Edition 01.2021, RE 30239-B
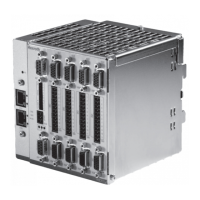
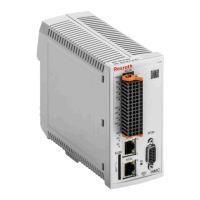
Fig. 1: Mounting of the VT-HMC...1X on the DIN mounting rail
Should the spring-loaded latch not snap in automatically, it can be released using
a screwdriver. After having positioned the latch, let it spring back into the engaged
position.
Observe the following notes on mounting the axis control VT-HMC...1X
▶ For mounting, observe the notes on applicable standards and operating
conditions in the data sheet.
▶ Use low-capacitance cables.
▶ Whenever possible, execute cable connections without intermediate terminals.
▶ Install sensor cables separately.
▶ When sources of electromagnetic disturbance are used (e.g. frequency
converter), malfunction may occur. Avoid the direct installation of the VT-
HMC..1X in the direct vicinity to sources of disturbance.
▶ The distance to aerial lines, radio sources and radar equipment must be at
least 1 m.
▶ Do not lay signal cables near power cables.
▶ Execute the installation so that when differential inputs are used, both inputs
are always activated or deactivated simultaneously.
▶ Do not use any silicone-containing sealants, adhesives or insulating agents.
▶ The system ground is an essential, integral part of EMC protection of the axis
control. Here, interference, which is transported to the axis control via data and
voltage supply cables, is dissipated. This function can only be ensured, if the
system ground itself does not inject interference into the control electronics.
▶ Ensure maintenance-friendly installation, i.e. simple access to the connection
lines. Ensure free access to the connection side.
7.3.1 Place of installation
The VT-HMC...1X should not be installed next to power electronics (e.g. frequency
converters, etc.). The power supply unit of the VT-HMC...1X should be installed as
close to the VT-HMC...1X as possible.
NOTE: UV radiation!
Extended exposure to UV radiation can lead to discoloration.
▶ Do not install the VT-HMC...1X at a place exposed to direct sunlight.
 Loading...