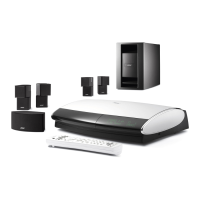
BASIC SYSTEM CONNECTIONS
Notice a label on each red-collared wire that matches it
to
the proper speaker (Figure
9a).
• Lfor the speaker at the left front •
LR
for the speaker at the left rear
• C for the speaker at the center front •
RR
for the speaker at the right rear
• R for the speaker at the right front
@
Connecting single
cube
or
cube
array
speakers
These speakers feature red and white connection terminals on the back
of
each speaker. Be
sure
to
match the red-collared wire
to
the red terminal,
to
maintain positive-to-positive
(+
to
+) connections.
C
b
k
• Use the supplied 20-ft
(6.1
m)
cables for the three front speakers.
u e array spea
er
• Use the supplied 50-ft (15.2
m)
cables for the speakers
at
the rear of your room.
After running these cables
to
the rear
of
your
room, you can pull them apart
to
reach each
of
the rear speakers.
•
To
make the connections:
to
Single cube speaker
1.
2.
Press the terminal tab
to
insert each wire into the proper jack (Figure 9b).
Figure 9
Making the connection to
(a)
a si'lgle
cube
or
cube
array speaker
and
(b)
to
a
center speaker (not
pro-
videdin all systems)
(a)
L,
R,
C, LR,
or
RR
3. Follow the instructions below
to
connect each cable
to
the corresponding jack on the
Acoustimass" module.
Connecting the speakers
to
the
module
You
may find it convenient
to
temporarily turn the module upside down while making these
connections. Then, be sure
to
place the module on its side or bottom surface when the
connections are completed.
A CAUTION: Before you make these connections,
be
sure that the media center
and
the
Acoustimass module are
NOT
yet connected to an
AC
(mains)
power
outlet.
To
make these connections:
1. Use the colors and labels on the RCA connectors at the free end
of
each speaker cable
as guides
in
connecting
to
the module. For a color reference, you may want
to
use the
Quick Setup Guide provided
in
the carton.
13
 Loading...