Brocade FastIron X Series Chassis Hardware Installation Guide 119
53-1001723-02
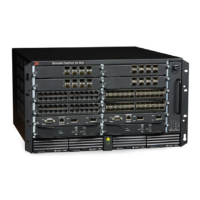
Replacing a management module
6
• A #2 Phillips-head or flathead screwdriver.
To remove a management module from the chassis, perform the following tasks.
1. Refer to “Installation precautions” on page 118.
2. If your Brocade chassis does not have redundant management modules, power down the
chassis and remove the power cables from the chassis power supplies.
3. Put on the ESD wrist strap and ground yourself by inserting the plug into the ESD connector
located on the chassis front.
4. Use a #2 Phillips-head or flathead screwdriver to loosen and remove the two screws on the
ends of the module.
5. Pull the card ejectors towards you, and away from the module front panel. This action unseats
the module from the backplane.
6. Pull the module out of the chassis, and place in an anti-static bag for storage if desired.
7. Install a new module in the slot. For information about performing this task, refer to “Installing
a new management module”.
Installing a new management module
Before installing a module into the chassis, have the following on hand:
• A new management module, which you can order from Brocade.
• An ESD wrist strap with a plug for connection to the ESD connector on the chassis.
For safety reasons, the ESD wrist strap should contain a series 1 meg ohm resistor.
• A #2 Phillips-head or flathead screwdriver.
To install a new management module in the chassis, perform the following tasks.
1. Refer to “Installation precautions” on page 118.
2. If your Brocade chassis does not have redundant management modules, power down the
chassis and remove the power cables from the chassis power supplies.
3. Put on the ESD wrist strap and ground yourself by inserting the plug into the ESD connector
located on the chassis front.
4. Remove the new management module from its packaging.
5. Insert the module into the chassis slot as shown in Figure 40 and Figure 41, and slide the card
along the card guide until the ejectors on either side of the module move close to the module
front panel.
6. Push the ejectors toward the center of the module. This action will fully seat the module in the
backplane.

 Loading...