158 Brocade FastIron X Series Chassis Hardware Installation Guide
53-1001723-02
Upgrading the device to run Layer 3 software
6
There is a hook on the back of the retainer that is attached to the grab-strap. As you pull the
retainer out, the filter is pulled along with it.
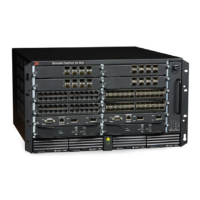
FIGURE 58 Air filter removal and replacement for FastIron SX-1600
3. Unhook the filter retainer from the air filter and discard the used filter.
4. Partially insert the replacement air filter (part number 11211-401) by sliding it along the metal
guides.
The filter is marked with an arrow. The arrow indicates how the filter should be installed in
regards to the direction of airflow in the chassis. Since air is pulled through the chassis, the
arrow must point up towards the fan tray.
5. Attach the hook on the back of the filter retainer to the filter grab-strap.
6. Push the filter retainer into the chassis and tighten the captive fasteners.
Upgrading the device to run Layer 3 software
You can upgrade the FastIron X Series chassis to run Layer 3 code. To do so, follow the instructions
In Appendix A, “Layer 3 Upgrade Procedures”.
Filter
Filter Retainer
Filter
Grab-strap
Fan Tray
Direction
of
Airflow in
Chassis

 Loading...