SmartWAVE
®
Training Manual
8
routinestochoosefrom.Factorydefaultis1;with14beingthemaximum.PressBREWAtodecreaseorBREWBto
increase.
Step 3: Press and release the hidden switch until display reads A3. This represents the adjust mode Drip-Out Time
for the A brew switch. The display will toggle between A3 and the setting. Press the BREW A button to decrease time
or the BREW B button to increase time.
Step 4:Repeatsteps1-3forsettingthe“B”brewswitch.
Level 2 Programming
Level 2 programming contains some of the machine parameters. Additional parameters are set on the control board
using dip switches. Access to level 2 is done by pressing the hidden switch for 10 seconds.
Option Default Minimum Maximum Adjustment Increments
P1:Temperaturesetpoint 200º F 185º F 205º F 1 Degree
P2:ReadyTemperature 195º F 180º F 198º F 1 Degree
P3:DisplayBrewCount 0 0 9999 N/A
P4:FahrenheitorCelsius F N/A
Level 3 Programming
Level 3 programming contains 8 menus which include calibration and factory set-up menus for the sequence steps
used throughout a WAVE brew cycle. Access to level 3 is done by pressing the hidden switch for 15 seconds.
U1: This screen can not be adjusted however, it displays the current water condition number when the water
istouchingtheprobe.Range:0/openrellprobe–232/shortedrellprobe.
U2:Calibrationofwaterrellthreshold.Default:85,AdjustmentRange:30–220
Thisscreenisusedtosetthesensitivityoftherellcircuitwhich,canbeadjustedfordifferentwatercondi
tions. Increase default number according to very soft water. The relative water condition number can be
viewedinU1menuwhenwateristouchingtherellprobe.
U3 to U7: Factory Setup Menus.
Warning: Do Not Adjust!
U8: Calibration menu for the temperature sensor.
This screen is used to calibrate the thermistor reading and CBA to the actual temperature.
Restore Factory Defaults
Step 1: Unplug the brewer.
Step 2: Press the ENABLE BREW ON/OFF switch and plug the brewer into the power source.
Step 3: Press the ENABLE BREW ON/OFF switch for 10 seconds. During those 10 seconds the middle bars on the
display will be on. After 10 Seconds the 3 upper, middle and lower bars on the display will be lit for 5 seconds. Dur-
ingthose5seconds,releaseandagainpresstheENABLEBREWON/OFFswitchtorestoredefaultsettings–the
display will read DONE.
To exit the programming mode at any time, press and release the ON/OFF button located on the user interface. The
display will return to the main screen.
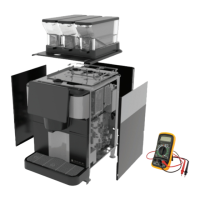
If the programming cannot be access then the programming lockout dip switch is in the ON position. The switch is
located on the control board. Remove the control board access panel, locate the switch and place it into the OFF
position.
Programming SmartWAVE
®
Silver Series
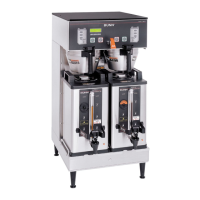
The Silver Series brewer can brew two different batch sizes. Note that the maximum water on time is 5 minutes.
When programming the SmartWAVE
®
brewer It is important to know what type of holding vessel the customer will be
using in order to set batch sizes. The brewer can accept a variety of airpots and carafes.