Installing the Nozzle
Three nozzles are supplied with the UltraDoser 2K – 0.040”, 0.050”, and 0.060”. Custom sizes may be
ordered from Chart.
1. Remove the dosing head heater.
2. Select a nozzle.
3. Insert the nozzle into the nozzle tool, threads out (Image 1).
4. Thread the nozzle into the dosing head area in a clockwise direction (Image 2 & 3). Do not over
torque.
5. Re-apply the dosing head heater.
CAUTION: Never use an ice-pick, screwdriver, torch, or similar devices on the dosing head (Image 2).
The ribs of the internal bellows are a thin walled metal and the hole on the outer ring of the dosing head is
a positive pressure port to help keep moisture out and ice from forming. High heat and puncture holes
will destroy the vacuum insulation and VOID WARRANTY.
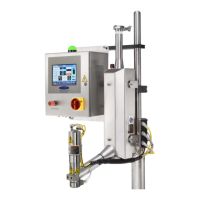
Positioning the Dosing Head
The dosing head should be directly over the bottle (or container) opening. The dosing head is typically
installed 1/2” - 3/4” above the bottle (or container) opening. The UltraDoser unit must be manually adjusted
to accommodate different sized bottles (or containers) running on the same production line.