Service and Maintenance
Nozzle Change Out
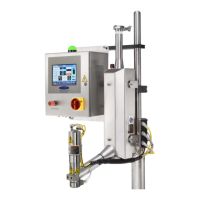
1. Remove the dosing head heater.
2. Insert the nozzle tool into the nozzle area until the tool connects with the nozzle (Image 7).
3. Remove the nozzle with the driver in a counter-clockwise direction. Remove.
4. Once the nozzle is removed, place the new nozzle or cleaned nozzle into the nozzle tool and insert
in a clockwise direction (Image 8).
CAUTION: The dosing head heater may still be in operation. Do not expose skin to prolonged contact
with the dosing head heater. The maximum temperature of the dosing head heater is 150ºF (65ºC).
IMPORTANT: Always perform nozzle change out procedures before introducing LN
2
into the UltraDoser
unit. Failure to do so may cause the nozzle to unthread and fall out.
IMPORTANT: If the nozzle does not loosen easily, drain the UltraDoser unit through the drain plug and
warm up nozzle with a low voltage heat gun.
Nozzle Cleaning
1. Remove the nozzle from the UltraDoser. See “Nozzle Change Out,” page 53.
2. Clean the nozzle opening with a very thin wire and blow dry nitrogen through it.
3. Thoroughly dry the nozzle with dry nitrogen gas before re-installing.
IMPORTANT: Any moisture left on the nozzle will immediately freeze up when the nozzle is re-installed
which may cause the nozzle to unthread and fall out.