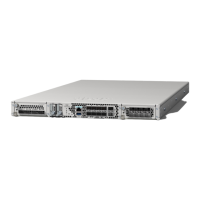
Figure 42: Remove the Network Module
Ejector handle2Captive screw1
If the slot is to remain empty, install a blank faceplate to ensure proper airflow and to keep dust out of the chassis;
otherwise, install another network module.
Step 4 To replace a network module, hold the network module in front of the network module slot on the right of the chassis,
press the ejector handle, and pull out the handle.
Step 5 Slide the network module into the slot, push it firmly into place, and close the handle on the front of the network module.
Step 6 Tighten the captive screw on the upper left side of the network module.
Step 7 Power on the chassis so that the new network module is recognized.
Remove and Replace the SSD
The chassis supports two NVMe SSDs. The SSDs are configured for SW RAID1 support. See SSDs, on page
30 for more information.
Cisco Secure Firewall 4200 Series Hardware Installation Guide
65
Installation, Maintenance, and Upgrade
Remove and Replace the SSD
 Loading...