DETERGENT SOLUTION
After lling the solution tank with clean water add the liquid detergent to the tank in the concentration and manner indicated on the detergent manufacturer's label.
To prevent the formation of an excessive amount of foam that could damage the vacuum motor, use the minimum percentage of detergent required.
CAUTION: protective gloves should always be worn before handling detergents or acidic or alkaline solutions, to avoid serious injury to the hands.
ATTENTION: always use detergents whose manufacturer's label indicates their suitability for scrubbing machines. Do not use acid or alkaline products or solvents without this indication.
N.B.: always use low-foam detergent. To avoid the production of foam, put a minimum quantity of anti-foam liquid in the recovery tank before starting to clean. Do not use pure acids.
For versions with automatic management system of chemical products, ll the solution tank with clean water and then proceed as follows:
1. Bring the machine to the area designated for relling the solution tank.
2. Make sure the machine has been secured (see the section titled “SECURING THE MACHINE”).
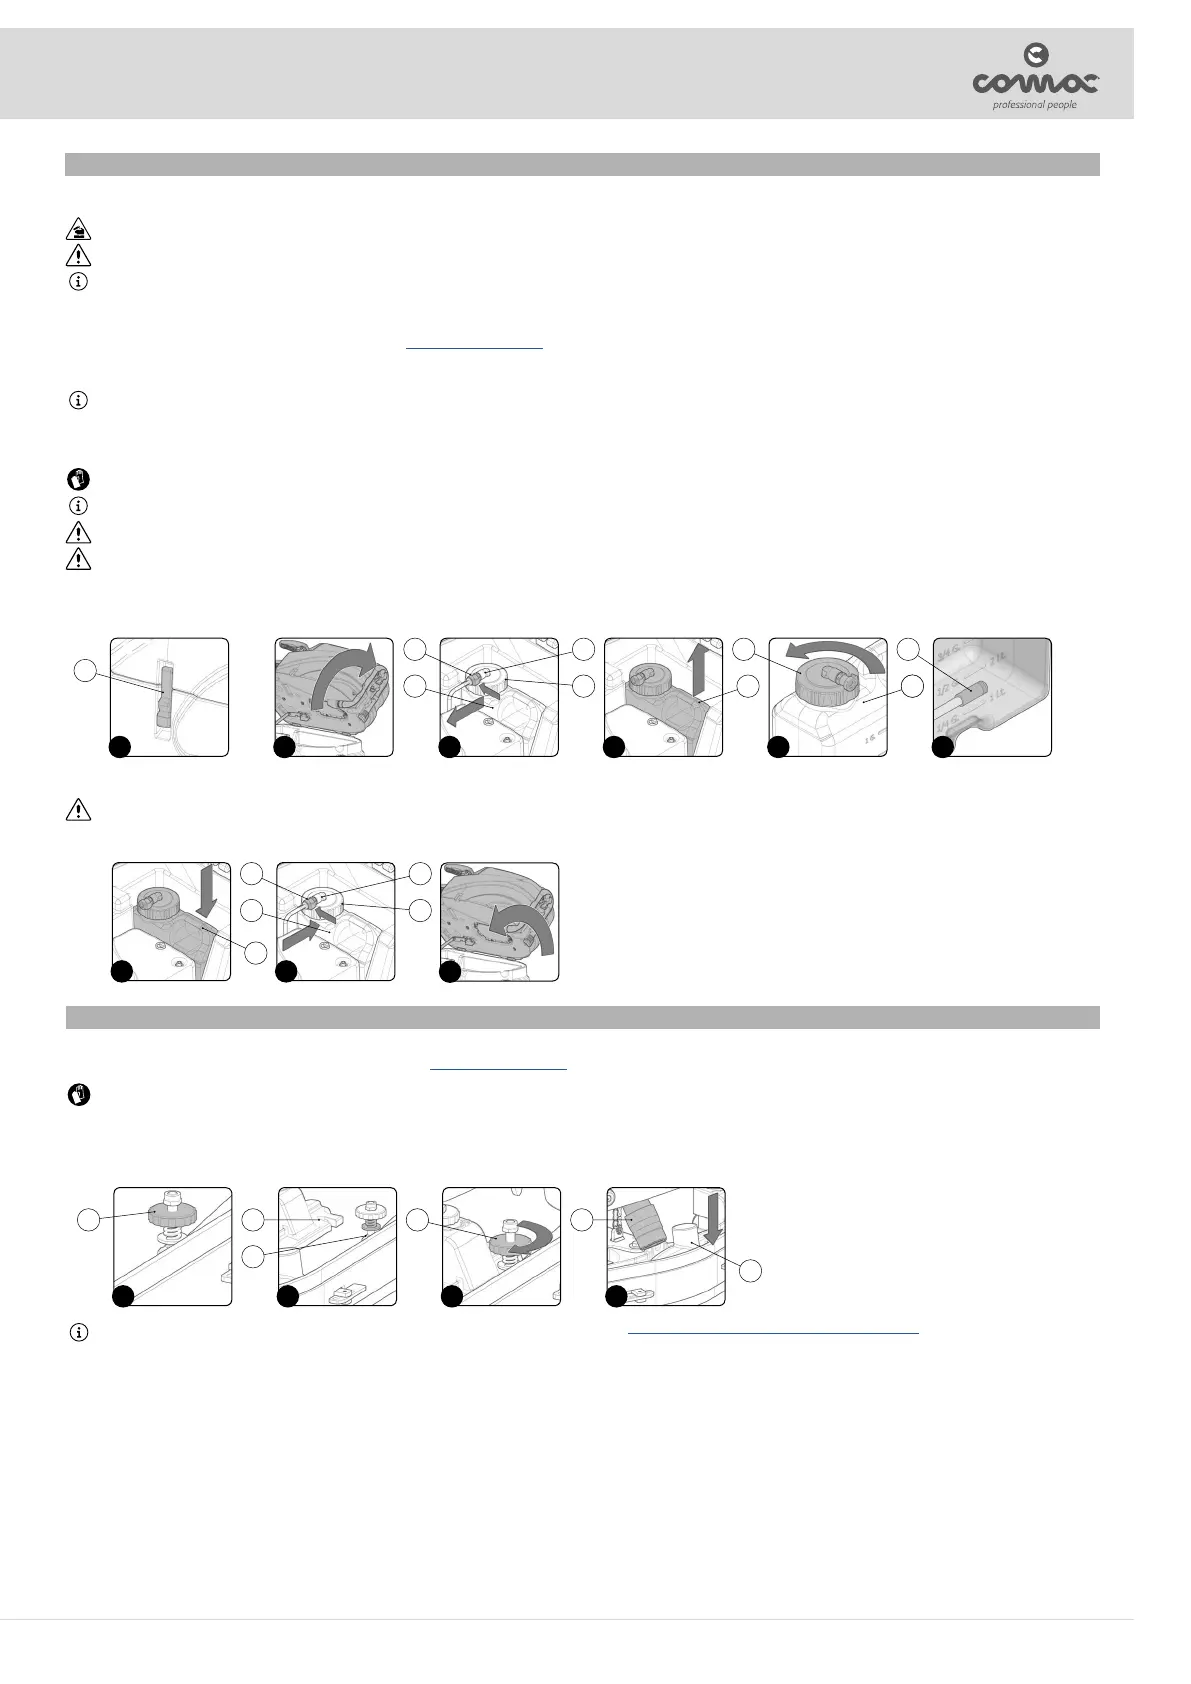
3. Unhook the tank rotation latch (1) (Fig. 1) and turn the recovery tank into the maintenance position (Fig. 2).
4. Disconnect the male insert (2) from the female insert (3) present on the cap (4) for the detergent tank (5) (Fig. 3).
N.B.: before pulling on the male insert, push the lever on the female insert.
5. Gripping the handle (6) on the detergent canister (5), remove the canister from the compartment in the solution tank (Fig. 4).
6. Remove the cap (4) from the detergent canister (5) Fig. 5).
7. Fill the canister with the desired detergent, as shown on the label supplied with the appliance.
CAUTION: protective gloves should always be worn before handling detergents or acidic or alkaline solutions, to avoid serious injury to the hands.
NOTE: always use low-foam detergent. To avoid the production of foam, put a minimum quantity of anti-foam liquid in the recovery tank before starting to clean. Do not use pure acids.
ATTENTION: always use detergents whose manufacturer's label indicates their suitability for scrubbing machines. Do not use acid or alkaline products or solvents without this indication.
ATTENTION: the dosing system is suitable for frequent maintenance cleaning. Acid or alkaline maintenance detergent tank be used with pH values between 4 and 10 and that do not contain: oxidising agents,
chlorine or bromine, formaldehyde, mineral solvents. The detergents used must be suitable for use with scrubbing machines. Wash the circuit with water after use if the system is not used daily. The system
can be excluded. In case of sporadic use of detergents with pH between 1-3 or 11-14, use the oor scrubbing machine in the traditional way by adding the detergent in the clean water tank and excluding the
dosing circuit.
8. Make sure you tighten the cap (4) properly to avoid any leakage of liquid while working. Make sure the detergent suction lter (7) is correctly positioned on the bottom of the canister (Fig. 6).
9. Gripping the canister handle (6), place the canister (5) back in its compartment inside the solution tank (Fig. 7).
ATTENTION: Position the detergent canister (8) as shown in gure (Fig. 7). To help, refer to the label located near the water system pumps support box.
10. Connect the male insert (2) to the female insert (3) in the cap (4) of the detergent canister (5) (Fig. 8).
11. Turn the recovery tank until it is closed in the working position (Fig. 9), tighten the tank rotation latch (1) in order to prevent accidental rotation.
1 3 4 5 62
1
2 3
5 4 6 5
4 7
87
9
2 3
5 4
6
ASSEMBLING THE SQUEEGEE BODY
For packaging reasons, the squeegee body comes disassembled from the machine. To assemble it on the squeegee body support, proceed as follows:
1. Perform the procedure for securing the machine (see the section titled “SECURING THE MACHINE”).
CAUTION: these operations must be carried out using protective gloves to avoid any possible contact with the edges or tips of metal objects.
2. Unscrew the knobs (1) in the squeegee body pre-assembly (Fig. 1).
3. Insert the right pin (2) on the squeegee body into the right slit (3) in the squeegee support (Fig. 2), making sure that the washer and spring adhere to the top of the squeegee support.
4. Repeat the same operation for the left knob.
5. Tighten the knobs (1), ensuring that the washer and spring adhere to the top part of the squeegee support (Fig. 3).
6. Insert the vacuum tube (4) in the sleeve (5) in the squeegee body (Fig. 4).
N.B.: Although the squeegee comes pre-adjusted, it is nevertheless recommended to read the section titled “ADJUSTING THE SQUEEGEE BODY'S RUBBER BLADES”.
1 3 42
1 1 4
5
3
2
17