Do you have a question about the Contour NEXT ONE and is the answer not in the manual?
Consult your doctor before changing treatment or if results differ from how you feel.
All kit parts are biohazardous. Handle with care and follow cleaning and disinfection procedures.
Not for critically ill, shock, hypoxia, or hyperglycemic-hyperosmolar states. Specific operating conditions apply.
Details meter temperature, humidity, sample volume, measuring range, altitude, AST, hematocrit, and xylose interference.
Always use original bottle, keep tightly closed, avoid humidity, heat, cold, dust, dirt.
Do not use expired materials. Use approved equipment. Check expiration dates.
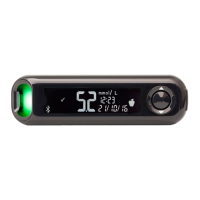
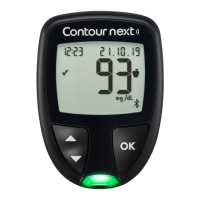
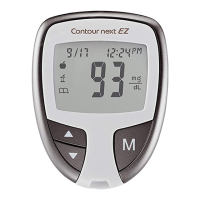
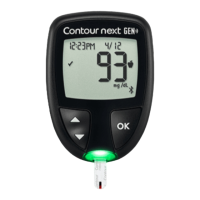
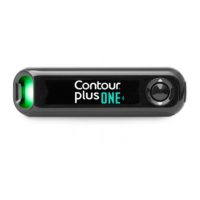
Identifies meter buttons, test strip port, and sample tip for blood application.
Use OK to exit screens. Screen dims after 30 seconds inactivity; press any button to wake.
Explains symbols for target range indicators, HI/LO results, logbook, settings, and markers.
Highlights 'No Coding' and 'Second-Chance' sampling features for easier and more accurate blood application.
Perform setup, add notes, set reminders, view graphs, share reports, track results against targets.
Instructions to download from App Store or Google Play, search, and install the CONTOUR DIABETES app.
Easiest setup method: download app, follow in-app instructions to pair meter.
Alternative setup: press and hold OK for 3 seconds to turn on, then follow on-screen prompts.
Instructions to change hour and minutes using meter buttons, including AM/PM selection for 12-hour format.
Select m/d or d.m format. Change year, month, day using buttons.
Confirms setup completion with a beep and meter turn-off. Meter is ready for testing.
Read guide, check parts, ensure meter works with CONTOUR NEXT strips/solution. Avoid expired materials.
Ensure you have meter, test strips, lancing device, and lancets. Quality control checks are in Section 5.
Lists common symptoms of hypoglycemia (low blood glucose) like shakiness, sweating, fast heartbeat, etc.
Lists symptoms of hyperglycemia (high blood glucose) and ketones (ketoacidosis), advising to test if experienced.
Single-patient use only. Do not reuse lancets. Refer to lancing device insert for preparation.
Remove strip, insert grey square end until meter beeps. Do not use expired materials.
Remove strip, insert into port. Screen shows blinking blood drop. Apply blood to tip within 3 minutes.
Wash hands. Press lancing device, touch strip tip to blood drop. Hold until meter beeps.
CAUTION: Do not press strip tip on skin or place blood on top. Use only the tip for sample.
If meter beeps twice, apply more blood to the same strip within 60 seconds if not enough blood was drawn.
Attach Meal Markers (Fasting, Before Meal, After Meal) to results when feature is On.
Select a Meal Marker when meter displays result if feature is On. Do not press OK or remove strip yet.
Scroll through markers using buttons, press OK to select. Timeouts apply for selection or meter turn-off.
Meter displays result with units, time, date, marker, and target indicator.
Test strip port displays color (Green, Red, Yellow) for In Target, Below, Above target ranges.
Consult doctor for medication changes. Follow advice for critical low or high readings; retest if needed.
Nondiabetic fasting <100 mg/dL, postprandial <140 mg/dL. Consult HCP for personal values.
LO (<20 mg/dL) requires contacting HCP. HI (>600 mg/dL) requires retesting; contact HCP if persistent.
Ask HCP if AST is right. Do not calibrate CGM or calculate insulin dose from AST. Do not use if glucose is low or changing rapidly.
Press/hold OK to turn on. Select Logbook symbol. Scroll through individual test results using buttons.
Change time/date format, sound, markers, target ranges, lights, Bluetooth. Save settings with OK.
Press/hold OK to turn on. From Home screen, highlight Settings symbol, press OK to enter.
To exit Settings at any time, press and hold OK. The meter turns off.
Select 12/24 hour format. Change hour, minutes, and AM/PM using buttons.
Select m/d or d.m format. Change year, month, day using buttons.
Turn sound On/Off. Beeps indicate confirmation or errors. Some sounds remain active.
Turn Meal Markers On/Off. When On, select markers during tests. Displays Target Range screens.
Discuss target range settings with HCP. Meter displays Fasting, Before Meal, After Meal, Overall ranges.
Turn Target Lights On/Off. Green=In Target, Red=Below Target, Yellow=Above Target.
Turn Bluetooth On/Off. Bluetooth is available after pairing meter with a mobile device.
Turn meter off, press/hold OK until flashing blue light. Follow app instructions to match serial number.
Store in case, wash/dry hands, handle carefully, avoid extreme conditions. Clean/disinfect as recommended.
Meter tested for 260 cycles (5 years) of cleaning/disinfection. Contact CS for malfunctions or display changes.
Wash hands. All parts are biohazardous. Disinfect before second-person use. Single-patient use.
Use Clorox Germicidal Wipes (0.55% sodium hypochlorite). Purchase online. Contact CS for assistance.
Clean meter with germicidal wipes until soil is removed. Dry with paper towel. Avoid liquid entry into ports.
Keep meter surfaces wet with germicidal wipe for 60 seconds. Dry with paper towel. Clean lancing device separately.
Wirelessly transfer results to smartphone/tablet. Pair meter via app as described in Getting Started.
Requires diabetes management software and USB cable. Ensure USB port is closed. Use only approved equipment.
Low battery symbol appears normally. Dead batteries stop testing; replace immediately.
Turn off meter, slide cover, remove old batteries, insert two CR2032/DL2032. Settings saved if replaced within 5 mins.
Use only CONTOUR NEXT control solution. Shake well. Do not apply directly from bottle. Do not use expired solution.
Perform when using meter for first time, opening new strips, suspecting malfunction, or getting unexpected results.
Store between 48-86°F. Test when temperature is 59-95°F. Results are not included in logbook or app.
Remove strip, insert into port. Shake control solution 15x. Touch strip tip to drop. Compare result to range.
Meter displays error codes (E + number) for test, strip, or system errors. Beeps twice. Press OK to turn off.
Lists E1 (Too Little Blood), E2 (Used Strip), E3 (Upside Down), E4 (Wrong Strip), E6 (Moisture), E8 (Strip Errors) with actions.
Lists testing errors (E20, E24, E25, E27, E28) and system errors (E30-E99) with troubleshooting steps.
When calling CS, have meter, strips, control solution ready. Locate model/serial number and check battery status.
Lists meter, user guide, quick reference, test strips, control solution, lancing device, lancets, carrying case by model number.
Presents accuracy data for glucose concentrations below 75 mg/dL and at/above 75 mg/dL vs lab methods.
Shows mean, SD, 95% CI of SD, and CV for repeatability across different glucose levels.
Shows precision results for control levels 1, 2, and 3, including mean, SD, 95% CI of SD, and CV.
Equipment meets FCC Part 15 limits for Class B digital devices. Lists measures to correct interference.
Device should not affect other devices. Increase distance or turn off interfering devices/Bluetooth for interference.
Details sample type, result reference, countdown, memory, battery, dimensions, weight, meter life, sound, RF, and EMC.
Explains symbols used on product labeling: Control Discard Date, Shake 15 times.
Explains ISO/IEC symbols: Catalog Number (REF), Batch Code (LOT), In Vitro Diagnostic (IVD) Medical Device.
Measures electrical current from glucose reaction with reagents. Blood drawn via capillary action. No user calculation needed.
System uses capillary whole blood. Comparison needs simultaneous aliquots. Glucose drops rapidly due to glycolysis.
Lists references from FDA, CDC, journal articles on blood glucose monitoring, disease, and testing.
Available Mon-Sun, 8am-12am ET. For medical emergencies, contact HCP or 911. Leave message for callback.
Lists Ascensia trademarks and licensing information. Apple, Bluetooth, Google Play are also mentioned.
| Measurement Range | 20-600 mg/dL |
|---|---|
| Sample Size | 0.6 µL |
| Test Time | 5 seconds |
| Bluetooth | Yes |
| Connectivity | Bluetooth |
| Battery Type | Two CR2032 3V lithium batteries |
| Memory Capacity | 800 results |
| Weight | 36 g |
| Operating Temperature | 5-45°C (41-113°F) |
| Operating Conditions | Temperature: 5°C to 45°C, Humidity: 10% to 93% RH |