Do you have a question about the Craftsman 113.22521 and is the answer not in the manual?
Essential safety practices for operating power tools, covering manual reading, grounding, and workspace conditions.
Critical warnings regarding manual review, safety gear, and understanding kickback hazards.
Emphasizes operating the machine only after full assembly, installation, and comprehension of instructions.
Details grounding, outlet types, extension cords, and motor rotation checks for safe power connection.
Lists essential tools required for the assembly process, including various wrenches and a screwdriver.
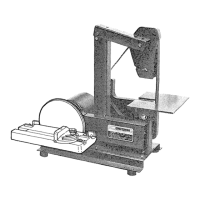
Step-by-step instructions for securely attaching the sander unit to its floor base.
Procedures for attaching the work table, adjusting its position, and ensuring it is properly secured.
Guide to mounting the abrasive belt, applying correct tension, and ensuring proper tracking.
Instructions for fitting the dust collection trap onto the sander assembly.
Steps for attaching the backstop component to the main unit of the sander.
Explains the function of belt adjusting screws for tension and tracking.
Describes how to use belt locking screws to secure the adjustment mechanism.
Details locking the work table's tilt angle, including specific angle settings.
Instructions for securing the belt table position, including vertical adjustment.
Techniques for finishing flat surfaces and long workpieces using the abrasive belt.
Methods for finishing workpiece ends with the belt in a vertical position.
How to finish outside and inside curves on the sander's belt.
Procedures for finishing small ends and curves safely on the abrasive disc.
A schematic illustrating the electrical connections for the sander.
A guide to common problems, their causes, and recommended solutions for the sander.
Details the components and assembly of the sander's electrical switch box.
A comprehensive list of replacement parts for the sander, keyed to diagrams.