5
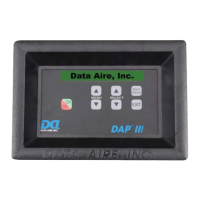
Modes of Operation - The DAP III has two modes of operation. The Operation mode is the prevelant mode
and occurs when the unit is in normal operation. During this mode the top row of the display shows the current opera-
tion which the unit is in, such as: humidifi cation, dehumidifi cation, reheat stage - either 1,2 or 3 depending on how the
unit is confi gured; cooling stage - either 1 or 2 again depending on the confi guration of the unit; and energy saver. If
none of these condition exist a display of “Data Aire System Ready” will be shown. The lower row will continuously
scrolls through the following displays: date and time set in the DAP III program; unit number and zone number (Pro-
viding the unit is connected to a network. If not connected to a network it will display “N/A.”) as programmed; current
temperature and humidity detected by the return air sensors or if the optional remote sensors are used it will be the
conditions the remote sensors record; then any alarm conditions currently active. (A listing of these alarm conditions
are shown on page 11.) If your unit uses chilled water DAP III will display the percentage of chilled water fl ow as well.
In the upper right-hand corner of the DAP III display you should fi nd a blinking form in the shape of a heart. The blink-
ing indicates that the processor is functional.
The second mode of the DAP III is the Menu Mode which is described in the balance of this manual. To enter the
Menu Mode depress either of the MENU buttons.
DAP III Buttons - On the front of the DAP III there are seven buttons: an ON/OFF, MENU UP ()and MENU
DOWN () button; SELECT UP () and SELECT DOWN () button; SILENCE / ALARM button and an EXIT button.
The ON/OFF button is a soft power on/power off button. The hard power ON/OFF switch is located on the DAP III
Control Module circuit board and will be explained in the next section of this manual.
SILENCE /ALARM button only function is to mute audio alarms, the button is sparingly used in programming.
EXIT button has no function in the operation mode, however, it is used in the menu mode. Once in the menu mode
when the EXIT button is depressed the values programmed are saved and takes you up one level. For example if
you are in the Menu Groups, as shown on the top of page 13, depressing the EXIT button will take you to the opera-
tion mode. However, if you are in a Sub-Menus, shown on pages 13-15, depressing the EXIT button will take you to
the Menu Group for that sub group. For example if you were in sub-menu group 4-6 Firestat Temperature Alarm Limit,
depressing the EXIT button will take you to Menu Group 4 - Alarms .
MENU / MENU these buttons primarily allow you the scroll up or down in the menu grouping that you are in
currently. If you are in the Group menus depressing the MENU button will take you to the next higher menu, from
Group1 - Status & History to Group 2 - Setpoints. Conversely pressing the MENU button will take you to the next
lower menu in that grouping, from sub group 8-5 Set-Back Reheat depressing the MENU button would take you
to sub group 8-4 Set Up Cool. (All menu grouping continuously scroll, once you reach the last menu option and you
depress the MENU button you will return to the fi rst menu option.) These buttons have other specialized functions
depending on the subgroup menu you are addressing. These functions are described in the body of this manual in
the section where they apply. If the MENU buttons are held down they will advance at a rapid rate. If there is no but-
ton activity for three minutes the DAP III will return to the Operation Mode.
SELECT /SELECT these buttons, as the name implies, allows you to select a menu once you have located it
using the menu buttons. For example if you wanted to select the sub group menus for “Group 3 - Operation,” once
you scrolled to the group using menu buttons - depress the SELECT button will take you to “3-1 - Set Time and
Date,” the SELECT button would take you to sub menu “3-16 - Humidifi cation Desaturation Cycle” the last menu
option in sub-menu group 3 Once in sub group menus the SELECT and SELECT buttons permit you to scroll
through that menu’s options..