20
4. Important: Turn repeater DIP Switch #4 off once the test is complete, otherwise it
will significantly shorten battery life.
5. Close the repeater enclosure.
6. Select the second repeater in the chain (Repeater ID B) and put it into Test Mode. The
LEDs displays the same light pattern as described in step 3.
Note: Set the Transmitter ID on only one repeater (the first repeater) in the chain. The second repeater in the
chain automatically repeats the first repeater.
7. Repeat the test process to verify communication for every repeater in the chain.
Use the following diagram for an example of transmitter and repeater DIP switch settings
for each repeater in a daisy chain.
Verifying Repeater Communication with a Console
The console is configured the same way it is configured in a single repeater installation,
except that the repeater ID that is selected is the last repeater in the chain.
Vantage Pro2: On the Console in Setup Mode Screen 2: Configuring Transmitter IDs:
1. Select the transmitter ID transmitting through the repeater. If the transmitting station is
not already turned on with its station type selected, do so now. Turn the transmitting
station on by pressing the up arrow until “ON” displays on the screen. Change the
transmitting station type by pressing GRAPH until the correct station type displays.
2. Press 2ND and then press WIND to enter Repeater Setup Mode and to select or
deselect a repeater ID. Once the console is in the Repeater Setup Mode, subsequent
pressing of WIND continue to cycle through the all the repeater IDs.
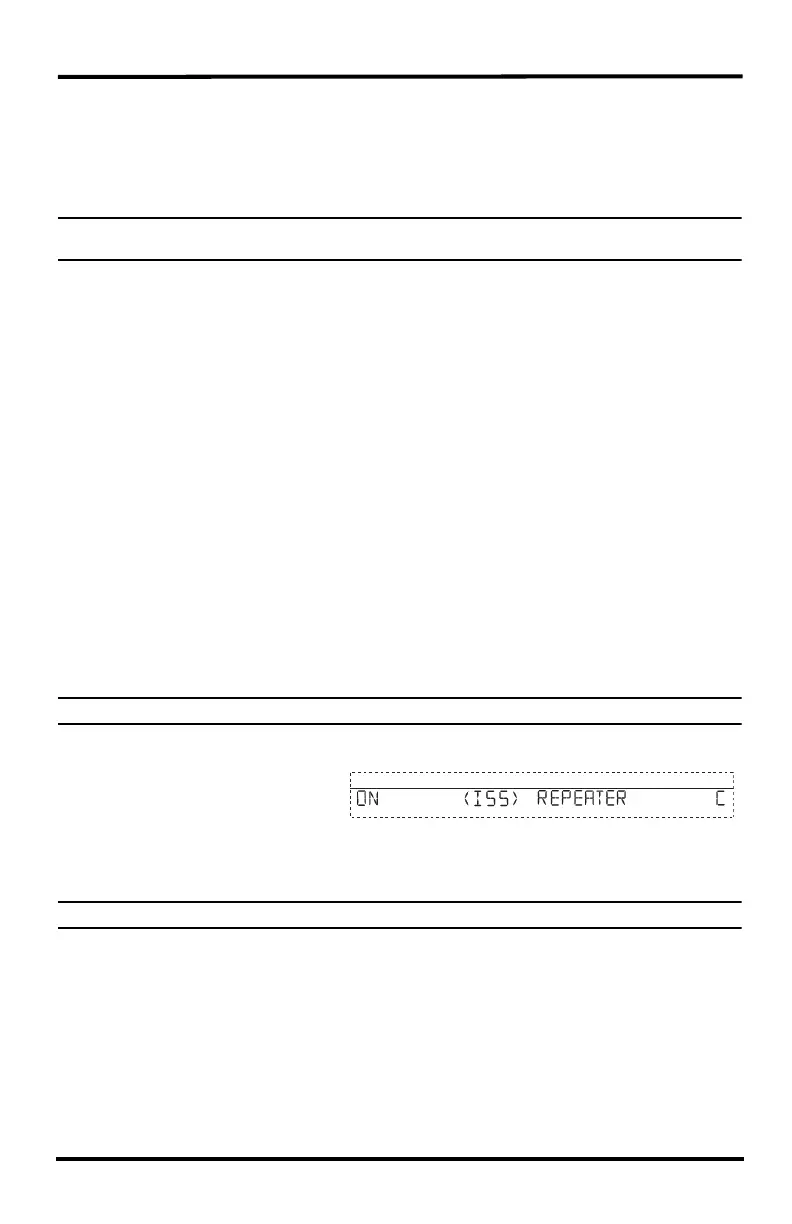
3. Press WIND repeatedly to cycle to the desired repeater ID or to turn off the repeater
ID in the right hand corner. When no repeater ID is shown, the console is configured
to listen directly to a transmitting station and not to a repeater.
Note: If a transmitter ID is turned off, pressing WIND or 2ND and WIND will not display the repeater ID.
In this example, the
console is set up to receive
an ISS station with
transmitter ID 1 from
repeater C.
4. Press DONE to continue to other screens in Setup Mode, or press and hold DONE to
return to Current Weather Mode.
Note: See the Vantage Pro2 Console Manual for more information on the Setup Mode screens if necessary.
To verify that setup was successful, in the console’s current mode:
View the transmitter information displaying at the bottom of the console screen.
If an “X” flashes in the bottom right-hand corner of the ticker tape, the transmitter is
being repeated and received by the console successfully.
Vantage Vue: On the Console in Setup Mode Screen 6: Configuring Transmitter IDs:
1. Select the transmitter ID transmitting through the repeater. If the transmitting station is
not already turned on with its station type selected, do so now. Turn the transmitting
1
 Loading...