EN - 5
A-1025
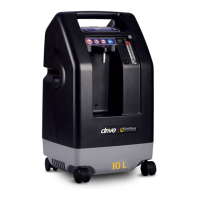
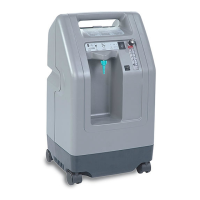
Front View (Figure A)
1. Operating instructions
2. Power Switch
| = ON
O = OFF
3. Flow meter knob
4. Flow meter
5. Circuit breaker – resets the unit after electrical overload shutdown
6. Oxygen outlet – oxygen is dispersed through this port
7. Normal Oxygen (green) light (see page 7)
8. Low Oxygen (yellow) light (see page 7)
9. Red Service Required (red) light – when illuminated contact your
DeVilbiss provider
10. Hour meter
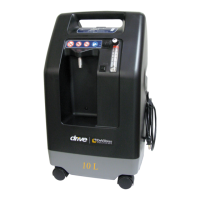
Back View (Figure B)
11. Handgrip
12. Exhaust
WARNING – When device is used under extreme operating
conditions, the temperature near the exhaust vents on the bottom of
the unit may reach 138.2˚F (59˚C). Keep body parts a minimum of 30”
away from this area.
13. Power cord and/or IEC power connector.
14. Line cord strap
15. Air lter – prevents dirt, dust and lint from entering your unit.
16. Oxygen Outlet Port: Your concentrator is equipped with an auxiliary
oxygen port that can be used to ll oxygen cylinders with an FDA-cleared
cylinder lling device that is designed to use oxygen from a concentrator
to ll a cylinder. The port is only for use with FDA-cleared lling devices
with compatible oxygen input specications. Refer to the cylinder lling
device instruction guide for the oxygen input/output specications,
connection and operating instructions.
IMPORTANT PARTS OF YOUR CONCENTRATOR
Please take time to familiarize yourself with your DeVilbiss oxygen concentrator before operating.
1
2
3
4
5
6
A
11
12
13
12
14
11
15
B
16
10
7
9 8
ACCESSORIES
Transfiller Caddy ........................................................................................................................................................................................................................DeVilbiss 525DD-650
High Flow (6-15 LPM) Bubble Humidifier ....................................................................................................................................................................Salter Labs 7900 or equivalent
Low Flow (up to 6 LPM) Bubble Humidifier ................................................................................................................................................................Salter Labs 7600 or equivalent
High Flow Nasal Cannula ....................................................................................................................................................................................... Salter Labs 1600HF or equivalent
There are many types of humidiers, oxygen tubing and cannulas/masks that can be used with this device. Certain humidiers and accessories may impair the device’s
performance. A mask or any nasal cannula can be used with continuous ow delivery and may be sized according to your prescription as recommended by your homecare
provider who should also give you advice on the proper usage, maintenance and cleaning.
NOTE– The bubble humidier should be supplied with a permanent re stop device. If a bubble humidier needs to be used without a permanent re stop device, a secondary
re stop device must be used and placed as close to the humidier as possible. Failing to do so could increase the risk of re.
NOTE– The device should only be used with bubble humidiers that are designed for use with ows up to 10 liters per minute and 20 psi pressure.
NOTE– A maximum of 50 feet (15 meters) of crush-proof oxygen tubing, plus 7 feet (2.1 meters) of cannula, plus a bubble humidier is allowed between the concentrator and
the patient.
NOTE– The oxygen supply accessory (patient tubing) shall be equipped with a means that, in case of re, stops the delivery of
oxygen to the patient. This means of protection should be located as close to the patient as practicable.
NOTE– Your healthcare provider should verify the compatibility of the oxygen concentrator and all of the parts used to connect to the patient before use.
SETTING UP YOUR OXYGEN CONCENTRATOR
1. Position your unit near an electrical outlet in the room where you spend most of your time.
NOTE– Do not connect to an electrical outlet controlled by a wall switch.
WARNING
Oxygen causes rapid burning. Do not smoke while your oxygen concentrator is operating, or when you are near a person utilizing oxygen therapy. Keep the
oxygen concentrator and cannula at least 2 m (6.5 feet) from hot, sparking objects or naked sources of ame.
2. Position your unit at least 6 inches (16 cm) from walls, draperies or any other objects that might prevent the proper ow of air in and out of your oxygen concentrator. The
oxygen concentrator should be located in a well-ventilated area to avoid pollutants or fumes.