23
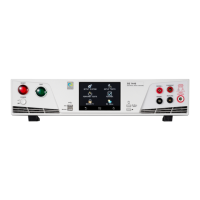
1. POWER SWITCH: Powers the test instrument ON or OFF.
2. RESET BUTTON: Resets the instrument. If a failure condition occurs during a test, pressing this
button will reset the system, shut off the alarm and clear the failure condition. The Reset
button must be pressed before performing another test or changing any of the setup
parameters. This button also serves as an abort signal to stop any test in progress.
3. TEST BUTTON: Starts a test.
4. TOUCH SCREEN GRAPHIC LCD: Displays all the information and allows full control of the
instrument.
Note : This product has screen saver function. When the instrument is not operated for more
than 30 minutes, it will automatically enter the screen saver. User can touch the screen of the
instrument and RESET key to stop the screen saver function.
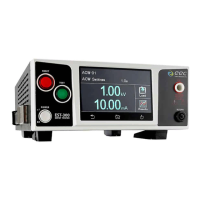
5. (OPTION) CONTINUITY OUTPUT TERMINAL: Connector used to attach the return test lead,
adaptor box return lead, or test fixture return lead used during Continuity testing.
6. RETURN TERMINAL: Connector used to attach the return test lead, adapter box return lead or
test fixture return lead to the instrument. This connection provides the return current path.
7. HIGH VOLTAGE OUTPUT TERMINAL: Connector used to attach the high voltage test lead,
adapter box high voltage lead or test fixture high voltage lead to the instrument. This
connection provides the high voltage used during a Hipot test.
8. MY MENU: Allows the user to customize the interface.
9. TOGGLE: This button allows the user to toggle between test files if the user is wearing gloves
since the touch screen will not respond to gloves.
10. DATA USB PORT: This USB style port allows for connecting a USB flash drive to extract test
data.
Note:
Support brand: ADATA, Apotop, Ridata, SanDisk, Team,
Interface: USB 2.0
Capacity limit: under 16GB
Format: FAT 16 or FAT 32
11. BARCODE USB PORT: This USB style port allows for connecting a barcode scanner.
Note:
a. The barcode type needs use code 128.
b. Support CINO-F680, Honeywell, Metrologic, DENSO.