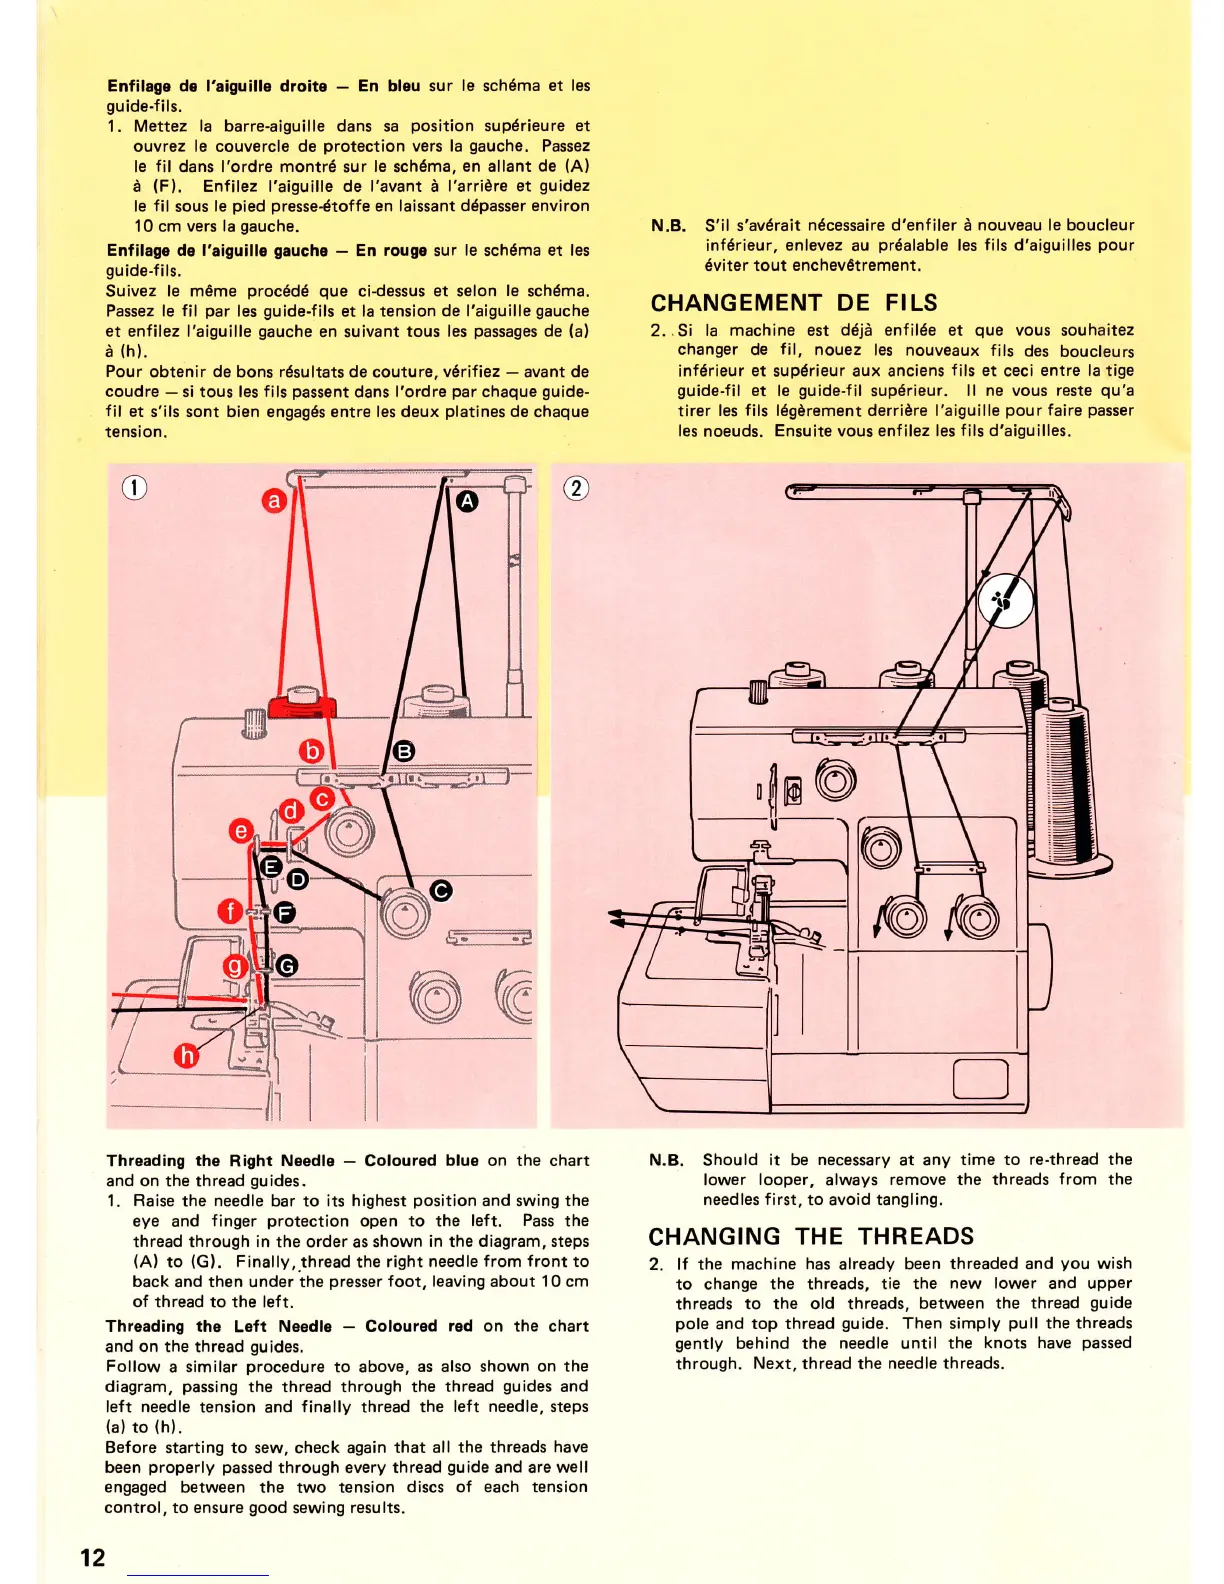
Enfilage de l'aiguille droite
-
En bleu sur
le
sch6ma
et les
guide-f
ils.
1. Mettez
la barre-aiguille dans
sa
position
supdrieure et
ouvrez le couvercle de
protection
vers la
gauche.
Passez
le
fil
dans I'ordre montr6 sur
le
sch6ma,
en allant
de
(Al
a
(Fl.
Enfilez l'aiguille de I'avant I l'arriCre et
guidez
le fil
sous
le
pied presse4toffe
en laissant d6passer environ
10 cm
vers la
gauche.
Enfilage de
l'aiguille
gauche
-
En
rouge
sur
le
sch6ma
et les
gu
ide-f ils.
Suivez
le m€me
proc6d6 que
cidessus
et selon le schCma.
Passez le
fil
par
les
guide-fils
et
la
tension
de l'aiguille
gauche
et enfilez l'aiguille
gauche
en suivant
tous les
passages
de
(a)
e
(h).
Pour obtenir de bons r6sultats de couture, vfriliez
-
avant de
coudre
-
si
tous
les fils
passent
dans
l'ordre
par
chaque
guide-
fil
et
s'ils sont bien engagds entre
les
deux
platines
de
chaque
tension.
Threading
the
Right
Needle
-
Coloured
blue on the chart
and on the thread
guides.
1. Raise the needle bar to its highest
position
and swing the
eye and
finger
protection
open to the left.
Pass
the
thread through
in
the order as shown
in
the
diagram, steps
(A)
to
(G).
Finally,thread
the right
needle from front to
back
and
then
under the
presser
foot,
leaving
about
1
0 cm
of thread to the left.
Threading tho
Left
Needle
-
Coloured
red
on the chart
and on the thread
guides.
Follow
a similar
procedure
to above,
as also shown on the
diagram,
passing
the thread through the
thread
guides
and
left needle tension
and
finally thread the
left needle, steps
(a)
to
(h).
Before starting to sew, check again
that all the threads
have
been
properly
passed
through every
thread
guide
and are well
engaged
between the two tension
discs of each tension
control, to ensure
good
sewing
results.
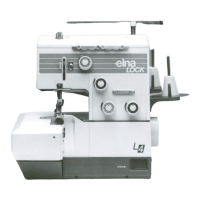
N,B. S'il
s'avdrait
n6cessaire d'enfiler
d
nouveau
le boucleur
infdrieur, enlevez au
pr6alable
les
fils d'aiguilles
pour
6viter
tout enchevetrement.
CHANGEMENT
DE FILS
2..Si
la machine est
ddja
enfil6e et
que
vous
souhaitez
changer
de
fil.
nouez les nouveaux
fils
des boucleurs
inf6rieur
et
supdrieur
aux anciens
fils
et ceci entre la tige
guide-fil
et
le
guide-fil
sup6rieur.
ll ne vous reste
qu'a
tirer les
fils l6gdrement
derridre
I'aiguille
pour
faire
passer
les
noeuds.
Ensuite vous enf ilez les
fils
d'aiguilles.
N.B.
Should
it be
necessary
at any time
to re-thread the
lower
looper,
always
remove the threads
from
the
needles first,
to avoid tangling.
CHANGING
THE THREADS
2. lf the
machine has
already
been threaded and
you
wish
to change
the threads, tie
the new lower and upper
threads
to the
old threads,
between the
thread
guide
pole
and
top thread
guide.
Then simply
pull
the threads
gently
behind the
needle
until the
knots have
passed
through.
Next, thread
the
needle threads.
@
12