Appendix B Page 7 Loop Powered Indicator
10. To remove the LPI Option from a Model 2808 Transmitter, follow steps 7 through 9 in
reverse order, removing rather than installing the item in question.
2.2 FIELD WIRING
The LPI uses compression-type terminals that accommodate up to #14 AWG wire. A
connection is made by inserting the bared end (1/4 inch Max.) into the Meter Motherboard
Connector (TB1) clamp beneath the screw and then securing the screw. Insert the bared
end fully to prevent short circuits.
Allow some slack in the wires when making terminal connections. The slack makes the
connections more manageable and minimizes mechanical strain on the Meter Motherboard
and the wiring harness (see Section 2.4 of CI-2808 and Figure 2-5 below).
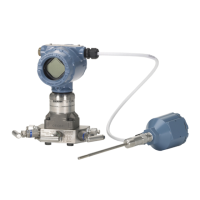
Figure 2-5 - Transmitter LPI Option Field Wiring
2.3 OPERATIONAL DETAILS
2.3.1 Configuring the Loop Powered Indicator
Configuration involves selecting an engineering unit (called the Base Unit or BU) and then
establishing Zero and Full-scale values to be used when converting current into that unit.
The Mode (left-hand) and Select (right-hand) buttons are used to configure the LPI. The
LPI ships from the factory with a configuration that displays the flowing current in a BU of
percent (%). During configuration the Mode button is used to move through the
configuration sequence and the Select button is used to choose a particular setting from
those available at a particular point in the sequence.
Configuration begins with the selection of an engineering-unit followed by the choices for
the zero; minus sign, ten-thousandths half-digit, four full digits (thousands to units), then
the decimal point. Next is the Full-scale; minus sign, ten-thousandths half-digit,
thousandths to units, and decimal point. The final press of the Mode button causes an exit
 Loading...