84 85
EN EN
889 5550
or animals. Prior to the generator being put into ope-
ration in enclosed rooms after necessary measures are
taken, it must be approved by the workplace safety
department or respective government authorities.
The generator must not be operated at an incline of
more than 10° relative to the horizontal plane, since at
agreater incline the lubrication system is insufficient
and this causes serious damage to the engine.
If this incline of the generator is exceeded, fuel may
leak out of the fuel tank.
3. Screw out the lling plug and into the
crankshaft of the engine, use afunnel to pour
motor oil as shown in g. 7. Use SAE15W40
class motor oil, or another class of oil accor-
ding to g. 6based on the generator's opera-
ting ambient temperature.
The oil level must be at the level as shown on
the pictogram on the label (see g. 2, position
4). The oil level dipstick is on the cap of the
lling neck.
REQUIRED OIL LEVEL
• WARNING
y When handling oil, use suitable water-resistant protecti-
ve gloves because oil is absorbed through the skin and
is damaging to health.
• ATTENTION
y In order to protect the engine against damage, in the
event that there is no oil in the engine's crankcase, the
oil sensor will prevent the generator from starting.
Use quality motor oils intended for lubricating four-
-stroke air-cooled petrol/diesel engines, e.g. Shell Helix
HX715W-40, Castrol GTX15W40 or their equivalents,
with an SAE15W40 viscosity class, or others based on
the ambient operating temperature, as indicated in fig.
6. Oils with an SAE15W40 viscosity class ensure good
lubrication properties at the temperatures in our clima-
tic conditions (in temperature range of -20°C to +40°C).
Class SAE 15W40 oils can be purchased at fuel stations.
Only quality motor oil may be used in the generator.
Using other types of oils, e.g. food-grade oil or pneu-
matic tool oil, or used automotive oil, etc. is forbidden.
Never use oils intended for two-stroke engines in
the generator!
• WARNING
When adding or replacing oil, do not mix motor
oils of various SAE classes or oils of the same SAE
class from various manufacturers.
y Check the oil level on the gauge (dipstick) after screwing
it out of the oil tank.
Only check the oil level in the oil tank when the
generator is standing on ahorizontal level and only
after an extended period of time after the engine is
turned off (at least 15 minutes). If you perform the oil
check too soon after turning off the generator, not all
the oil will have flowed down the walls of the crankcase
and the oil level reading will not be reliable.
4. Check the condition air lter.
Check the condition of the air filter and whether it is
clogged before putting the generator into operati-
on. Aclogged air filter or operation of the generator
without the air filter will result in damage to the carbu-
rettor and the engine. Aclogged air filter prevents the
supply of asufficient amount of combustion air to the
engine and leads to the carbonisation of the engine,
spark plug and exhaust pipe.
1) Screw off the air filter cover.
2) Remove the filter, see fig. 8.
Clean the filter after every 50 motor hours of ope-
ration (see motor hours counter, fig. 2, position 1)
or in the case of operation in adusty environment
after every 10 motor hours or more frequently.
Clean the filter according to the procedure descri-
bed in chapter Cleaning and servicing. Prior re-
-inserting the filter, the filter must be perfectly
dry. In the event of damage or substantial clog-
ging, replace with anew original one (part no.:
8895550B).
3) To insert the filter proceed in reverse sequence. For
effective air filtration, seat the filter properly into the
filter compartment and put on the cover and secure it
firmly in place using bolts.
5. Through the strainer in the petrol tank lling
neck (g. 9), pour clean lead-free car petrol
without oil.
Always pour the fuel into the fuel tank through the
strainer (g. 9) that is inserted in the inlet of the fuel
tank since this will eliminate any mechanical particles
contained in the petrol, which could clog the fuel sys-
tem or carburettor.
y Petrol is highly flammable and very volatile. Petrol or its
fumes may very easily ignite, and therefore do not
smoke when handling petrol and prevent access to any
flame or spark sources. Do not pour
petrol into the fuel tank while the
engine is running and turn off the
engine of the generator and allow
it to cool down before adding petrol!
y Petrol is damaging to health. Therefore, prevent petrol
from coming into contact with skin, breathing in its
vapours and ingesting it. When handling petrol, use pro-
tective aids, i.e. waterproof gloves as well as
safety glasses. Petrol is absorbed through
the skin into the body. Only add petrol in
well-ventilated environments to prevent
inhalation of fumes.
3)
The maximum power output serves for very short coverage of ahigher current draw by aconnected electrical device
above the value of the continuous (long-term) operating power output COP (see above), e.g. during the ramp up of
an electric motor, which has aramp up (starting) power input. Thus, the generator can only be continuously loaded
at the value of the operating (nominal) power output COP.
When the generator is loaded above its max. power output, the supply to the current will be interrupted by the circu-
it breaker.
4)
Power characteristic class G4 according ISO8528-1:
Voltage quality for powering sensitive electrical appliances, e.g. TVs, computers, medical devices.
5)
Quality Aclass according ISO8528-8: At adifferent operating temperature or pressure than corresponding to the
standard comparative conditions (see table 1), the nominal power output is not less than 95% of the initial value spe-
cified during standard comparative conditions (calculation according to ISO3046-1).
6)
Standard comparative conditions for determining the nominal parameters of the generator according to
ISO8528-1: Ambient environment conditions for the specified nominal parameters of the generator (nominal power
output COP, fuel consumption, quality class).
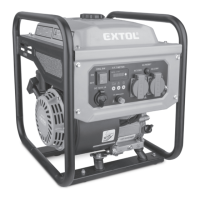
III. Parts and
control elements
Fig. 1, position-description
1) Power switch
2) Display -indicator of alternating-current voltage,
frequency, total motor hours counter since
commissioning and motor hours from the last start up
3) Toggle button for displaying alternating-current voltage,
frequency and motor hours
4) Circuit breaker for 230V power sockets
5) Grounding terminal
6) 230 V power socket
7) Circuit breaker for 12V power socket
8) Power indicator
9) Power supply error indicator
10) Oil sensor indicator
11) 12 V socket for charging car batteries
Fig. 2, position-description
1) Oil refill inlet cap
2) Oil drain bolt
3) Oil level monitoring sensor
4) Label showing the required oil level
Fig. 3, position-description
1) Carburettor
2) Carburettor mud bolt
3) Spark plug connector
Fig. 4, position-description
1) Pull cord of manual starter
2) Lever for opening/closing the supply of petrol
using the fuel valve
3) Air filter cover
4) Choke control lever
5) Label with the position of the choke lever for starting
(position "OFF") and for operation (position "ON")
Fig. 5, position-description
1) Fuel tank cap
2) Petrol level in tank indicator
IV. Preparing
the generator
for operation
• WARNING
y Carefully read the entire user's manual before first use
and keep it with the product so that the user can beco-
me acquainted with it. If you lend or sell the generator
to somebody, include this user's manual with it. Prevent
this user's manual from being damaged. The manu-
facturer takes no responsibility for damages or injuries
arising from use of the generator that is in contradiction
with this user's manual. Before using the generator, first
acquaint yourself with all the control elements and parts
as well as how to turn it off immediately in the event of
adangerous situation arising. Before using, first check
that all parts are firmly attached and check that no part
of the generator, such as for example safety protective
elements, is damaged or incorrectly installed, or missing.
Do not use agenerator with damaged or missing parts
and have it repaired or replaced at an authorised gene-
rator service centre for the HERON® brand.
1. After unpacking, check the condition of the
surface, perfect working order of the control
elements of the generator and whether there
are any visible defects, e.g. unconnected
cables, unconnected fuel supply hoses, etc.
2. Place the generator on arigid, level surface in
awell-ventilated location, which is at asafe
distance from ammable and explosive mate-
rials, and away from aammable and explosi-
ve atmosphere.
• WARNINGS
The generator must not be operated in
enclosed or poorly ventilated areas or
in environments (e.g. in rooms, deeper
outdoor trenches, etc.) since the exhaust
fumes are toxic and may lead to poisoning of people
 Loading...