48
NISEA
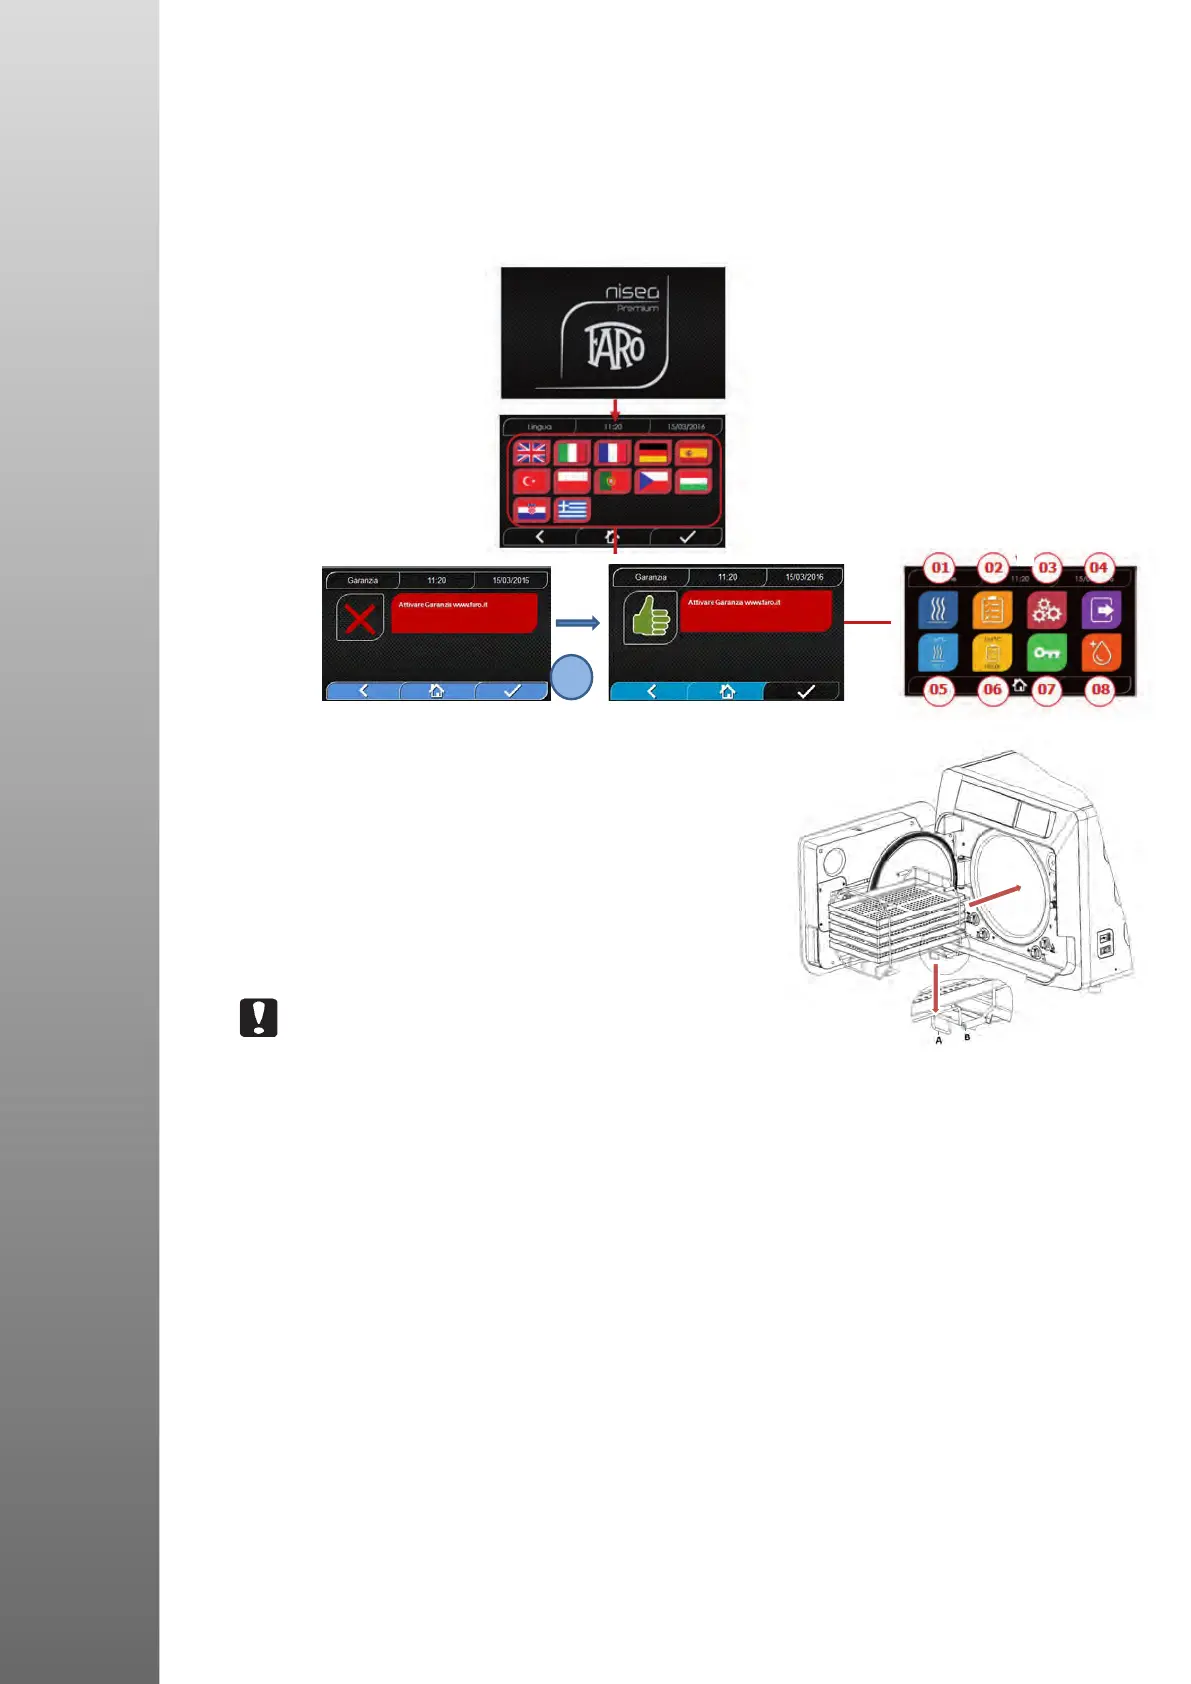
3.1 FIRST POWER-UP
- Press the illuminated main switch (5 g. 1).
1 - Wait for the main screen to load
2 - Select the desired language.
3 - Warranty Activation” screen.
4 - Home page loading following the choices made during warranty activation.
Select the “07 open door” icon to open the door and extract the supplied accessories from the chamber.
EXAMPLE OF LANGUAGES SCREEN
Check that the accessories include:
- Documentation (instruction manual)
- The tray support
- 3 trays (Basic version) or 5 trays (Premium version)
- 1 tray extraction pincer
- 1 lling hose
- 1 drain hose
- 1 funnel
WARNING
- Insert the tray holder as shown in the gure
- The tray holder must be inserted into the chamber with foot “A” facing down and positioned at the bottom
of the chamber. The position of foot “A” must be respected both when using 3 trays and 5 trays
- The tray holder must always have rubber protection “B” mounted on the eight supports
If the autoclave is not lled with water from external tanks, DO NOT CONNECT it directly to the water
mains, but connect it to a demineralizer or water treatment system that will ensure the required water
specications (see 7.1). The water treatment system must prevent water backow to the mains.
Validate the installation in accordance with the following table:
– Vacuum test
– Autoclave automatic test
– Autoclave instrumentation calibration check
– Overtemperature trip test
– Thermometric test for small loads (*)
– Drying test for small loads (*)
– Steam penetration test for porous loads (*)
– Thermometric test for solid loads (*)
– Drying test for solid loads (*)
– Steam penetration test for solid loads (*)
– Thermometric test for a load chosen by the user
– Microbiological test for a load chosen by the user
(*) To be carried out with cycles of 121°C and 134°C
“WARRANTY ACTIVATION” SCREEN on the website www.faro.it:
The screen will appear every 24 hours for 30 days. Please register your warranty on FARO’s
website – www.faro.it – within 30 days.When you press the “A” button you will see the
“Registration Conrmation” screen.
1919
NISEA
Verificare che la dotazione comprenda:
- Documentazione (manuale d’uso)
- Il supporto porta tray
- N° 3 tray (versione Basic) n° 5 tray (versione Premium)
- N° 1 pinza d’estrazione tray
- N° 1 tubo carico
- N° 1 tubo scarico
- N° 1 imbuto
Qualora il carico dell’acqua non avvenga tramite taniche esterne, l’autoclave NON DEVE
ESSERE COLLEGATA direttamente alla rete idrica, ma ad un demineralizzatore o
sistema di trattamento acque che permetta di ottenere le caratteristiche di acqua richieste
(vedi pag. 30). Il sistema di trattamento acque deve prevenire il reflusso dell’acqua verso
la rete idrica.
Eseguire la qualifica dell’installazione secondo la tabella di test seguente:
– Vuoto test
– Test Automatico Autoclave
– Verifica taratura strumentazione autoclave
– Test di intervento sovratemperatura
– Test termometrico per piccoli carichi (*)
Schermata di “attivare garanzia” sul sito www.faro.it:
- La schermata verrà mostrata ogni 24 ore per i successivi 30 giorni.
- Si prega di provvedere alla registrazione della garanzia entro 30 giorni, sul sito della
FARO – www.faro.it
- Premendo il pulsante “A” verrà mostrata la schermata di avvenuta registrazione.
1919
NISEA
Verificare che la dotazione comprenda:
- Documentazione (manuale d’uso)
- Il supporto porta tray
- N° 3 tray (versione Basic) n° 5 tray (versione Premium)
- N° 1 pinza d’estrazione tray
- N° 1 tubo carico
- N° 1 tubo scarico
- N° 1 imbuto
Qualora il carico dell’acqua non avvenga tramite taniche esterne, l’autoclave NON DEVE
ESSERE COLLEGATA direttamente alla rete idrica, ma ad un demineralizzatore o
sistema di trattamento acque che permetta di ottenere le caratteristiche di acqua richieste
(vedi pag. 30). Il sistema di trattamento acque deve prevenire il reflusso dell’acqua verso
la rete idrica.
Eseguire la qualifica dell’installazione secondo la tabella di test seguente:
– Vuoto test
– Test Automatico Autoclave
– Verifica taratura strumentazione autoclave
– Test di intervento sovratemperatura
– Test termometrico per piccoli carichi (*)
HOME PAGE SCREEN
01 “Sterilisation cycles” menu
02 “Test” menu
03 “Settings” menu
04 “Data Output” menu
05 Last sterilisation cycle run
06 Last test run
07 Unlock door
08 Water lling


 To Next Page
 Loading...