64
NISEA
ForacorrectcongurationyoumustassigntotheIPaddressofthemachine:-anumberbelongingtothelocal
networkdenedbytherst3valuesoftheIPaddress:intheexampleaboveitis”169.254.190.xxx”;-asthelast
numberavaluenotassignedtothelocalnetwork:e.g.“169.254.190.158).
ThereforethecompleteIPaddressofthesterilizercouldbeofthetype:169.254.190.158
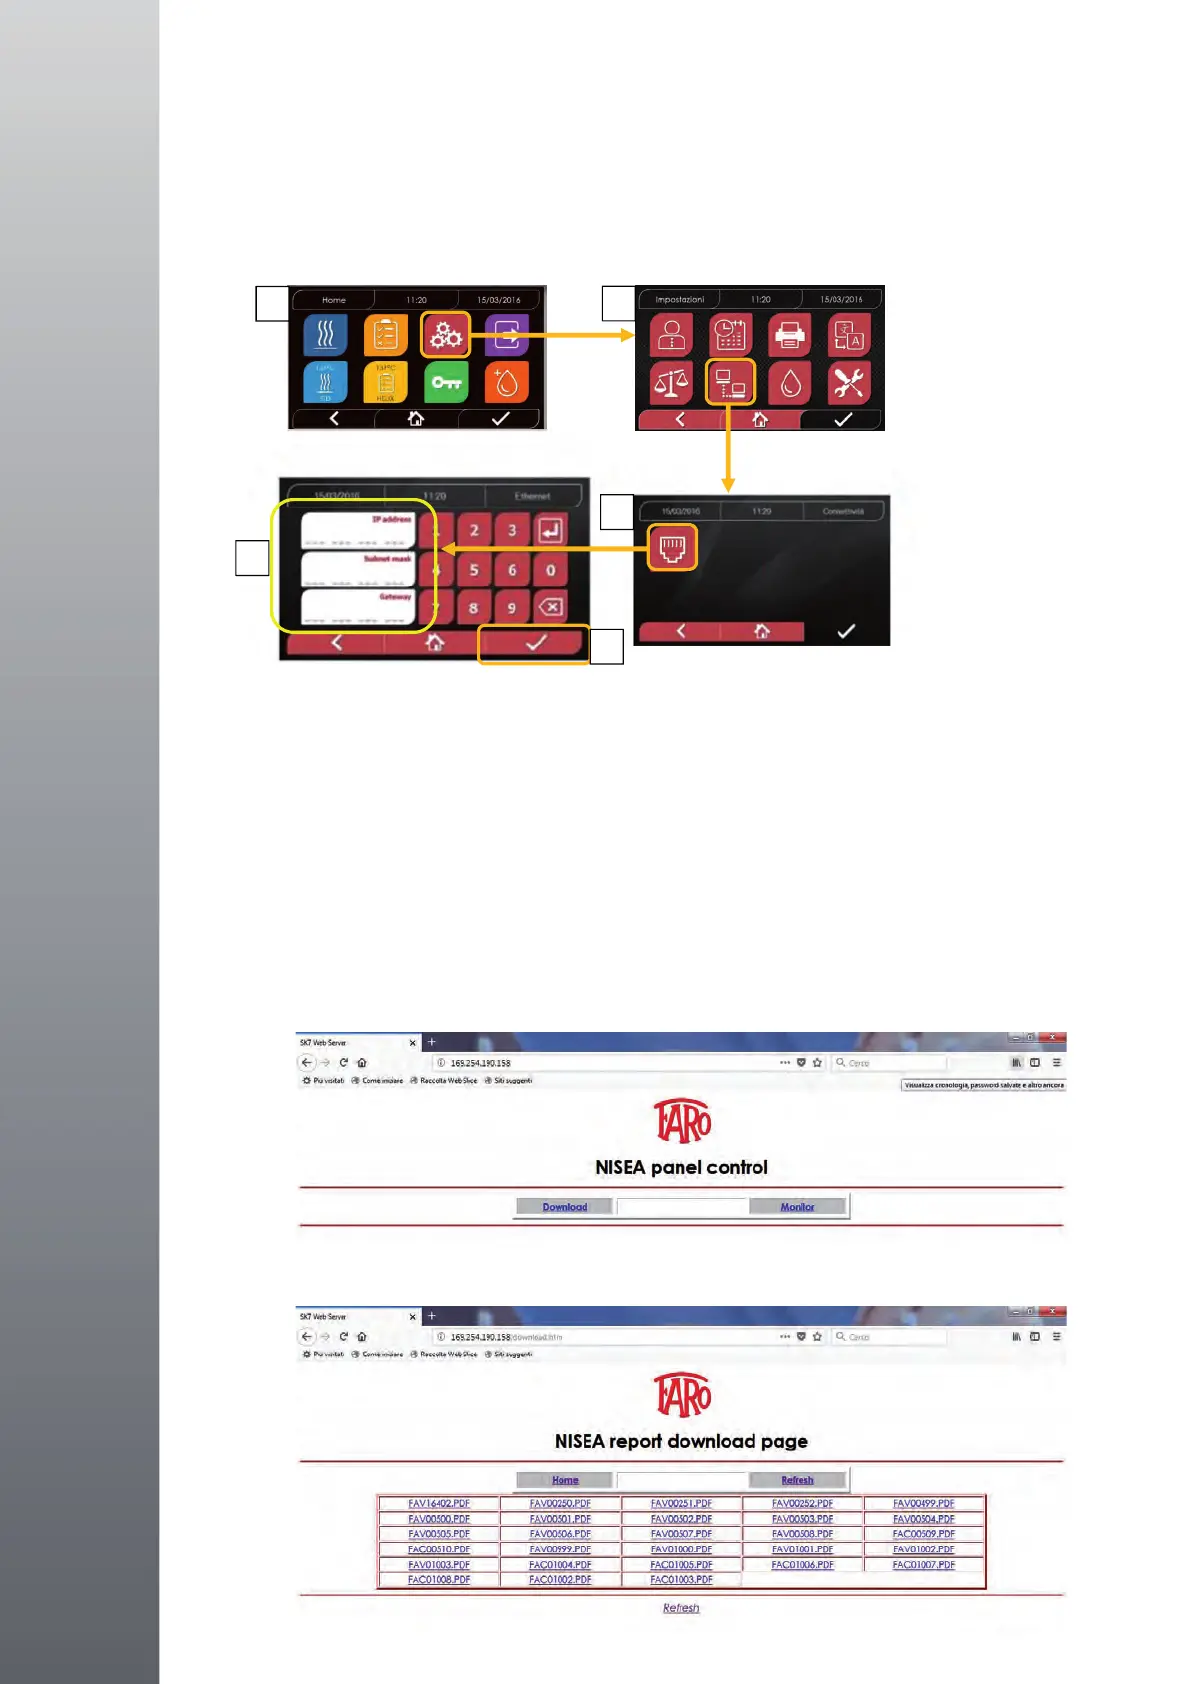
Once you know the IP address and Subnet Mask to be assigned to the machine you must enter these values in the
settingscreenoftheautoclaveEthernetparametersusingthekeyboardandsavethedata:
Note:TheGatewayaddressisnotimportantforlocalnetworkcommunications.
Once the Ethernet conguration data has been entered and saved, the autoclave must be switched off and
on again so that the data can be used by the Web Server of the machine.
At this point, with the sterilizer turned on on the Home screen, from a PC connected to the local net-
work, or directly connected to the machine via Ethernet cable, you must open the Web Browser (In-
ternet browsing program like Internet Explorer, Firefox, Chrome, etc.) and in the address eld
you must enter the IP address previously entered in the sterilizer (in our e.g. 169.254.190.158).
Youwillthenhaveaccesstoa“NiseaPanelcontrol”Webpagededicatedtodownloadingreportsofcyclesthat
the machine has performed (Download) or to monitor its operation (Monitor):
AvretecosìaccessoadunapagineWeb“Niseapanelcontrol”dedicataalloscaricodeireportdeiciclichela
macchinaharealizzato(Download)oalmonitoraggiodelsuofu n z i onamento(Monitor):
Niseacontrolpanel
Niseareportdownloadpage
AvretecosìaccessoadunapagineWeb“Niseapanelcontrol”dedicataalloscaricodeireportdeiciclichela
macchinaharealizzato(Download)oalmonitoraggiodelsuofu n z i onamento(Monitor):
Niseacontrolpanel
Niseareportdownloadpage
Una volta conosciuti indirizzo IP e Subnet Mask da assegnare alla macchina occorre introdurre tramite la
tastiera questi valori nella schermata di impostazione dei parametri Ethernet dell’autoclave e salvare i dati:
Nota: l’indirizzo Gateway non è importante per le comunicazioni nella rete locale.
Una volta inseriti e salvati i dati di configurazione Ethernet occorre spegnere e riaccendere
l’autoclave affinché tali dati possano essere utilizzati dal Web Server della macchina stessa.
A questo punto, con la sterilizzatrice accesa sulla schermata Home, da un PC connesso alla rete locale, o
direttamente connesso alla macchina tramite cavo Ethernet, si deve aprire il Web Browser (programma di
navigazione internet tipo Internet Explorer, Firefox, Chrome, ecc.) e nel campo indirizzi occorre introdurre
l’indirizzo IP precedentemente introdotto nella sterilizzatrice (nel nostro es.
169.254.190.158)
.
1 2
3
4


 To Next Page