Do you have a question about the Flexim FLUXUS G800 and is the answer not in the manual?
Provides information about the user manual's purpose and how to use it.
Contains important instructions for safe operation and handling of the measuring instrument.
Details the warranty terms and conditions for the FLUXUS flowmeter.
Outlines the initial visual inspection procedures upon delivery of the instrument.
Provides general guidelines for careful handling of the precision measuring instrument.
Describes the components of the ultrasonic flow measurement system.
Explains the ultrasonic transit time difference correlation principle used for flow velocity measurement.
Details different transducer mounting configurations like diagonal and reflection arrangements.
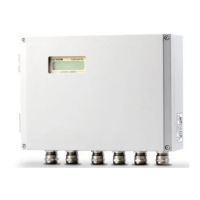
Describes the physical characteristics and layout of the FLUXUS G800 transmitter.
Describes the physical characteristics and layout of the FLUXUS G801 transmitter.
Explains the function of the transmitter's keyboard keys for operation and navigation.
Discusses requirements for sound propagation through pipe and fluid for accurate measurement.
Explains the importance of flow profile and recommended distances from disturbance sources.
Addresses how pipe wall signals can disturb measurements and points to avoid.
Guides on selecting a measuring point considering both flow profile and noise influence.
Helps choose between diagonal and reflection arrangements based on measuring conditions.
Provides guidance on selecting the sound beam plane orientation relative to pipe elbows.
Specifies criteria for selecting the installation location for the transmitter and transducers.
Details the procedure for safely opening and closing the transmitter housing.
Covers wall and pipe installation methods for the FLUXUS G800.
Explains how to connect the transmitter to power and other components.
Provides detailed steps for connecting the transducers, including extension cables.
Guides on how to safely connect the power supply to the transmitter.
Details how to connect various output signals from the transmitter.
Explains how to connect the RS232 serial interface for data communication.
Describes the function and installation of the sensor module for transducer data.
Specifies criteria for selecting the installation location for the transmitter and transducers.
Details the procedure for safely opening and closing the transmitter housing.
Covers wall and pipe installation methods for the FLUXUS G801.
Explains how to connect the transmitter to power and other components.
Provides detailed steps for connecting the transducers, including extension cables.
Guides on how to safely connect the power supply to the transmitter.
Details how to connect various output signals from the transmitter.
Explains how to connect the RS232 serial interface for data communication.
Describes the function and installation of the sensor module for transducer data.
Describes how to prepare the pipe surface for transducer mounting.
Explains the correct orientation of transducers and how to set the distance.
Details the installation procedure using the Variofix L mounting fixture.
Details the installation procedure using the Variofix C mounting fixture.
Explains the purpose and installation of damping mats for transducers.
Discusses the installation of pipe damping mats to reduce acoustic noise.
Provides instructions for applying self-adhesive damping mats to the pipe.
Basic steps to power on the transmitter and initial display.
Explains the process of initializing the transmitter to default settings.
Describes the transmitter's display and main menu structure.
Lists key sequences (HotCodes) for accessing specific functions and settings.
Details how to select the operating language for the transmitter display.
Explains the meaning of the transmitter's operational status LEDs.
Describes how the transmitter handles power interruptions and data saving.
Guides on entering essential pipe dimensions and material properties for accurate measurement.
Instructs on entering fluid properties like sound speed, viscosity, and density.
Covers additional parameters like transducer type and extension cable length.
Explains how to activate or deactivate measurement channels.
Details how to specify the number of sound paths for the measurement.
Crucial section on setting and adjusting the transducer distance for optimal measurement.
Covers the procedure for initiating a flow measurement.
Explains how the transmitter indicates the direction of fluid flow.
Describes how to safely stop an ongoing flow measurement.
Guides on choosing which physical quantity and units to display.
Explains how to switch between different displayed channels or modes.
Covers options for customizing the display layout to show multiple values.
Describes the information provided in the status line during measurement.
Shows how the transducer distance is displayed and its relation to optimal measurement.
Lists commands that can be executed while a measurement is in progress.
Explains how to adjust the damping factor for averaging measured values.
Details how to monitor and manage total flow volume or mass.
Allows setting an upper limit to ignore flow velocities considered outliers.
Describes setting a lower limit for flow velocity to exclude low flow conditions.
Explains how to view flow velocity without profile correction.
Covers the FastFood mode for measuring highly dynamic flows and its configuration.
Explains how to set up virtual channels for calculating derived values from measurements.
Allows modification of the minimum inner pipe diameter limit for transducers.
Introduces the snap function for storing diagnostic parameters.
Details how to set and use a program code for protecting measurements.
Explains the data logger's function, stored data, and activation.
Covers methods for transmitting logged data to a PC via serial interfaces.
Describes how to divide the memory for storing material and fluid parameters.
Guides on entering material/fluid data as constants without the extended library.
Explains how to use the extended library for temperature/pressure dependent fluid properties.
Provides steps for removing user-defined materials or fluids from the system.
Details how to manage and display material and fluid lists in the Parameter branch.
Instructions for setting the transmitter's internal clock and date.
Covers settings related to dialogs, menus, and pipe circumference input.
Allows configuration of measurement-specific settings like gas measurement and turbulence mode.
Explains how to set standard pressure and temperature for gas measurements.
Describes how to adjust the display contrast of the transmitter.
Shows how to access information about the transmitter, including serial number and firmware.
Explains how to activate and deactivate the SuperUser mode for advanced analysis.
Describes how to input or select transducer parameters in SuperUser mode.
Covers setting advanced flow parameters like profile bounds and velocity correction.
Allows setting a maximum signal amplification limit to avoid invalid signals.
Explains how to set an upper limit for the sound speed for plausibility checks.
Describes how to configure the time interval for detecting long measurement failures.
Allows setting the number of decimal places for totalizer display.
Explains how to manually reset totalizers, even with a program code active.
Describes how to display the sum of totalizers for both flow directions.
Explains how to display the last valid value when the signal is insufficient.
Lists additional parameters that can be displayed during measurement in SuperUser mode.
Guides on installing and configuring different types of outputs.
Explains how to set the delay for transmitting error values to outputs.
Details the process of activating and configuring analog outputs, including range.
Describes how to configure a frequency output to function as a pulse output.
Explains how to activate a binary output to function as a pulse output.
Covers the activation and configuration of binary outputs as alarm outputs.
Describes how alarm outputs behave under different conditions and switching functions.
Explains how to deactivate installed outputs.
Addresses issues where no signal is received or measurement is impossible.
Provides guidance on selecting an appropriate measuring point to avoid issues.
Refers to chapter 8 for instructions on achieving maximum acoustic contact.
Discusses problems related to fluid sound speed, pipe roughness, lining, and fluid composition.
Explains common causes for large deviations in measured values.
Covers issues related to totalizer values being too high, too small, or incorrect.
Addresses problems with transmitted data containing meaningless strings.
Shows the menu structure within the Parameter program branch.
Displays the menu structure within the Measuring program branch.
Presents the menu structure within the Output Options program branch.
Lists units of measurement for length and roughness.
Lists units of measurement for temperature.
Lists units of measurement for pressure.
Lists units of measurement for density.
Lists units of measurement for sound speed.
Lists units of measurement for kinematic viscosity.
Lists units of measurement for flow velocity.
Lists units for standard and operational volumetric flow rates.
Lists units for mass flow rate.
Lists units for heat flow rate.
Provides sound speed data for various pipe and lining materials.
Lists typical roughness values for different pipe materials.
Tabulates physical properties for common fluids.
Provides detailed properties of methane at various temperatures and pressures.
Instructions for cleaning the transmitter and transducers.
Details how to check and replace O-rings for housing seals.
| Display | Graphical LCD |
|---|---|
| Number of Channels | 1 or 2 |
| Measurement Principle | Ultrasonic |
| Power Supply | 24 V DC |
| Communication Interfaces | RS232, RS485, Ethernet |
| Fluid Types | Liquids, Gases |
| Pipe Size Range | DN6 ... DN6500 (Transducer Dependent) |
| Outputs | 4-20 mA, pulse, frequency, relay |
| Enclosure | IP65 |
| Measurement Range | 0.01 ... 25 m/s |