35
EN
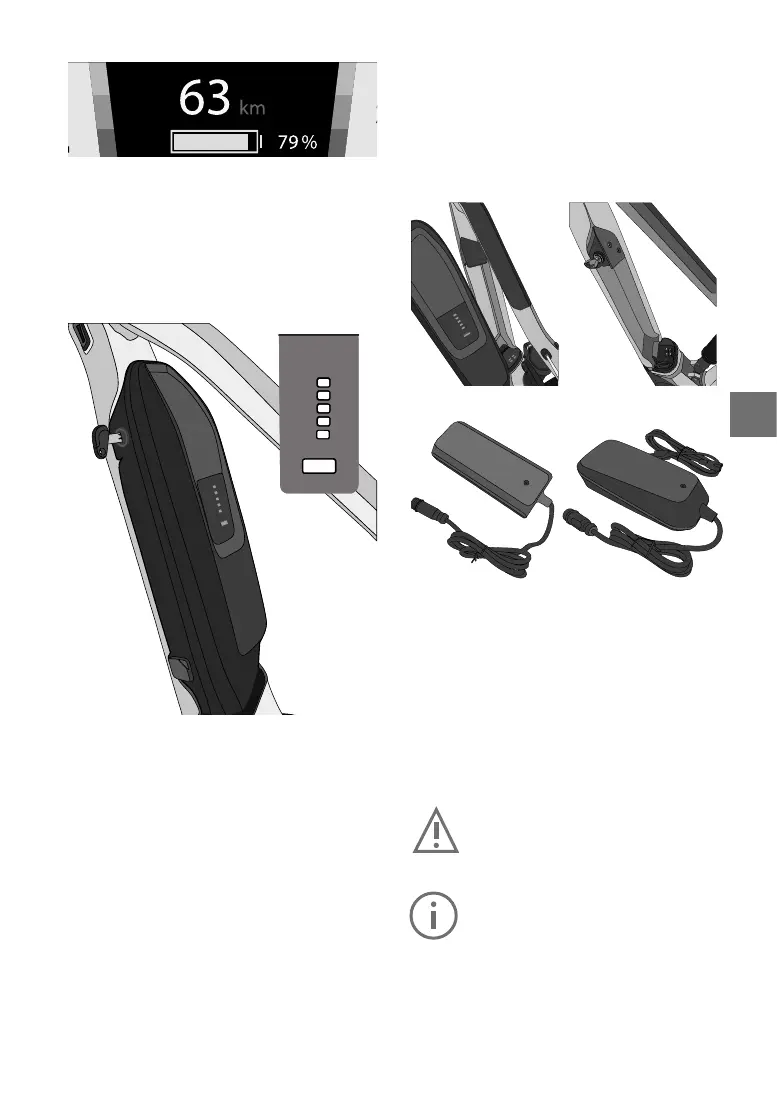
Charging status indicator
The main menu “Drive” on your display contains
a symbol that indicates the battery charge level,
which is also shown as a percentage.
In all other menus, the charge level is displayed
as a symbol in the top-left.
If the charge level is less than 20%, the battery
is red.
Batterychargelevelcheck
Akkuladestandsanzeige
Jede leuchtende Akkuladestandsleuchte steht für ca. 20 % der Akkukapazität.
Akkuladestandsleuchten
5 an
4 an 3 an 2 an
1 an 1 blinkt*
1
5 an 4 an 3 an 2 an 1 an 1 blinkt*
1
Anteil der Akkukapazität
im Vergleich zum voll
geladenen Akku
81 % bis 100 % 61% bis 80% 41% bis 60% 21% bis 40% 11% bis 20% 1% bis 10%
*
1
Wenn keine Restkapazität mehr im Akku vorhanden ist, blinkt eine Akkuladestandsleuchte schnell.
1LEDbatterychargeindicator
Shows the e-bike battery’s remaining capacity.
If an error occurs, an error code is displayed (see
Chapter 5.29 Battery error codes)
2Controlbuttonforbatterychargelevel
Let the LED battery charge level indicator blink to
verify the remaining battery capacity.
3 Charger connector
4 Rubber cap
Protects the charger connectors when the battery
is not being charged.
To check if the battery is charging, press the control
button on the battery to be shown the charge level.
Chargethebatterywhennotallofthevecharge
indicator LEDs light up. Only use the original
charger.
Never use chargers supplied by other manufac
-
turers!
Afast-ashingLEDindicatesthatthebatteryhas
been completely discharged.
Removingthebattery
1. Switchotheelectricalsystemrst.Todothis,
presstheon/obuttononthedisplay.
2. Unlock the battery with the battery key and re
-
moveitfromtheholder.Holdthebatteryrmly,
as it is heavy.
Chargingthebattery
The battery can be charged while it is installed in
the e-bike or once it has been removed.
Safetywarningforthebatterycharger
The name plate on the charger refers to warning
notes and other safety information in connection
with handling the charger. Be sure to read this be
-
fore use. Please note the temperature ranges of
the battery and charger:
Battery operating temperature: -5 °C to 40 °C
Battery storage temperature: 10 °C to 40 °C
Charging temperature range: 0 °C to 40 °C
Only use the charger supplied with your
e-bike. Only this charger is designed for
the lithium-ion battery used on your
e-bike.
Completely charge the battery using the
chargerbeforetherstridetoensurefull
battery performance. Read and adhere
to the operating instructions for the
charger when charging the battery. Do
not connect the charger to the mains
socket immediately after a sudden tem
-
perature change from cold to warm. It is
possible that condensed water has col
-