10
NT530 Plus User’s Manual_English_V1.03
To connect to computer:
1. Connect the scanner to a computer with the USB cable provided.
3.2 Application Overview
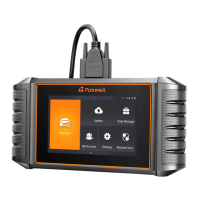
When the scan tool boots up, the Home screen opens. This screen shows all applications loaded on the unit.
The available vehicle applications may vary depending on software configuration.
● History - Displays the tested vehicle records.
● OBDII/EOBD - leads to OBDII screens for all 9 generic OBD system tests.
● Update - leads to screen for updating the scanner.
● Diagnostic - leads to screens for diagnostic trouble code information, live data stream, ECU information of
a variety of vehicles.
● Settings - leads to screens for adjusting default settings to meet your own preference and view information
about the scanner.
● Data Manager - leads to screens for access to data records.
● Shopping- leads to scan the QR code to enter our store.
Figure 3-1 Sample Home Screen
3.3 Input Dialog Box
This section illustrates how to use the scan tool to input letters and numbers, such as VIN number, channel
number, test values and DTC number. Typically, you may be required to input letters or numbers when you are
doing any of the following operations.
● VIN entry
● input channel number
● set adaptation value
● enter block number
● enter login code
● key matching
● look up DTCs
The scan tool provides 4 different types of keyboard to meet your specific needs. Depending on the needs of
text entry, it automatically shows the most suitable keypad.
● classic QWERTY keyboard for input of texts that contain both letters and numbers