Home
Gocycle
Bicycle
G1
Page 81
Gocycle G1 - Page 81
94 pages
Manual
Save Page as PDF
To Next Page
To Next Page
To Previous Page
To Previous Page
Loading...
Gocycle
®
Owner’s Manual Version
August 2015
©
Karbon Kinetics Lim
ited. All Rights Rese
rved.
78
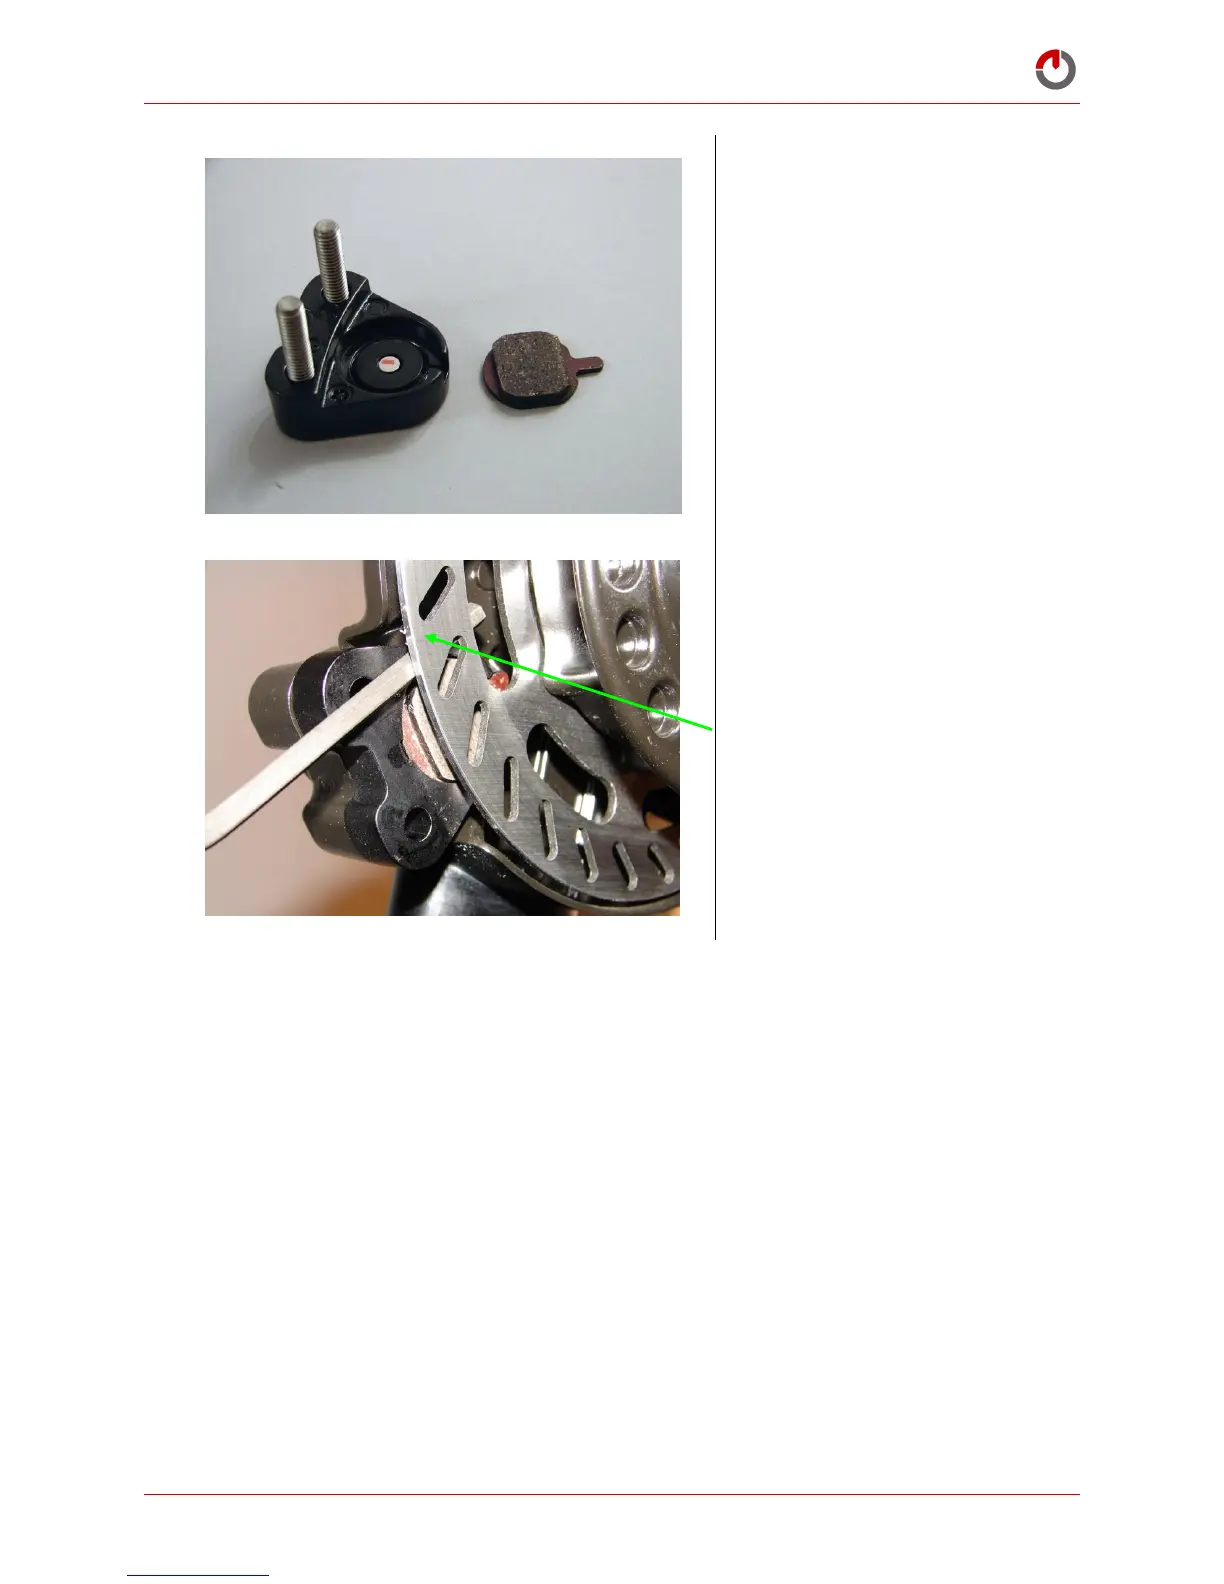
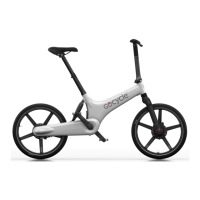
Figure 9-
22
Figure 9-
23
To remove the movin
g brak
e
pad, insert a scre
wdriver or
Allen key between
the disk
rotor and the callipe
r
housing. The disk
rotor is a
‘
floating
’
rotor design
will lift
away from the pa
d when you
apply a parting ac
tion to the
screwdriver.
80
82
Table of Contents
Main Page
Default Chapter
2
Table of Contents
2
1 Warranty
4
2 Gocycle Frame Number
5
3 Disclaimer, Copyrights and Trademarks
6
Disclaimer
6
Copyright Notice
6
Trademarks
6
4 Safety
7
Intended Use
7
Maximum Design Limit: Rider and Luggage Not to Exceed 100Kg (220Lbs)
7
Limited Life Span
7
Attaching the Front and Rear Reflectors
7
Fit Front and Rear Lights if Riding in Low Light Conditions
8
Wear a Helmet
8
No-Hands' Riding
8
Wet Weather Riding
8
Tools Required for Maintenance (no Tools Required for Assembly)
8
Pre-Ride Checklist
9
5 Recommended Assembly Sequence
11
Unpacking
11
Fitting the Handlebar Stem
11
Handlebar Stem
12
Fitting the Seat Post
15
Unfolding the Frame
17
Fitting the Front Fork Assembly
20
Attaching the Pitstopwheel
23
Fitting the Rear Mudguard
25
Attaching the Front Brake
27
6 Fitting the Front and Rear Reflectors
29
Small Parts Bag
29
Rear Reflector
29
Front Reflector
30
7 Adjusting Seat and Handlebar Position
32
Seat Height
32
Handlebar Stem Height
33
Handlebar Reach Position
37
Adjusting the Handlebar Stem Quick-Release Tension
38
Quick-Fold Handlebar Position
39
8 Fitting the Accessories
40
Empower Pack: Battery
40
Empower Pack: Charging
43
Empower Pack: Operation
45
Attaching the Mudguards
47
Lightweight Display Stand
48
Antitheft Bolts for Pitstopwheel
48
Shocklock
49
Front and Rear Safety Lights
50
Front Pannier Rod
54
Fitting the Rear Luggage Arm
57
Fitting the Heavy-Duty Kickstand
60
Fitting Ortlieb ® Luggage
61
Soft Bag
64
Hard Case
66
9 Maintenance and Adjustments
68
Maintenance and Service Centre Location
68
Service Interval
68
Water and Cleaning
68
Checking for Cracking and Fatigue Failures
69
Adjusting the Shifting
71
Adjusting the Brakes
72
Adding Brake Ferrules to Compensate for Cable Stretch
76
Replacing the Brake Pads
79
Adjusting the Bottom Bracket
84
Adjusting the Pitstopwheel
86
Tyres
89
Seat Rotation
90
Adjusting the Headset
91
Adjusting the Bearings on the Rear Hub
92
Other manuals for Gocycle G1
Service Notices
3 pages
Related product manuals
Gocycle G3
101 pages
Gocycle GS
69 pages
Gocycle G2
91 pages
Gocycle G2 Gear Servo
33 pages


 To Next Page