308553 23
Service
Diaphragm Repair
Tools Required
D Torque wrench
D One 7/16” (11 mm) and two 1/2” (13 mm)
socket wrenches
D Phillips screwdriver
D O-ring pick
D 13/32” EZY-OUT bearing extractor
D Rubber mallet
D Vise with soft jaws
Disassembly
NOTE: A Fluid Section Repair Kit is available. See
page 27 for the correct kit. Parts included in the kit are
marked with an asterisk, for example (401*). Use all
the parts in the kit for the best results.
WARNING
To reduce the risk of serious injury whenever you
are instructed to relieve pressure, always follow the
Pressure Relief Procedure on page 11.
1. Relieve the pressure. Disconnect all hoses.
2. Remove the air valve from the pump (see page
16).
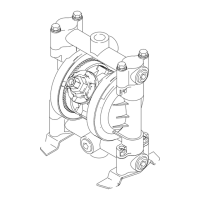
3. Remove the manifolds (102) and disassemble the
ball check valves as explained on page 21. Always
replace the o-rings (108) with new ones.
4. Using a 7/16” socket wrench, remove the clamp
nuts (113) and the grounding strip (112). Loosen
the clamps (111) and slip them over the housing
(1). Pull the covers (101) off the pump, then
remove the clamps from the housing. See the
Detail in Fig. 16.
5. Using a 1/2” socket wrench on both outer dia-
phragm plates (103), unscrew one plate from the
diaphragm shaft (23). Remove one diaphragm
(401), inner diaphragm plate (118), and o-ring
(404). Pull the opposite diaphragm assembly and
the diaphragm shaft out of the pump housing (1).
See Fig. 16. Clamp the shaft in a vise with soft
jaws and unscrew the outer plate (103), then
disassemble the remaining diaphragm assembly.
6. Inspect the diaphragm shaft (23}) for wear or
scratches. If it is damaged, check the bearings
(31}) also. Replace parts as needed. To remove
the bearings, place a 13/32 EZY-OUT in a vise.
Position the pump housing (1) over the EZY-OUT
(see Fig. 16). Turn the housing in the direction
shown by the arrows to remove the bearing.
7. Hook the shaft seals (30}) with an o-ring pick and
pull them out of the housing (1).
8. Clean all parts and inspect for wear or damage.
Replace parts as needed.