Page 153
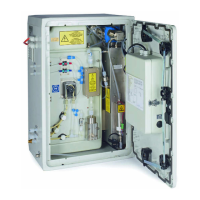
Using the Simulate menu (see Section 8.1.2 Simulate for details) and referring to figure 1 and table
2 in Section 4.1.1 Analysis Enclosure, check and confirm that the valves are operating and there
are no leaks:
Check Sample (ARS) Valve, MV4 rotation from sensor 1 (SEN1) to sensor 2 (SEN2) to sensor 3
(SEN3) and to (SEN4) positions.
Check Sample Out Valve, MV5. When the valve is activated, the LED on the valve should be on.
Check Exhaust Valve, MV1. When the valve is activated, the LED on the valve should be on.
Check TOC Acid Valve, MV6. When the valve is activated, the LED on the valve should be on.
Check Base Valve, P2. When the valve is activated, the LED on the valve should be on.
Check Injection Valve, MV7. When the valve is activated, the LED on the valve should be on.
Check all the other valves (e.g. multi-stream valves) if installed in the BioTector.
Check and confirm that MANUAL/CALIBRATION ports are not blocked or isolated.
Check the oxygen/ozone inlet port at the bottom of the Mixer Reactor for build-up of salts. Clean
the inlet tube if necessary.
Remove Ozone Line Filter and wash it with DIW (or tap water). Dry the filter well and reinstall in
place. See figure 1 and 4 in Sections 4.1.1 Analysis Enclosure and 4.2.2 BioTector
Sample Injection for details.
Using the Simulate menu (see Section 8.1.2 Simulate for details) and referring to figure 1 and table
2 in Section 4.1.1 Analysis Enclosure, check and confirm that the peristaltic pumps are pumping
correctly. The pump rate measurements are used to confirm that the correct tubing has been installed in
the appropriate pump.
Remove the nut at the T fitting located between the Mixer Reactor and the Sample Out Valve.
See figure 4 in Section 4.2.2 BioTector Sample Injection for details. Place a small container
under the reactor and place the open end of the tubing coming from the reactor into the container
to capture any liquid discharged. Place a 10ml graduated cylinder under the open end of the T
fitting. Activate the Acid Valve and run the Acid Pump. Acid Pump rate for SR25 Pump at 20
pulses should be between 3.9ml and 4.9ml in ~13 seconds. (Depending on the quantity of the liquid
injected into the reactor and due to an internal system interlock, the system may request the activation of
Reactor Purge cycle to purge any excess liquid from the reactor. If necessary run “REACTOR PURGE”
function in the Simulate menu.)
Activate the Base Valve and run the Base Pump rate for SR25 Pump at 20 pulses should be
between 3.9ml and 4.9ml in ~13 seconds. Reconnect the tubing and fittings.
Important Note: For the correct operation of the system, the measured Acid and Base Pump rates must
be identical or similar. The maximum allowable difference in the measured volumes for acid and base
injections above should not be more than 0.2ml.
Sample Pump rate for WMM60 Pump at 16 pulses should be between 5.5ml and 7.5ml in ~8
seconds. (Any variation between these pumped volumes is corrected when the zero and span calibration is
carried out.)
Replace the 149mm filter mats in fan and vent housing (see item AI in service kit).
Check the operation of the fan. (Note that at temperatures below 25°C, BioTector automatically switches
the fan off to stabilize system temperature using its own internal heat.)
Check the operation of the Ozone Generator Fan, which is located inside the Ozone Generator.
 Loading...