36
9.5 Kolben wieder einbauen
Zum Einbau die Zahnstange so ausrichten, dass
die Verzahnung zum Sichtfenster zeigt und unter
Drehen der Handräder nach hinten (Füll-Richtung)
die Zahnstange in das Getriebe einführen.
- Geräteoberteil auf Ventilblock mit
Zylinder aufstecken. Pfeil auf
Geräteoberteil mit linker Kante der
Markierung auf dem Chromring zur
Deckung bringen. Geräteoberteil 6 mm
bis zum ersten Anschlag auf
Ventilblock mit Zylinder einschieben
und bis zum rechten Anschlag drehen,
danach um weitere 6 mm zusammen-
schieben. Auslaufeinheit jetzt in
gewünschte Arbeitsposition bringen.
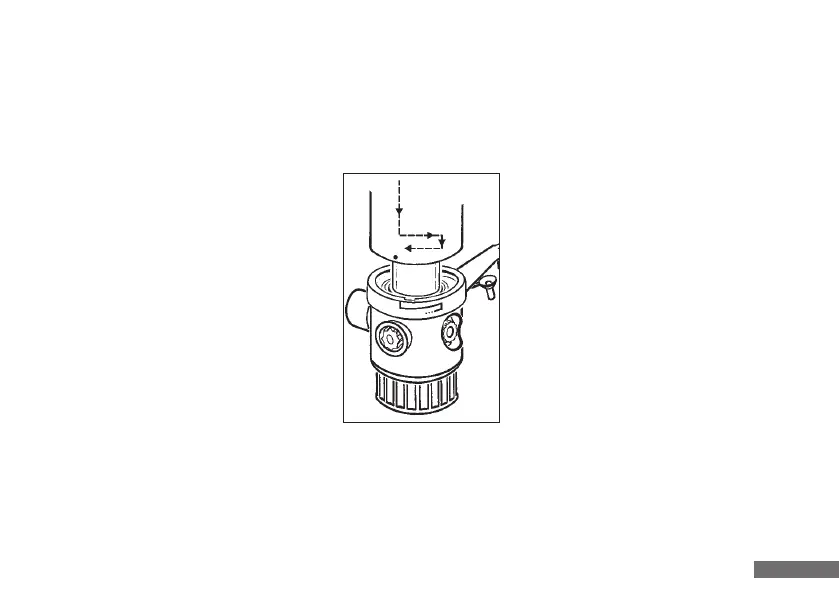
9.5 How to reassemble the piston
For assembly, align the toothed rack in such a
way, that the teeth face the view glass. Then turn
the hand wheels into the fill direction and guide
the rack into the gears.
- Place upper section of the device onto
the valve block with cylinder. The
arrow on the upper part must align
with the left edge of the marking on
the chrome ring. Slide upper section
6 mm onto valve block with cylinder
until stop, then rotate to the right
until movement stops and push down
another 6 mm. Finally move discharge
tube to the desired working position
(arrow should no longer be aligned
with the right edge of the chrome
ring) to lock the mechanism.
- 36 -
For assembly, align the toothed rack in such a
way, that the teeth face the view glass. Then turn
the hand wheels into the Fill direction and guide
the rack into the gears.
- Place upper section of the device onto
the valve block with cylinder. The
arrow on the upper part must align
with the left edge of the marking on
the chrome ring. Slide upper section
6 mm onto valve block with cylinder
until stop, then rotate to the right
until movement stops and push down
another 6 mm. Finally move dischar-
ge tube to the desired working positi-
on (arrow should no longer be alig-
ned with the right edge of the chrome
ring) to lock the mechanism.
Zum Einbau die Zahnstange so ausrichten, dass
die Verzahnung zum Sichtfenster zeigt und unter
Drehen der Handräder nach hinten (Füll-Richtung)
die Zahnstange in das Getriebe einführen.
- Geräteoberteil auf Ventilblock mit
Zylinder aufstecken. Pfeil auf
Geräteoberteil mit linker Kante der
Markierung auf dem Chromring zur
Deckung bringen. Geräteoberteil 6mm
bis zum ersten Anschlag auf
Ventilblock mit Zylinder einschieben
und bis zum rechten Anschlag drehen,
danach um weitere 6 mm zusammen-
schieben. Auslaufeinheit jetzt in
gewünschte Arbeitsposition bringen.