PRIMUSr 1000 Integrated Avionics System
A28--1146--112--00
C--13
PRIMUS
â
II Radio System
VHF Communications Transceiver Operation
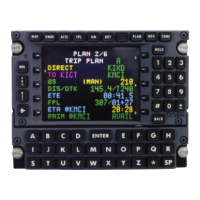
The COM frequencyselect isin theupper leftcornerofthescreen.The
COMwindowhasthreelines,allassociatedwithfrequency.Thetopline
displays the active frequency of the COM, while the second line
displays either the memory frequency or a scratchpad frequency,
depending on the last operation by the pilot.
Pushing the line select key associated with the lower (preset) COM
frequency display encloses the present frequency with the yellow
cursor box. Rotating thetuning knobs changes the preset frequency. If
it is necessary to store the preset frequency, push the STO key. The
COM storage mnemonics change to show the memory location.
Pushing the same line select key a second time encloses the storage
mnemonics with the yellow cursor box. Rotating the tuning knob
progresses through the stored COM frequencies by memory location
number. As each memory location (channel) is selected, the stored
frequency is shown in the COM preset area.
Storing overwrites anything previously in the memory location. When
overwriting occurs, the nomenclature beneath the bottom COM
frequency changes back to MEMORY.
Pushing the upper left transfer keyon the RMU bezel(YyB), swaps the
preset frequency and the active frequency location and function. This
switches the COM so it channels the new active frequency(previously,
the preset frequency). At the same time, the frequency in the active
portion of the window drops down to the second line and becomes the
presetfrequency, labelledTEMP (asif thepilot hadchangedthepreset
frequency with the tuning knobs). The new frequency can be stored,
using the STO button, or it can be modified to a new preset frequency
using the tuning knobs. If required, the new frequency can also be left
in the scratchpad for instant recall.
BASIC COM TUNING
After completing power onself--test, the RMU displaysthe main tuning
page, as shown in figure C--6. The data configuration is the same as it
was before the last power down.
Normally, the cursor is parked at the COM preset window. If not,
pushingthelineselectkeyalongsidetheCOMpreselect windowmoves
the cursor to that window. Thisaction connects the tuningknobs tothe
COM preset frequency.
 Loading...