28
Inputs – Using Photocells and Photocell Settings
CX Panel Photocells are dened as “Open Loop” sensors. Open Loop sensors operate such that the photo sensor views daylight
directly and does not respond to or “see” the electric light that it controls. This means the actual value displayed on the CX Panel
User interface AND the ON and OFF set points programmed for the Inputs ARE NOT THE ACTUAL light levels in the space. They
are relative values used to turn lights ON and OFF at appropriate times to use available daylight.
Additionally, to make using the photocells easier the CX Panel has the values defaulted to 0-100%. The panel can be programmed
to allow settings to be made in foot-candles based on the photocell internal jumper settings if desired. Using the default 0-100%
values can help to disassociate the reading as actual room design foot-candles.
Placement of the photocell has signicant ramications to the ability to get the system set properly. The following are guidelines to
help in developing the optimum energy savings:
• Outdoor Photocell – The LUXSTATLSO should be mounted on a vertical north facing surface on the rooftop with the
lens portion of the head facing up. Care should be given to place the photocell where it has a clear view to the horizon
and is not obstructed by trees, rooftop equipment or other close by buildings.
• Indoor Photocells – The LUXSTATLS should be mounted on the ceiling with the lens facing windows. The photocell
should have a clear view and be located at a distance from the window created by a view line at 45° from the lens to
the center of the glass. Care should be taken to be sure that indirect light xtures do not emit light energy directly into
the photocell. When placing photocells in skylight cells mount the head on the north facing vertical surface with the lens
facing up. Be sure the head is positioned that it does not receive direct sunlight.
Photocell Control with ON/OFF Functionality Only
For xtures that do not dim and require photocell control the CX Panel can turn the relays on/off based on daylight contribution.
Prior to programming the photocell settings create your Group as instructed in the Group section. This will be the relay or collection
of relays that will be turned on/off based on the settings below.
• From the Main Menu, select Inputs. Then press the ENTER key.
• Select Input – Scroll to an Input to program. Select any of the Inputs available based
on the CX Panel system. NOTE: All Inputs that are connected to the system will be
present and visible by continuously scrolling up and down. When highlighted, press
the ENTER key or the F1 key to select an Input.
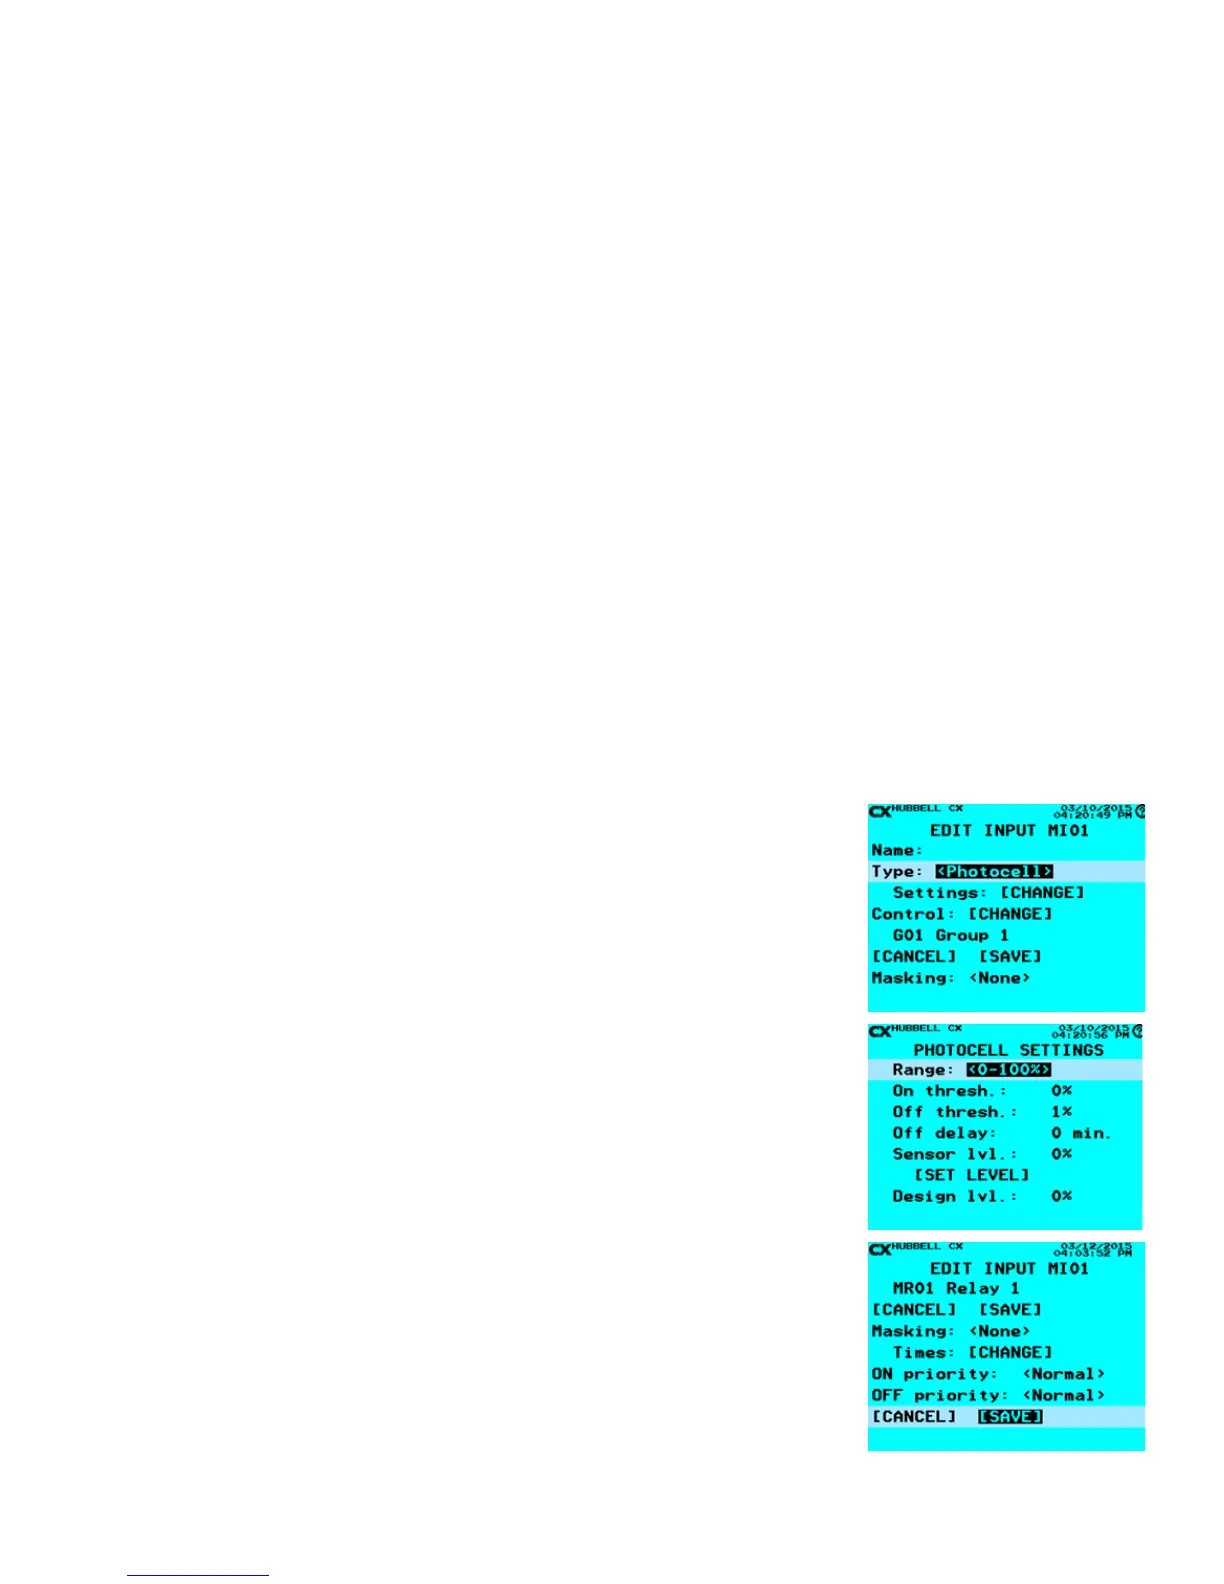
• From the EDIT INPUT Screen, after deciding and editing the Name:, scroll to Type:
and choose, (left or right), <Photocell>.
• Scroll to Settings: [CHANGE], then press the ENTER key.
• Once inside the Settings select the Range: (left or right), 0-100%, 0.3-30ft-c, 3-300ft-
c, and 30-3000ft-c, 50-750ft-c, and 60-6000ft-c, 200-2500ft-c, 1000-7500ft-c, based
on the photosensor’s range conguration.
• Scroll down to choose the On thresh: (Threshold) – The light level below which the
photocell will turn the lights ON. This is a numerical value that must be entered by the
alphanumerical keypad.
• Scroll down to choose the Off thresh: (Threshold) - The light level above which the
photocell will turn the lights OFF. This is a numerical value that must be entered by
the alphanumerical keypad.
• Scroll down to the choose Off delay: - This numerical value, (in minutes) is to
determine how long the photo sensor must see the ambient light above the OFF
threshold for this amount of time before the light will be turned OFF.
• When nished, scroll down to highlight [SAVE], and then press ENTER to save your
settings.
• Once back in the Edit Input screen scroll down to Control: [CHANGE] and select your
Relay, Group or Preset that you would like the Photo Sensor to control.
• If Masking or Priorities are needed ll out accordingly, (see Masking and Priorities
sections).
• When nished, scroll down to highlight [SAVE], and then press ENTER to save your
photocell settings.
 Loading...