32
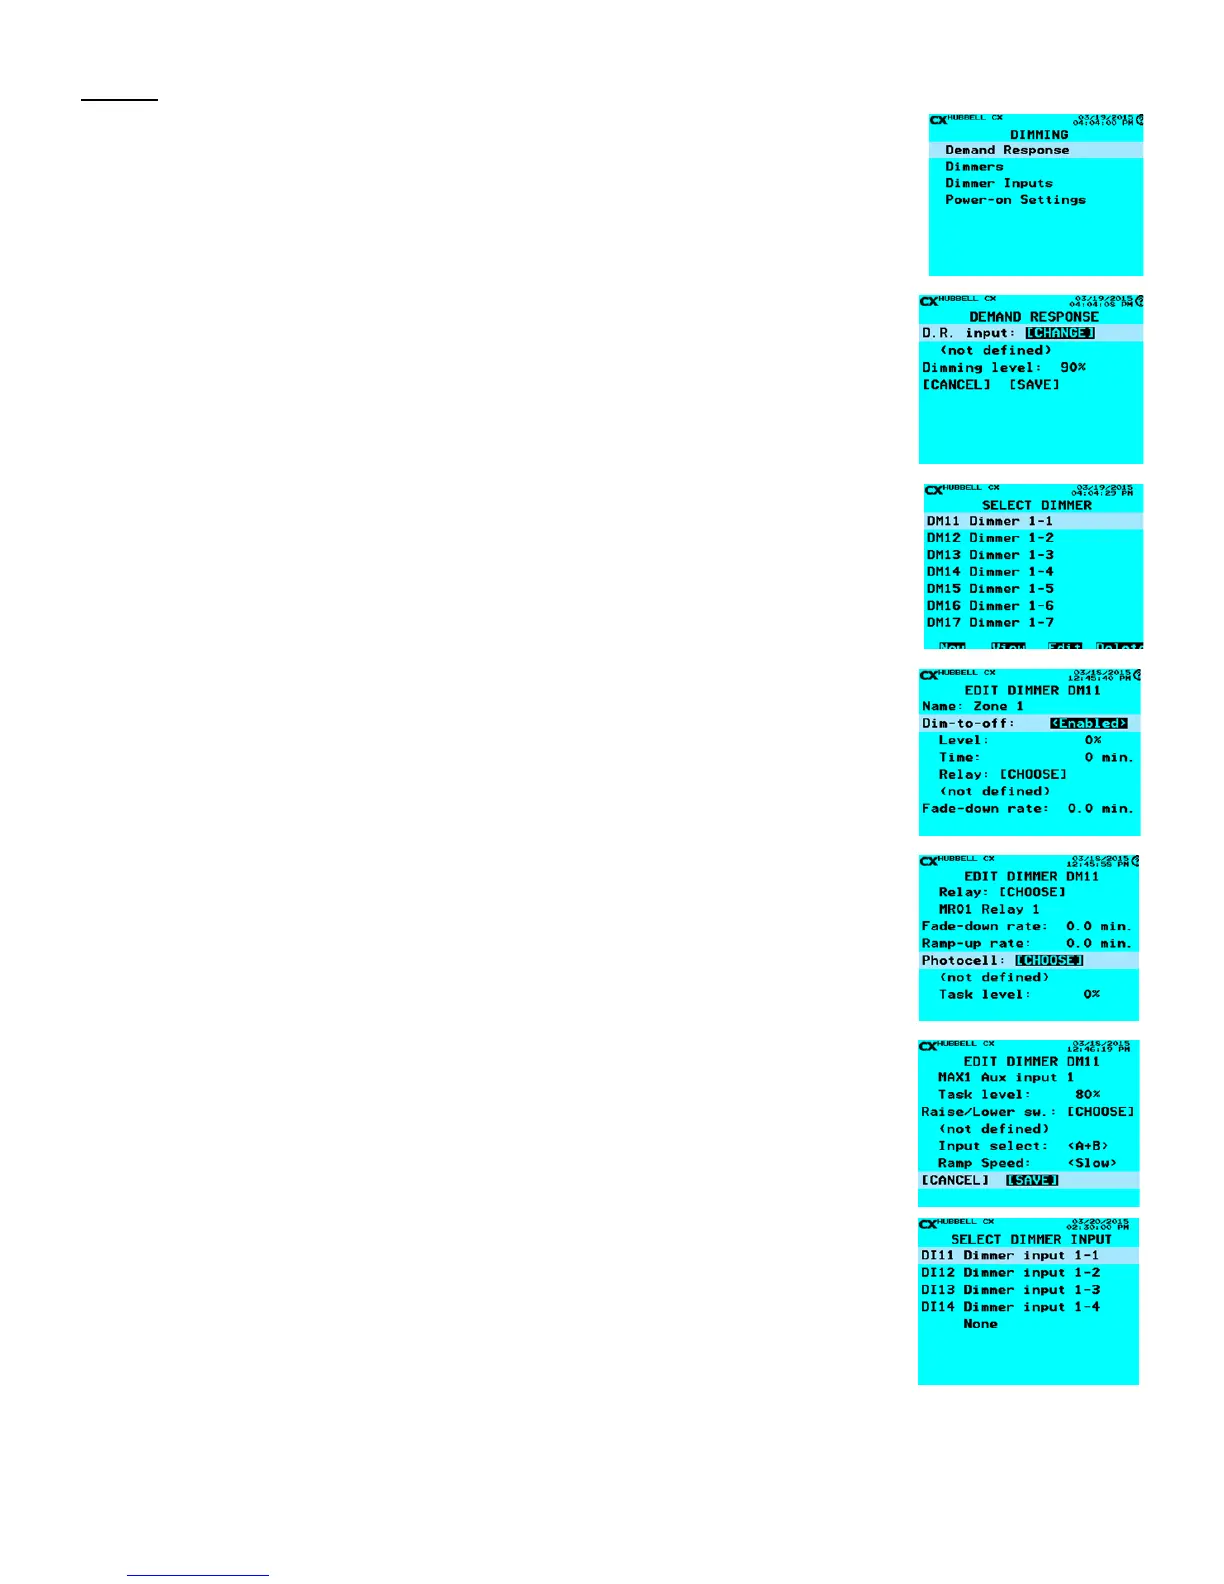
Dimming
In the Main Menu scroll down to Dimming and press the ENTER key. Once in the DIMMING menu there
are four choices.
Demand Response - Congures the Demand Response settings.
Dimmers – Congures the dimmer outputs.
Dimmer Inputs – Congures dimmer inputs
Power-on Settings – Denes power-on state of dimmers that do not have a photocell congured.
Dimmers can be set to zero or maximum level or to the last dimming level when power was removed.
Demand Response
The purpose of Demand Response is to accept a signal, (contact closure), from a power/Utility
company and to translate the signal into dimming all channels of the CX panel to conserve energy
consumption. When Demand Response is selected there are two settings to set.
• D.R. input: [CHANGE] – Choose the Input that will be receiving the dry contracts from the
power/utility company to override and dim all Dimmers to the specied level. This can be any
Input whether on a relay card or an auxiliary input.
• Dimming Level: - Using the alphanumeric keypad, enter the percentage value required by the
power/utility company for the Dimmers to maintain when the power/utility signal is triggered.
Note if a Dimmer is at a dimmed level lower than the percentage dened, then that Dimmer(s)
will not be affected when the Demand Response is triggered.
• Scroll down to [SAVE] and press the ENTER.
Dimmers
Dimmers refers to the 0-10V dimming channels, (8 per Dimming Card). These settings in the Dimmers
are to work with Photocell Control and switch stations that are connected via the CAT5 cable into the
Dimming Card.
• From the Main Menu select Dimming and press the ENTER on the keypad.
• Scroll to Dimmers and press ENTER
• Scroll to the Dimmer channel that will need to be programmed and press ENTER on the
keypad or F3 to Edit the selected Dimmer channel.
• Dim-to-off: - (left or right) This feature, when enabled, allows the Relay or Group selected to
turn off when the photocell dims the xtures to a percentage level for a set amount of time in
minutes. If the dim loads are not to turn off due to the photo sensor level then this section will
not be programmed <Disabled>.
• Level: - The percentage, 0-100%, that the Dim-to-off will function. This is a numerical value
entered by the alphanumeric keypad.
• Time: - This is the length of time in minutes that the relay or group selected will turn Off
after the Level: has been maintained. This is a numerical value entered by the alphanumeric
keypad.
• Relay: [CHOOSE] When selected this will show the list of Relays and Groups available.
Simply highlight the Relay or Group and press ENTER.
• Fade-down rate: - This is the time, (in minutes), it takes to dim from 100% to 0% using
daylight harvesting.
• Ramp-up rate: - This is the time, (in minutes), it would take to dim from 0% to 100% using
daylight harvesting.
• Photocell: [CHOOSE] – When this is selected the user will choose the Input that has the
associated photocell that will be used to determine the appropriate dimmed level for the
Dimmer.
• Task level: - This value is a percentage value at Task, (work plane), that will determine the
calculation to maintain the dimmed level of the Dimmer.
• Scroll to Raise/Lower sw: [CHOOSE] and press the ENTER key. This will take the user to
the Dimmer Input section to dene what input will have the Raise/Lower switch attached. The
Raise/Lower switch is not programmed in the Dimmer Input section.
• Input select : (x+x) - scroll left/right to dene the Raise/Lower switch input type. (Typically C+D)
• Ramp Speed: - Selects the speed for the raise/lower dimming control: (Slow = 10 seconds, Medium = 8 seconds and Fast =
5 seconds.)
• When complete scroll down to [SAVE] and press the ENTER on the keypad.
 Loading...