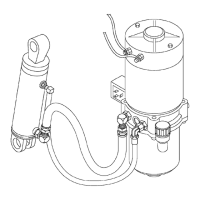
1900 SRM 964 Lift Pump and Motor
Legend for Figure 10
1. LIFT PUMP MOTO
R
2. COUPLING
3. LIFT PUMP
4. CLAMP
5. TUBE
6. CLAMP
7. STRAINER
8. SCREEN
9. RETAINER
10. O-RING
11. BREATHER/FILLER CAP
12. FLAT SEAL
13. FILLER ELBOW
14. RESERVOIR
15. CAPSCREW
16. WASHER
17. TWO-PIECE CLAM
P
18. RELIEF VALVE
19. CAPSCREW
20. WASHER
21. LOWERING VALVE COIL
22. LOWERING VALVE CARTRIDGE
23. O-RING
24. O-RING
25. LOWERING ORIFICE
Remove Pump Moto
r
B60Z, B60Z
AC
,C6
0Z, C60Z
AC
,andW60Z
1. Lift the motor aw
ay from the pump assembly.
2. Inspect the moto
r output shaft, the pump input
shaft, and the co
upling. Replace worn or dam-
aged parts.
B80Z, B80Z
AC
,C
80Z, C80Z
AC
, W65Z, and W80Z
1. Remove the two c
apscrews from top of motor.
2. Lift the motor f
rom the pump assembly.
3. Inspect the moto
r output shaft, the pump input
shaft, and the c
oupling. Replace worn or dam-
aged parts.
Disassemble P
ump
B60Z, B60Z
AC
,C
60Z, C60Z
AC
,andW60Z
1. Remove the clam
p retaining the inlet tube to the
pump.
2. Remove the inlet
tube and strainer by pulling
down and out.
3. Remove the lower
ing valve. See Lowering Valve,
Remove.
4. Remove the reli
ef valve. See Relief Valve, Re-
move.
B80Z, B80Z
AC
,C
80Z, C80Z
AC
, W65Z, and W80Z
1. Tag and identif
y each tube with their correspond-
ing location.
2. Remove tubes an
d associated items from the bot-
tom of pump.
3. Remove the lowe
ring valve from pump assembly.
See Lowering Va
lve, Remove.
4. Remove the chec
k valve from pump assembly.
See Valve Repa
ir, Remove.
5. Remove the rel
ief valve from pump assembly.
See Relief Val
ve, Remove.
13