1900 SRM 964 Drive Unit Compartment Covers
Hydraulic Reservoir
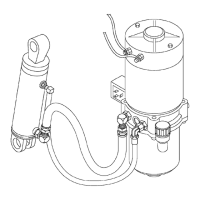
DESCRIPTION
The hydraulic reservoir is made of a durable,
translucent plastic that allows the operator to see
how much hydraulic oil is in the reservoir. The
reservoir is clamped to the adapter plate on the
bottom of the pump and motor assembly in the drive
unit compartment. The reservoir has MIN and MAX
marks on the side. With the truck on level surface,
the forks lowered completely, and the oil at room
temperature, the reservoir should be filled to the
MIN mark. See Table 1.
Table 1. Hydraulic Reservoir
Model Reservoir Markings Reservoir Capacity
B60Z, B60Z
AC
,C60Z,C60Z
AC
, and W60Z MIN and MAX
MIN: 0.71 liter (0.75 qt)
B80Z, B80Z
AC
, C80Z, C80Z
AC
, W65Z, and W80Z MIN and MAX
MIN: 0.85 liter (0.90 qt)
Drive Unit Compartment Covers
C60Z, C80Z, C60Z
AC
, AND C80Z
AC
Many procedures will require access to the drive unit
compartment. The drive unit compartment is located
at the front of the truck, in front of the battery and
below the control handle assembly. Two covers must
be removed to access the drive unit compartment.
The covers must be correctly reinstalled to protect
the electrical system and other components housed
in the drive unit compartment. See Figure 6.
Remove
1. Move the lift truck to a safe and level area.
2. Lower the forks completely to relieve pressure
from the hydraulic system.
3. Turn the key switch to the OFF position and dis-
connect battery.
4. Block load wheels to prevent lift truck from mov-
ing. Refer to the section Periodic Maintenance
8000 SRM 1032 or Periodic Maintenance 8000
SRM 1368 - How to Put A Lift Truck on Blocks.
5. Remove the three screws retaining the lower
cover to the truck.
6. Lift the lower cover from the drive unit compart-
ment.
7. Pull the bottom edge on one side of the upper
cover from the drive unit compartment. Con-
tinue pulling around the edge of the cover until
completely free of the truck.
Install
1. Place the top corners of the upper cover into the
retaining clips in the drive unit compartment.
SeeFigure6.
2. Working around each side, bump the cover into
place using the heel of the hand or a rubber ham-
mer.
3. Place the lower cover into the bottom of the drive
unit compartment. Align the clip nuts with the
cover holes.
4. Secure lower cover into place using three screws.
7