47
MAINTENANCE
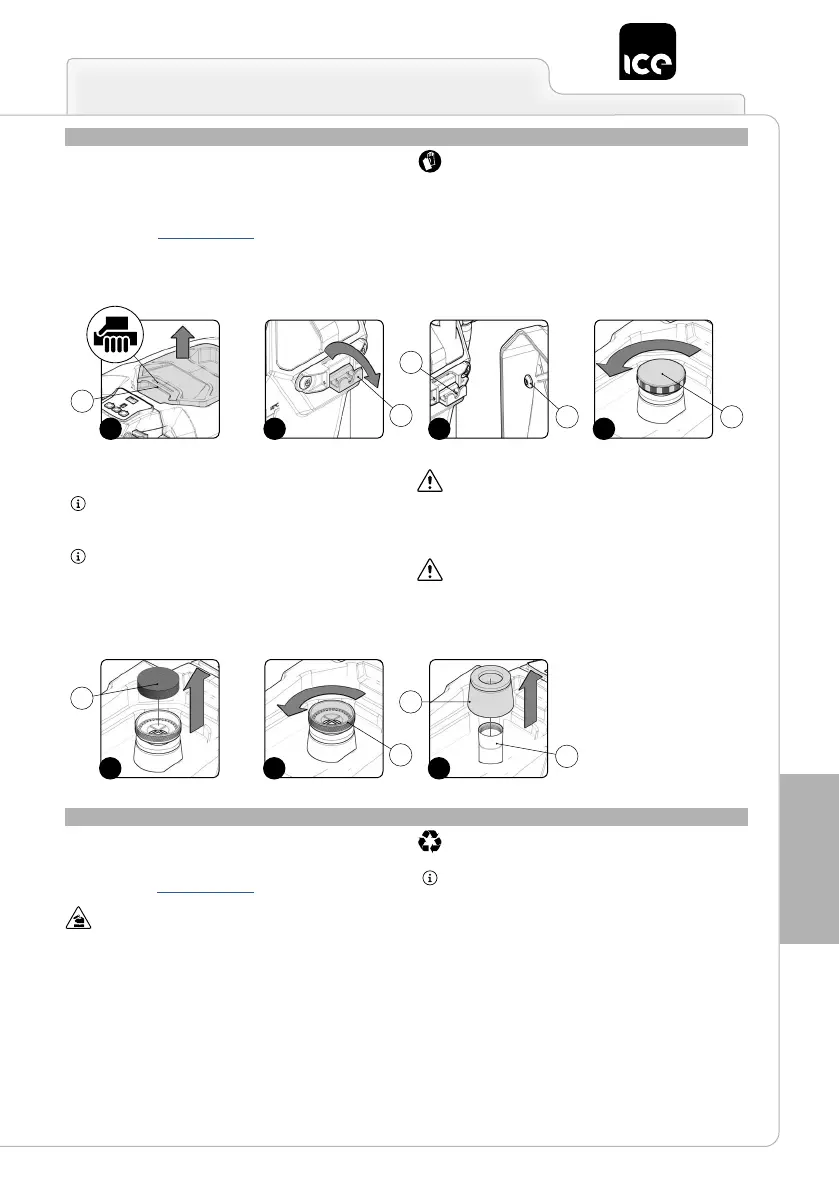
CHECKING AND CLEANING THE RECOVERY TANK FILTER-FLOAT
Careful cleaning of the recovery tank lter-oat guarantees better
cleaning of the oor as well as a longer vacuum motor lifespan.
Proceed as follows to clean the recovery tank lter-oat:
1. Take the device to the dedicated maintenance area.
2. Take all necessary steps to ensure that the device is in a safe
condition (see "MACHINE SAFETY’”).
ATTENTION: users are advised to always wear protective
gloves, to avoid the risk of serious injury to hands.
3. Grip the handle (1) on the back of the recovery tank cover and
remove it (Fig.1).
4. Rotate the recovery tank cover support (2). The optional support
is positioned on the left side of the appliance (Fig.2).
5. Insert the clamp (3) of the recovery tank cover in the slot (4) on
the recovery tank cover support (Fig.3).
6. Remove the oat cover (5), turning it in the direction of the arrow
(Fig.4).
7. Remove the vacuum lter (6) and clean it (Fig.5).
ATTENTION: you are advised to use a jet of air to remove the
impurities before cleaning the lter. Position the lter at least
20cm from the air jet.
ATTENTION: do not use highly corrosive products to clean
the lter, to avoid damaging it.
8. Remove the upper part of the oat (7), turning it in the direction
of the arrow (Fig.6).
ATTENTION: when removing the upper part of the oat, be
very careful not to remove the lower part as well (8) (Fig.7).
9. Remove the oat (9) (Fig.7). Rinse the inside with a jet of
water. If necessary, use a spatula to remove the sludge that has
accumulated at the bottom of the oat.
ATTENTION: if the polyurethane ring (10) on the oat (Fig.7)
is damaged or excessively worn, contact your nearest
assistance centre.
10. Repeat the operations in reverse order to reassemble all the
parts.
CHECKING AND CLEANING THE SOLUTION TANK
Proceed as follows to empty the solution tank:
1. Take the device to the dedicated maintenance area.
2. Take all necessary steps to ensure that the device is in a safe
condition (see “MACHINE SAFETY”).
ATTENTION: users are advised to always wear protective
gloves, to avoid the risk of serious injury to hands.
3. Close the ow from the tap on the back of the appliance by pulling
the tap command knob (1) on the back of the appliance upwards
(Fig.1).
4. Remove the solution tank level tube from its seat (2), empty the
solution tank (Fig.2).
ATTENTION: the place designated for this operation must
comply with current environmental protection regulations.
ATTENTION: Before removing the solution tank level tube
from its seat (2), close the drainage cap on the tube itself.
5. To facilitate the outow of water from the solution tank, remove
the solution tank water inlet cap (3) on the left side of the
appliance (Fig.3).
6. Remove the solution tank drainage cap (4) from its seat,
unscrewing it in the direction of the arrow (Fig.4).
7. Repeat the operations in reverse order to reassemble all the
parts.
3 421
1
4
3 5
2
765
6
9
8
7