Service
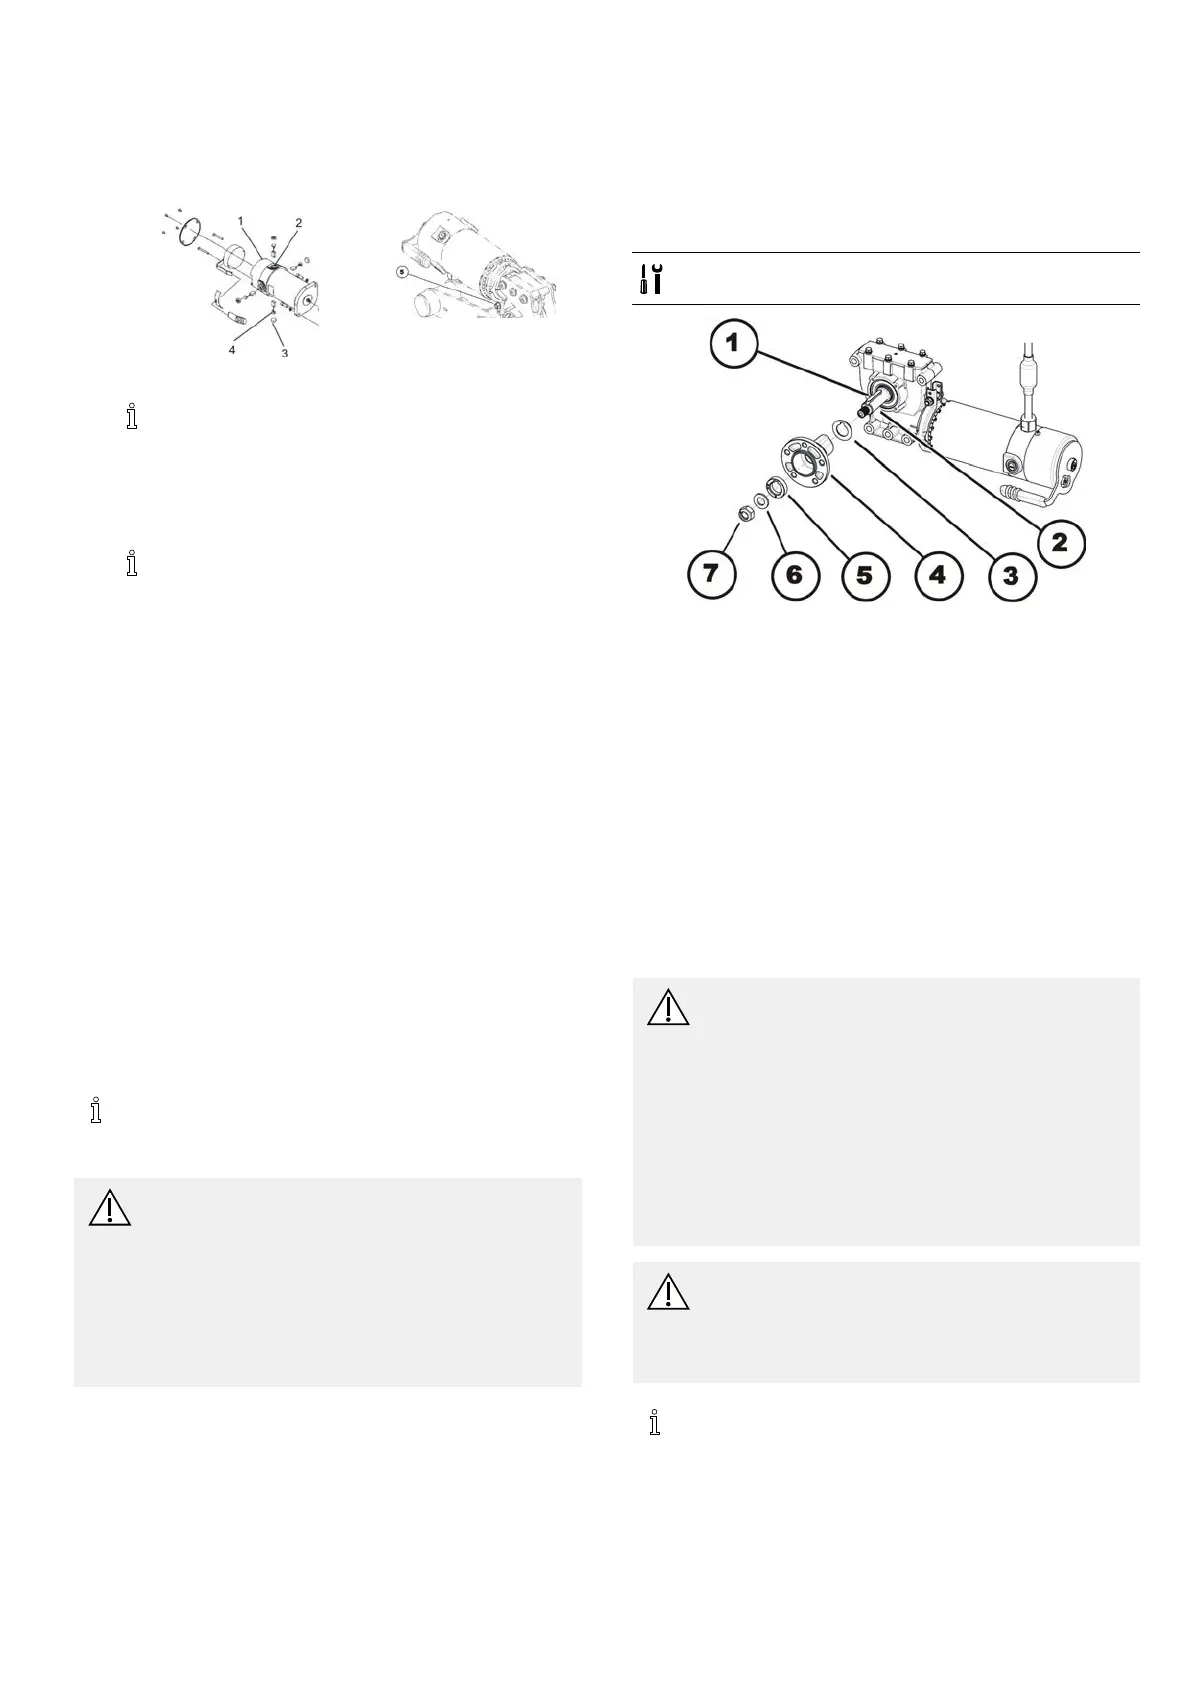
Removingcarbonbrushes
1.Turnoffmobilitydevice.
2.Removedrivewheelsasdescribedin6.5.6Replacing
drivewheel,page26.
3.Disengagemotor(1)bysettingengagingleverto"Push".
IncaseofSSDmotor,loosennut(5),thenturn
motoraroundsothatyoucanaccessrearcarbon
brusheseasier.
4.Removeallfourplasticcaps(3)withatscrewdriver .
5.Pullcarbonbrushes(4)alittleoutofbrushholder .Note
xingpositionandlocationofcarbonbrushes.
Ifcarbonbrusheswerecheckedbutnotreplaced,
youmustknowtheirexactttingposition.Used
carbonbrushesneedtoberettedexactlyinthe
samepositionfromwhichtheyweretakento
guaranteeoptimumcontacttocollector.
6.Makeamarkingonmotorandcarbonbrushesto
guaranteecorrectinstallation.
7.Removecarbonbrushescompletelyfrommounting(2).
8.Testcarbonbrushesandspringsforlevelofwear,broken
componentsordiscoloration.
Installingcarbonbrushes
1.Dependingonconditionofbrushesandspring:
•eitherre-insertbrushesinexactlysameposition
fromwhichtheyweretakenor
•tnewbrushes.
2.Replaceplasticcapsandtightenthem.
3.InstalltopwalkingbeamsasdescribedinInstallingtop
walkingbeam,page17.
4.InstallbottomwalkingbeamsasdescribedinBottom
walkingbeam,page17.
5.Installdrivewheelsasdescribedin6.5.6Replacingdrive
wheel,page26.
Toguaranteemaximumperformanceafter
replacementtreatcarbonbrushesaccordingto
followingprocedure.
CAUTION!
Riskofaccidents
Riskofinjurytoworkers,surroundingsand
mobilitydevice.
–Donotleavemobilitydeviceunattendedduring
followingprocedure.
–Makesurebothdrivewheelsareoffground
beforecalibrating.
–Securearea.
6.Liftmobilitydeviceupononesideandplacea14cm
highwoodenblockunderneathitsothatdrivewheelis
suspendedfreely.Useproperliftingtechniques.
7.Repeatsameprocedureonothersideofmobilitydevice.
8.Allowmotorstoruninforwarddirectionforanhour.
9.Allowmotorstocooldownfor30minutes.
10.Allowmotorstoruninreversedirectionforanhour.
11.Liftmobilitydeviceoffwoodenblocks.
6.4.6Replacingdrivewheelhub
•19mmwrench
Removingdrivewheelhub
1.Loosenandremovenut(7).
2.Removewasher(6).
3.Removedistancering(5).
4.Removewheelhub(4)fromaxle(2).
5.Removeshimrings(3).
6.Removefeatherkey(1)fromaxle.
Installingdrivewheelhub
1.Installdrivewheelhubpartsinreverseorder.
2.Usethinlmoflubricanttoeasierinstallwheelhub
onaxle.
3.Tightennuts(4)to60Nm.
6.4.7Replacingmotor/gearboxunit
CAUTION!
Riskofcrushing
Thewheelchairisveryheavy.Riskofinjuryto
handsandfeet.
–Useproperliftingtechniques.
Riskofinjuryduetouncontrolledmovementof
themobilitydevice
–Turnoffpower(ON-/OFFkey).
–Engagedrivemotors.
–Securemobilitydeviceagainstrollingawayby
placingwedgesunderwheels.
CAUTION!
Riskofcrushing
Motorgearboxunitisextremelyheavy.Riskof
injurytohands.
–Payattentiontoheavyweight.
DuraWattmotorsaremaintenance-free,dueto
lifetimebrushes.
1532486-L23





 To Next Page