IRIS MODEL 700/800 APPLICATION MANUAL
PAGE 8
the button labeled SET GAIN for two seconds and use
the INCREASE and DECREASE buttons. The gain is
live; changes are effective immediately, but if the dis-
played gain value is not stored (by pressing STORE),
and no other buttons are pressed, the processor returns
to the previous setting after four seconds. The older UV
viewing head always has a gain of 5, so “U5” is always
displayed. When an older UV viewing head is plugged
in, there is no response to a two second press of the
SET GAIN button.
The gain steps have a ratio of 1:1.19. Going from a gain of
5 to a gain of 9 doubles the gain; going from a gain of 5 to a
gain of 1 halves the gain.
If you have a Model 800 signal processor, then with a
programmer or a computer running the appropriate soft-
ware, the same functions as above are available, except
that “r7”, “u3” or “U5” are not displayed at power up.
ADJUSTMENT OF VH SIGHTING AND GAIN
The viewing head should be properly sighted in before
the set points are adjusted. Adjustment can be made
easier by a 1/2” swivel joint, which IRIS can supply if
one is not available. While the burner is firing, vary
the viewing angle while observing the green LED on
the connector at the rear of the viewing head. Adjust
the viewing angle for the maximum pulse rate, then
lock the swivel joint to preserve this mechanical set-
ting. If the LED pulse rate is very high or very low, see
the two paragraphs below. The locked mechanical set-
ting should still be correct when Model 700 viewing
heads are interchanged, because inside each Model 700
viewing head the optical axis is aligned with the me-
chanical axis within ±1/4 degree. Also, the reading
shouldn’t change when a viewing head is rotated in the
mount.
For the above sighting adjustments to work properly,
the blinking rate of the green LED in the connector at
the rear of the viewing head must be reasonable. If the
displayed count is above 25, the pulses begin to blur
together, making changes in the pulse rate difficult to
observe. If the count is higher (29 or 30), then the view-
ing head is in saturation. Saturation means that the count
would like to be even higher, possibly 50 or more, but it
is internally clamped. With count rates in saturation or
close to saturation, an operator will not be able to
“wiggle” the viewing head in the swivel mount and maxi-
mize the count rate properly. It should be possible to
bring high count rates down to a useable level by de-
creasing the gain. If the gain is set to 1 and the count is
still 25 or higher, orificing is needed. See the section on
orificing below.
If the displayed count is less than 8 or 10, it will be diffi-
cult to maximize the count by aiming the viewing head,
because the pulses come through too infrequently. In this
case the gain should be increased. A count rate of around
16 to 20 is recommended. If the gain is set to a maxi-
mum and the count rate is still down around 5 or 6, the
system can still be made to work reliably as long as the
count rate drops significantly when the flame is removed.
Nevertheless, you should question the setup. Is the view-
ing head aimed properly? Is it seeing flame directly?
ORIFICING
If the displayed count is 25 or higher when the gain is
set to 1, an orificing disc inserted in the back end of
the mounting block is recommended. An orifice kit is
available as an inexpensive accessory from IRIS,
part number M-702-6s, for Model 700 and Model 800
viewing heads. Each kit contains a selection of
orifice discs and a snap ring to hold the selected disc
in place. Try to choose a disc that gives a reading of
12 to 24 at a low fire firing rate. The discs have a
range of orifice sizes; each size step results in about
a 2:1 change in the counts displayed.
MANUAL SETUP OF SET POINTS –
MODELS 700 & 800
The keypad of the Model 700 signal processor is used to
set the RELAY ON and RELAY OFF set points. The
following section describes this process. The following
section applies to the Model 800 signal processor as
well because it works like the Model 700 signal pro-
cessor.
To change the RELAY ON and RELAY OFF set points,
the keypad functions are still needed. These functions
are achieved using RS-232 serial communications
through the stereo phone jack on the front of the Model
800. You can use a remote keypad in one of two ways:
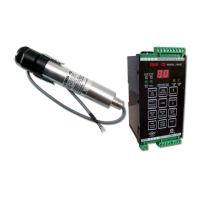
1) By using a setup programmer available from
IRIS Systems. This programmer looks and works
like the keypad on a Model 700 signal processor.
(Figure 15). A special cable is supplied with the
programmer.
2) By connecting the Model 800 signal processor
to a computer. The supplied software graphi-
cally simulates a keypad for the Model 800 on
the computer screen. Another special cable is
available to connect between the stereo phone
jack of the Model 800 and a male DB9 (9 pin)
serial port connector on the computer (Figure 13).