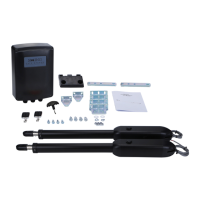
8. Installation Steps
8.1 Preparation Before Main Machine Installation
a) Before installing the gate opener, please confirm that the gates were installed correctly, please
ensure that the gate can be manually operated smoothly, and the gate safety stopper can effectively
prevent the gate to continue moving.
b) Please keep a distance of 45-50mm between the gate bottom and the ground for installing the
electric lock. If electric lock is not required, the distance between the gate bottom and the ground should
be ≥20mm;
c) The recommended mounting height of the 2 main machines is around 300 ~ 800mm above the
ground, and make sure there are reliable fixed points for mounting brackets.
8.1.1 Cable Bury
In order to ensure the normal operation of the gate opener and protect the cable from damage, please
use two PVC pipes to bury the motor and power cables, and the control cables separately. One PVC
pipe for motor and power cables, the other one for control cables.
8.1.2 Mounting Brackets Fixing
In order to install the SW300DC main machines firmly, it is recommended to use the expansion screws
to fix the mounting brackets.
8.2 Accessory Installation
A) Before installing the main machines, please install the wall bracket on the wall first, then fix the
connecting bracket, finally install the front mounting bracket on the gate.
Note: Please detect by gradienter before fixing to ensure that the front mounting bracket and the connecting
bracket are in the same level.
Connect the connecting bracket and two wall brackets, please refer to Figure 4.