Do you have a question about the JVC UX-A4 and is the answer not in the manual?
Critical safety advisories for repairers and maintenance regarding equipment safety standards.
Crucial safety information regarding the use of laser components and potential radiation hazards.
Information on identifying product labels and their placement on the unit.
Specific electrical safety guidelines for users in the United Kingdom, including plug and fuse replacement.
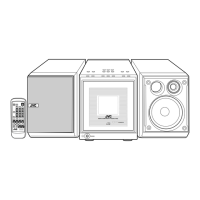
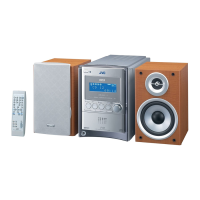
Details on CD player operation and identification of main unit controls.
Steps for installing batteries and initial setup of the remote control.
Guidelines for effective operation of the remote control, covering range and sensor usage.
Functionality for automatic power-on and playback initiation by selecting a source.
Steps for playing entire discs and basic playback controls like play, pause, and track selection.
Methods for stopping CD playback temporarily or completely using the /CLEAR button.
Using numbered buttons on the remote for direct track selection without pressing CD/II.
Locating specific points within a disc using fast-forward or reverse search functions.
Playing tracks in a random order on a disc using the RANDOM button.
Function to play the first few seconds of each track using the INTRO scan button.
Settings for FM stereo and mono reception to optimize broadcast quality.
Automatic tuning to the next available station by pressing UP or DOWN buttons.
Manually adjusting the tuner frequency step-by-step.
Manually saving specific radio stations to preset buttons for easy recall.
Instructions for connecting and adjusting the FM feeder and AM loop antennas.
How to record CDs onto tape, optimizing tape usage by calculating optimal length and dividing tracks.
Process for erasing content from pre-recorded tapes before making a new recording.
Step-by-step guide to setting the unit's internal clock accurately.
Procedure for configuring timer start time, stop time, and mode for automated operations.
Choosing the type of timer operation (CD, Tape, Tuner).
Adjusting the volume level for timer operations, including fade-in and fade-out.
Detailed steps for timer-based recording of radio programs, ensuring correct time and station settings.
Instructions for timer-activated playback of CDs, tapes, and broadcasts.
Location of parts within the tape deck and amplifier assembly, shown in diagrams.
Location of parts within the CD player and tuner assembly, shown in diagrams.
List of parts corresponding to the first analytic drawing, detailing part numbers and names.
Specific instructions for disassembling the front panel assembly, including connector and wire removal.
Steps for disassembling the power amplifier and supply assembly, including transformer and heat sink removal.
Steps for removing the unit's metal cover, detailing screw locations.
Instructions for disassembling the front panel, including wire and connector separation.
Specific steps for disassembling the CD player mechanism, including cover and wire removal.
Removal instructions for the tuner PC board, detailing connector and screw locations.
Removal instructions for the function PC board, detailing connector and screw locations.
Removal instructions for the operation key switch PC board from the front panel.
Parts list corresponding to the third analytic drawing, detailing part numbers, names, and quantities.
Instructions for removing the leaf switch board, detailing screw and pawl disengagement.
Parts list corresponding to the fourth analytic drawing, detailing part numbers, names, and quantities.
Steps for removing the pinch roller assemblies, detailing pawl and roller disengagement.
Procedures for removing the capstan motor and flywheel, including belt disengagement.
Instructions for removing the leaf switch board, detailing screw and pawl disengagement.
List of necessary tools and equipment for calibration and testing.
Important notes and precautions for performing testing and adjustment procedures.
Specific conditions, supply voltage, and reference output for amplifier adjustments.
Reference output and frequency conditions for radio section adjustments.
Default settings for operational switches like Tape Select and DOLBY NR.
Default settings for various controls including Beat Cut and Sound mode switches.
Default settings for volume, bass, and treble controls.
Key considerations for performing accurate adjustments, including capacitor and resistor connections.
The sequence for radio frequency alignment, including IF sweeper settings.
Steps to check and align LW radio frequency, including measurement points and oscillator settings.
Steps to check and align MW/AM radio frequency, including measurement points and oscillator settings.
FM tracking adjustment for UX-A4 B model, specifying test points and oscillator frequencies.
FM tracking adjustment for UX-A4 E/G/GI/EN models, specifying test points and oscillator frequencies.
Aligning the playback head for optimal sound by adjusting azimuth screws.
Calibrating the tape transport speed by adjusting VR801 for accurate playback.
Measuring tape speed variations (wow and flutter) at different positions.
Adjusting the signal level for playback to ensure standard output within specified tolerances.
Verifying the audio frequency range response by comparing levels at different frequencies.
Component locations on the CD/Tuner circuit boards, illustrated with diagrams.
Adjustment points on the tuner board for UX-A4 B model, indicating VR and TC locations.
Adjustment points on the tuner board for UX-A4 E/G/GI/EN models, indicating VR and TC locations.
List of parts for the CD mechanism, detailing part numbers, names, and quantities.
Instructions for removing the leaf switch board, detailing screw and pawl disengagement.
Steps for removing the pinch roller assemblies, detailing pawl and roller disengagement.
Procedures for removing the capstan motor and flywheel, including belt disengagement.
Layout of the power amplifier circuit board, showing component placement.
Layout of the fuse circuit board, showing component placement.
Layout of the headphone jack circuit board, showing component placement.
Layout of the operation key switch circuit board, showing component placement.
| CD Player | Yes |
|---|---|
| Radio Tuner | FM/AM |
| Bluetooth | No |
| USB Port | No |
| Cassette Deck | Yes |
| Remote Control | Yes |
| Type | Micro System |
| Power Output | 20W RMS |
| Speakers | 2 speakers included |